No-Fry Vegan Falafel

13

The chickpea, ladies and gentlemen, making yet another appearance. They’re just so bloody versatile! Yesterday I made cookies with them, last week hummus, today falafel.

Where I come from, falafel are fried in oil (where I come from just about everything is fried in oil!) but here at Two Kitchens we’re about healthy, nutritious food and Raine and I often take traditional recipes and try to make them healthier so these are baked instead of fried and have no grains or animal produce in them, they are fully plant-based. Here’s how:

Ingredients

2x 400g tins chickpeas
2 small carrots
1 onion
A handful of coriander, chopped finely
A handful of parsley, chopped finely
1 tbsp cumin
1 tsp Himalayan salt
Some pepper
1 tsp olive oil

Method

Preheat your oven to 200 and line a baking tray with baking paper.

Drain the chickpeas in a colander and rinse with cold water. Then pat dry with a paper towel to remove excess liquid and leave there to drain for a minute.

Peel the carrots and onion and put them in the food processor with the chopping blade or on a chopping setting to get them chopped up nice and small, very quickly. It shouldn’t take more than 10 seconds. Scoop it all out into a bowl and leave to the side for a moment.

Put the chickpeas in your food processor (you don’t need to clean it of the carrot and onion) and blend until smooth but not for too long as you don’t want to make hummus.

Once blended add the grated carrot and onion back in, along with the rest of the ingredients and pulse to combine. Alternatively you can remove all of it from the food processor and mix in a bowl.10

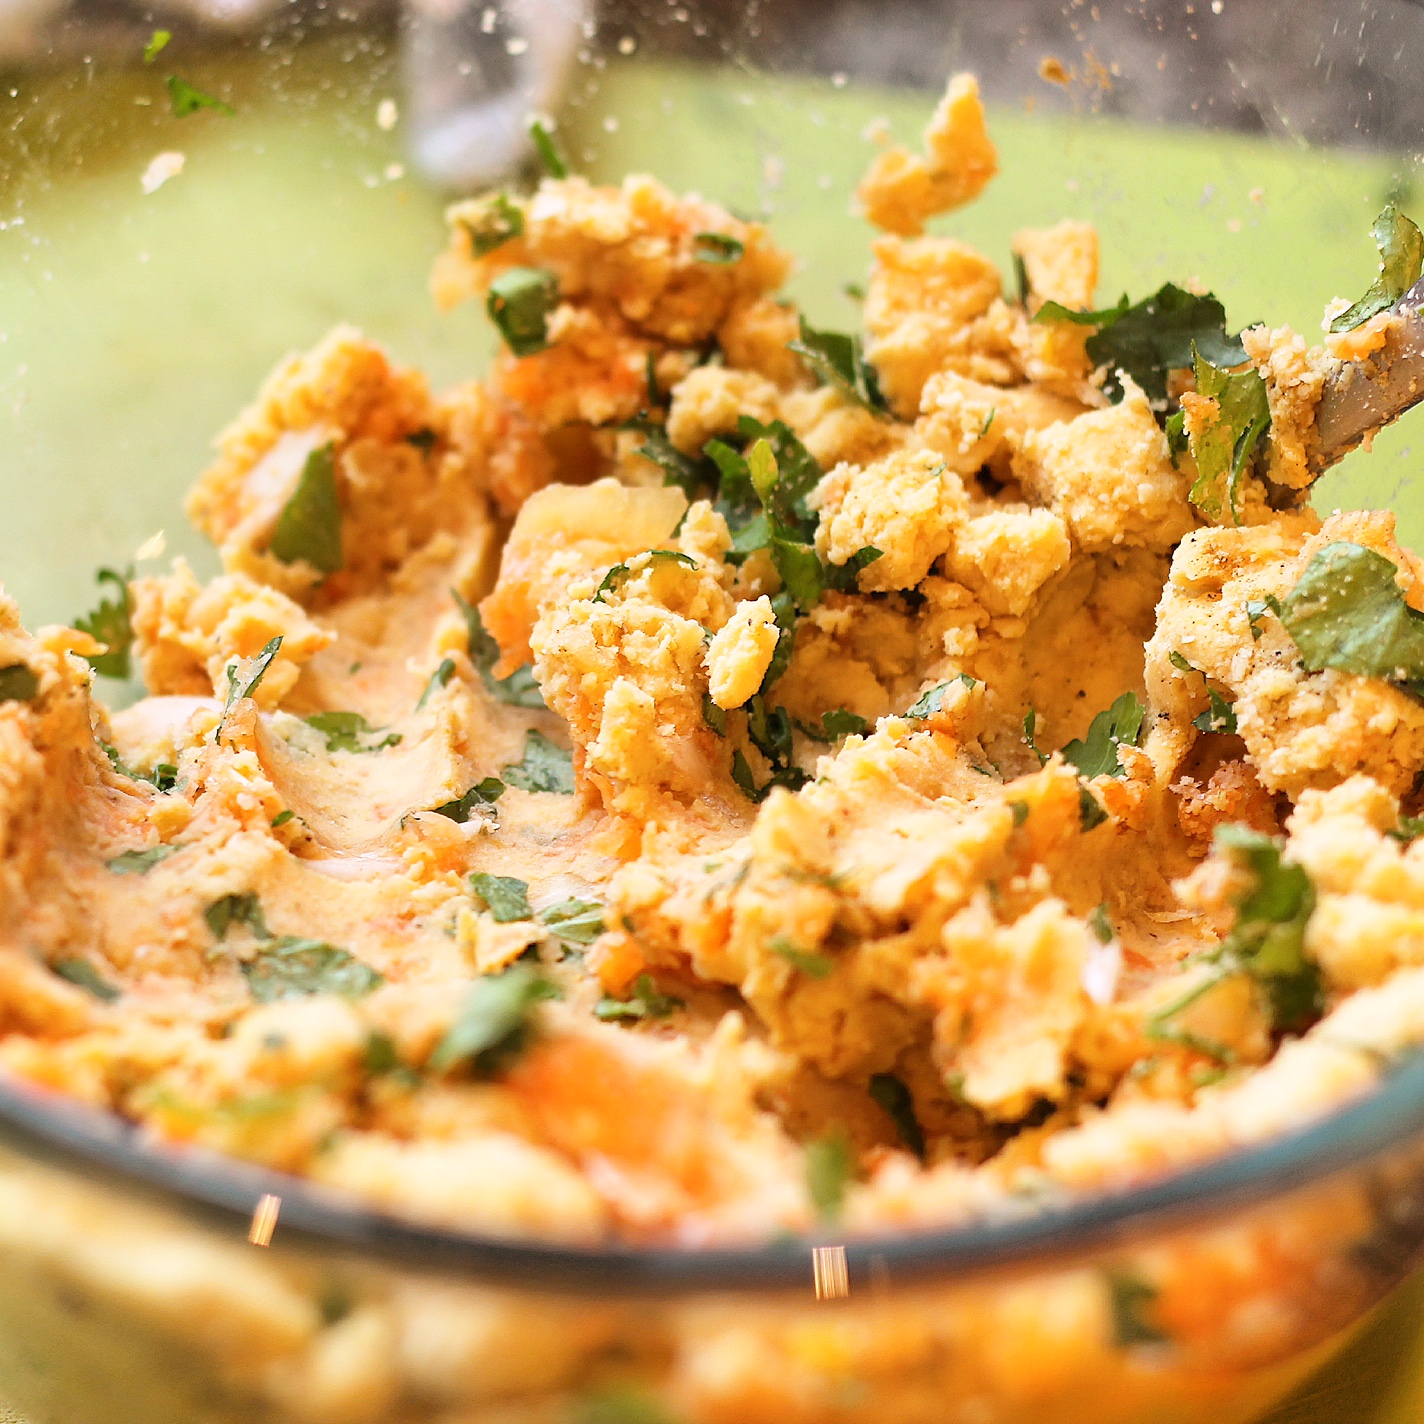
Once combined, wet your hands slightly and shape into balls or flatten them for falafel that fit nicely into pitta bread. I’ve done both in the picture below so you can see.11

Once all balls are on the baking tray, put them in the oven for 20-30 minutes until they are nicely golden but not burning. You can turn them over half way.

Serve straight away, either in pitta with salad and hummus or on a plate along with other plant-based goodies. I served it for dinner with roasted butternut squash, chopped avocado and homemade tahini.14

I’m feeling very happy and positive today, so I’m sending that out to all of you who need the same!
Love,
Lauren

Gluten-free Zucchini & Buckwheat Pizza

photo-2

My son went through a phase where he wanted to eat nothing but pizza. It was driving me crazy (processed white dough, sugary tomato sauce and processed cheese? Not good enough for my boy!) so I came up with this wheat, gluten, sugar and dairy-free recipe using buckwheat and zucchini (AKA courgette or baby marrow.) I was worried that he wouldn’t like it because buckwheat flour has quite a strong flavour but both he and my husband love it! I have since started using buckwheat flour for many recipes.

For the “cheese” I use Yum Universe’s dairy and soy-free recipe for Vegan Ricotta (why improve on perfection?!) It’s a super easy recipe made from cashew nuts.
My husband prefers dairy cheese so I use organic cheddar from grass-fed cows. Sometimes for my son I’ll use a bit of cheddar and some goat’s cheese, as goat’s milk is much more digestible for humans than cow’s milk. He also enjoys the vegan cheese though.

Ingredients

For the base:

1 cup buckwheat flour
3/4 tsp Oryx Desert Salt
1 tsp baking powder (try to use aluminium-free)
1 tbsp chia seeds, ground in a coffee grinder
1 egg (farm-raised)
2 tbsp olive oil
a bit of water
160g raw zucchini

For the sauce:

Olive oil for frying
1 medium size onion, chopped
3 big cloves of garlic, chopped
1 tin organic tomatoes
1 fresh medjool date
1 or 2 leaves of basil
1/2 tsp Oryx Desert Salt
about 1 1/2 tsp fresh lemon juice

Method

Sift together the flour, salt, baking powder and ground chia.
Break the zucchini into chunks and place into a food processor. Blend into fine crumbs, scraping down the sides if necessary to get all the bits the same size. Alternatively, use a grater.
Beat the egg and olive oil together, along with 1 tbsp water, and then add the zucchini.
Combine the wet and dry ingredients. You may need a little bit more water, but make sure to combine everything well before trying to add more. It will seem too dry and then suddenly it will come together into a dough. This is a very sticky dough, so be careful not to add too much water! Place in the fridge while you make the sauce.

Fry the onion in some olive oil until softened. Add the garlic and fry for a few minutes until it starts to caramelise. Add the tin of tomatoes and the date. Turn down the heat, cover with a lid and simmer for at least 30 minutes. The longer it simmers the more the flavour will develop.
Place the sauce in the blender, along with the salt, basil and lemon. Blend until smooth. Taste for seasoning and adjust if necessary. The trick with a good tomato sauce is getting the correct balance between sweet and sour, so don’t be scared to add a bit more lemon or another date if you think it needs it! This sauce freezes very well so I often make a double batch and freeze half for a day when I am in a rush. You could also use it as a base for a pasta sauce.

Preheat the oven to 200 C.
Oil a large baking tray liberally with olive oil. I find it best to make smaller pizzas so that the base cooks evenly and gets nice and crispy on the edges. So use about 60 – 80g of dough per pizza – one is enough for a child, two for a hungry man.
Place your weighed dough on the tray and sprinkle with buckwheat flour (so your fingers don’t stick.) Gently press the dough out with your finger tips until you have a round of thin dough.
At this point I often finely grate some fresh carrot over the base for added veggies. Then cover the base with your sauce. (If using the vegan cheese it helps to make a little “lip” around the edge of the dough and sauce, to stop the cheese running off.)
Now add your toppings. In this photo I’ve used kalamata olives, sun-dried tomatoes (I use organic, sulphur-free ones which I soak in hot water for a few minutes to soften), onion, basil and avo. Add avo and fresh herbs only after cooking. Other good toppings are caramelised onion, sautéed mushrooms, smoked salmon & rocket… use your imagination!
Now top with your cheese. If using the vegan cheese, simply blend all the ingredients until smooth and then pour directly onto the pizza (rather than heating in a saucepan as the recipe states.) The cheese will thicken as the pizza cooks in the oven. If you have any leftover cheese you can heat it in a saucepan and refrigerate in a jar.

Bake in the oven for about 15 – 20 minutes until crispy around the edges. Yum!

Health & happiness…
Love,
Raine

Zucchini & Cauliflower Gluten Free Pizza Base

pizza

Mmmm pizza! It’s taken a while and a few failed experiments but I’ve finally mastered the gluten free pizza base and here it is… I had it in my head that I wanted to make the base with courgette (zucchini) and cauliflower, so if your kids (or husbands!) don’t like veggies you can always hide it in this base, although I do think it’s good for kids to see their veggies so that they learn to love them and not have to have them hidden when they grow up 🙂 This isn’t a vegan recipe, but it is suitable for vegetarians. Raine will add her gluten and dairy-free pizza shortly!

Ingredients

For the base:
1 large cauliflower
4 courgettes
2 eggs, beaten (if you don’t like using eggs use 2 tbsp flax seeds with 6 tbsp water, mixed and left to set for 20 mins)
Half cup ground almonds
Quarter cup parmesan cheese
Quarter cup grated cheddar
Salt & Pepper
1 tsp ground oregano
1 tsp ground basil

For the sauce:
1 tin of tomatoes
2 tbsp tomato puree
1 tsp oregano
1 tsp ground basil
Pinch of salt

Topping:
Cheese, grated
Choice of vegetables

Method

Preheat the oven to 180. Chop up the courgette and cauliflower and steam together for 7 minutes. Once ready, line a colander with a thin dish cloth and empty the vegetables into this. Then you need to start wringing out all the moisture. Keep wringing for as long as possible until as much moisture as possible has left the vegetables and they look almost dry. Once you’re confident this is done, put in a food processor and blitz quickly – it doesn’t need to be completely blended.

Once blended, add to a bowl with the eggs, ground almonds, both cheeses, salt, pepper and herbs and mix well.

Smooth out onto a baking-paper lined baking tray (or a stone pizza base if you have one!)

pizza base

Put in oven and leave for around 30-40 minutes or until you can see it browning.

While it’s in the oven, make the sauce by adding all ingredients to a saucepan and simmering on low. Cut the vegetables at this time too. I used red pepper, onion, mushroom and some leftover cauliflower.

Once the pizza starts browning slightly, add the sauce and vegetables and continue baking for another 20 minutes or until vegetables are soft.

Take out the oven, slice, serve and wait for the compliments!

Love,
Lauren

Roasted Aubergine with Tahini

aubergine

Another one of my staples growing up was the aubergine. Honestly, my mum can do about 150 things with an aubergine! But I just wanted a simple dinner tonight, so I simply roasted it. Aubergines are rich in antioxidants, specifically nasunin which is found in the skin. Nasunin is what gives it its deep purple colour. As well as being a great antioxidant, it also protects the lipids (or fats) in brain cell membranes so if you’re feeling a little forgetful, get some aubergine down you! This one is totally vegan. We have another one on here using Greek yoghurt, check it out: Roasted Aubergine with Greek Yoghurt

Ingredients

1 aubergine (per person)
2 tsp extra virgin olive oil
2 cloves garlic, crushed
Himalayan salt and black pepper

For the tahini:
4 tbsp tahini paste
2 tbsp water
1 tbsp lemon juice
Pinch Himalayan salt
Pinch garlic salt
1 tsp paprika

Method

Preheat your oven to 180. Wash the aubergine and pat dry with a towel. Slice the aubergine lengthways down the middle. Next, take your knife and make deep criss cross incisions.

images

Brush the olive oil over the whole aubergine, both sides, then face them upwards on a baking tray and spread one crushed garlic clove on one half, and one on the other, then add salt and pepper.

Bake for twenty minutes, then turn them over and bake for another twenty minutes. Turn over once more and bake for a further ten minutes. You want to make sure the inside is really soft.

While it’s baking, make the tahini by simply putting all the ingredients (except the paprika) in a bowl and mixing really well. If it’s too thick, add some more water. If it’s too strong, add some more lemon juice.

Once the aubergine halves are ready, remove from the oven, place on a plate and spoon the tahini on top and sprinkle with paprika. Simples!

Enjoy!

Love,
Lauren

Roasted Aubergine with Greek Yoghurt and Chives

aubergine (2)

Another one of my staples growing up was the aubergine. Honestly, my mum can do about 150 things with an aubergine! But I just wanted a simple dinner tonight, so I simply roasted it. Aubergines are rich in antioxidants, specifically nasunin which is found in the skin. Nasunin is what gives it its deep purple colour. As well as being a great antioxidant, it also protects the lipids (or fats) in brain cell membranes so if you’re feeling a little forgetful, get some aubergine down you! This has Greek Yoghurt so it is vegetarian but not vegan. For a vegan aubergine recipe, try our Roasted Aubergine with Tahini

Ingredients

1 aubergine (per person)
2 tsp extra virgin olive oil
2 cloves garlic, crushed
Himalayan salt and black pepper
Greek yoghurt
2 tbsp chives, chopped

Method

Preheat your oven to 180. Wash the aubergine and pat dry with a towel. Slice the aubergine lengthways down the middle. Next, take your knife and make deep criss cross incisions.

images

Brush the olive oil over the whole aubergine, both sides, then face them upwards on a baking tray and spread one crushed garlic clove on one half, and one on the other, then add salt and pepper.

Bake for twenty minutes, then turn them over and bake for another twenty minutes. Turn over once more and bake for a further ten minutes. You want to make sure the inside is really soft.

Once ready, add a dollop of Greek yoghurt on each half and sprinkle with chives.

Enjoy!

Love,
Lauren

Garlicky Green Beans

green beans

You may not think so because of their vibrant green colour, but green beans (or string beans) are very high in carotenoids (what you usually expect from orange or red veggies like carrots and tomatoes.) The expected orange or red is hidden by exceptionally high levels of chlorophyll. Carotenoids help to prevent cancer and are also important for heart health. Chlorophyll has many benefits, one of which is promoting iron levels. Green beans are also rich in silicon, which is important for bone health and the formation of connective tissue.

Health benefits aside, they are one of my favourite vegetables and can be prepared in many different ways. This is one of the quickest (and most delicious!) ways I know to prepare beans. I made this as an accompaniment to my Creamy Porcini Pasta last night.

Ingredients

75ml olive oil

juice of half to a whole lemon

4 big cloves of garlic, finely chopped

Himalayan crystal salt and black pepper to taste

350g green beans

Method

Combine the olive oil, juice of half a lemon and garlic to make a dressing. Blanch the beans in rapidly boiling water for just a few minutes until they turn a vibrant green. Don’t over cook them! They must still have a bit of a bite. Strain the water off the beans and then immediately toss them in the dressing. Season to taste and add more lemon juice if necessary (I like a lot of lemon.) These can be served hot or left to marinate and served at room temperature.

Love,

Raine

Creamy Porcini Pasta with Crispy Sage

photo 2

Who doesn’t love a good creamy pasta? You may think that when you switch to a healthy lifestyle it’s something you’ll have to give up permanently. But I’ve got good news… you CAN enjoy a delicious and satisfying bowl of pasta, and know that you’ve nourished your body with the good stuff!

Mushrooms have many medicinal properties and make a great substitute for meat.

This recipe is dairy-free, wheat- and gluten-free and vegan. I use raw cashew nuts to make my “cream” for this sauce and nutritional yeast adds a cheesy flavour. You could use any gluten and wheat-free pasta, such as buckwheat, brown rice or amaranth pasta.

Ingredients

2/3 cup of raw cashews

1 1/4 cup of water

2 tbsp nutritional yeast

1 tsp Himalayan crystal salt

a handful of fresh sage

250g quinoa pasta

Organic and virgin coconut oil or extra virgin olive oil for frying

250g porcini mushrooms

120g shiitake mushrooms

3 big cloves of garlic, finely chopped

truffle oil and fresh lemon to finish

Method

Place the cashews, water, nutritional yeast and salt in a blender and blend until completely smooth.

Cook the pasta according to package instructions.

Slice the mushrooms and saute them in coconut or olive oil. Once they start to brown nicely, add the garlic and continue to fry for a few minutes. 

In a separate pan, fry the sage in some oil for a few minutes until it turns crispy.

Season the sauce to taste with black pepper and salt if necessary. Toss the pasta and sauce together and serve topped with a few crispy sage leaves. Finish with a drizzle of truffle oil and a squeeze of lemon if desired.

Enjoy!

Love,

Raine