Peanut Butter & Chocolate Mousse Mini Pies

peanut butter pies 2

These are a bit of a strange invention, I have to say! But they’re pretty decadent and yummy and I was totally happy with the outcome 🙂

You will need to prepare the day before by soaking the cashews overnight, putting the top layer of peanut butter in the fridge and putting the coconut cream in the fridge to chill. Read the recipe thoroughly before starting…

Ingredients

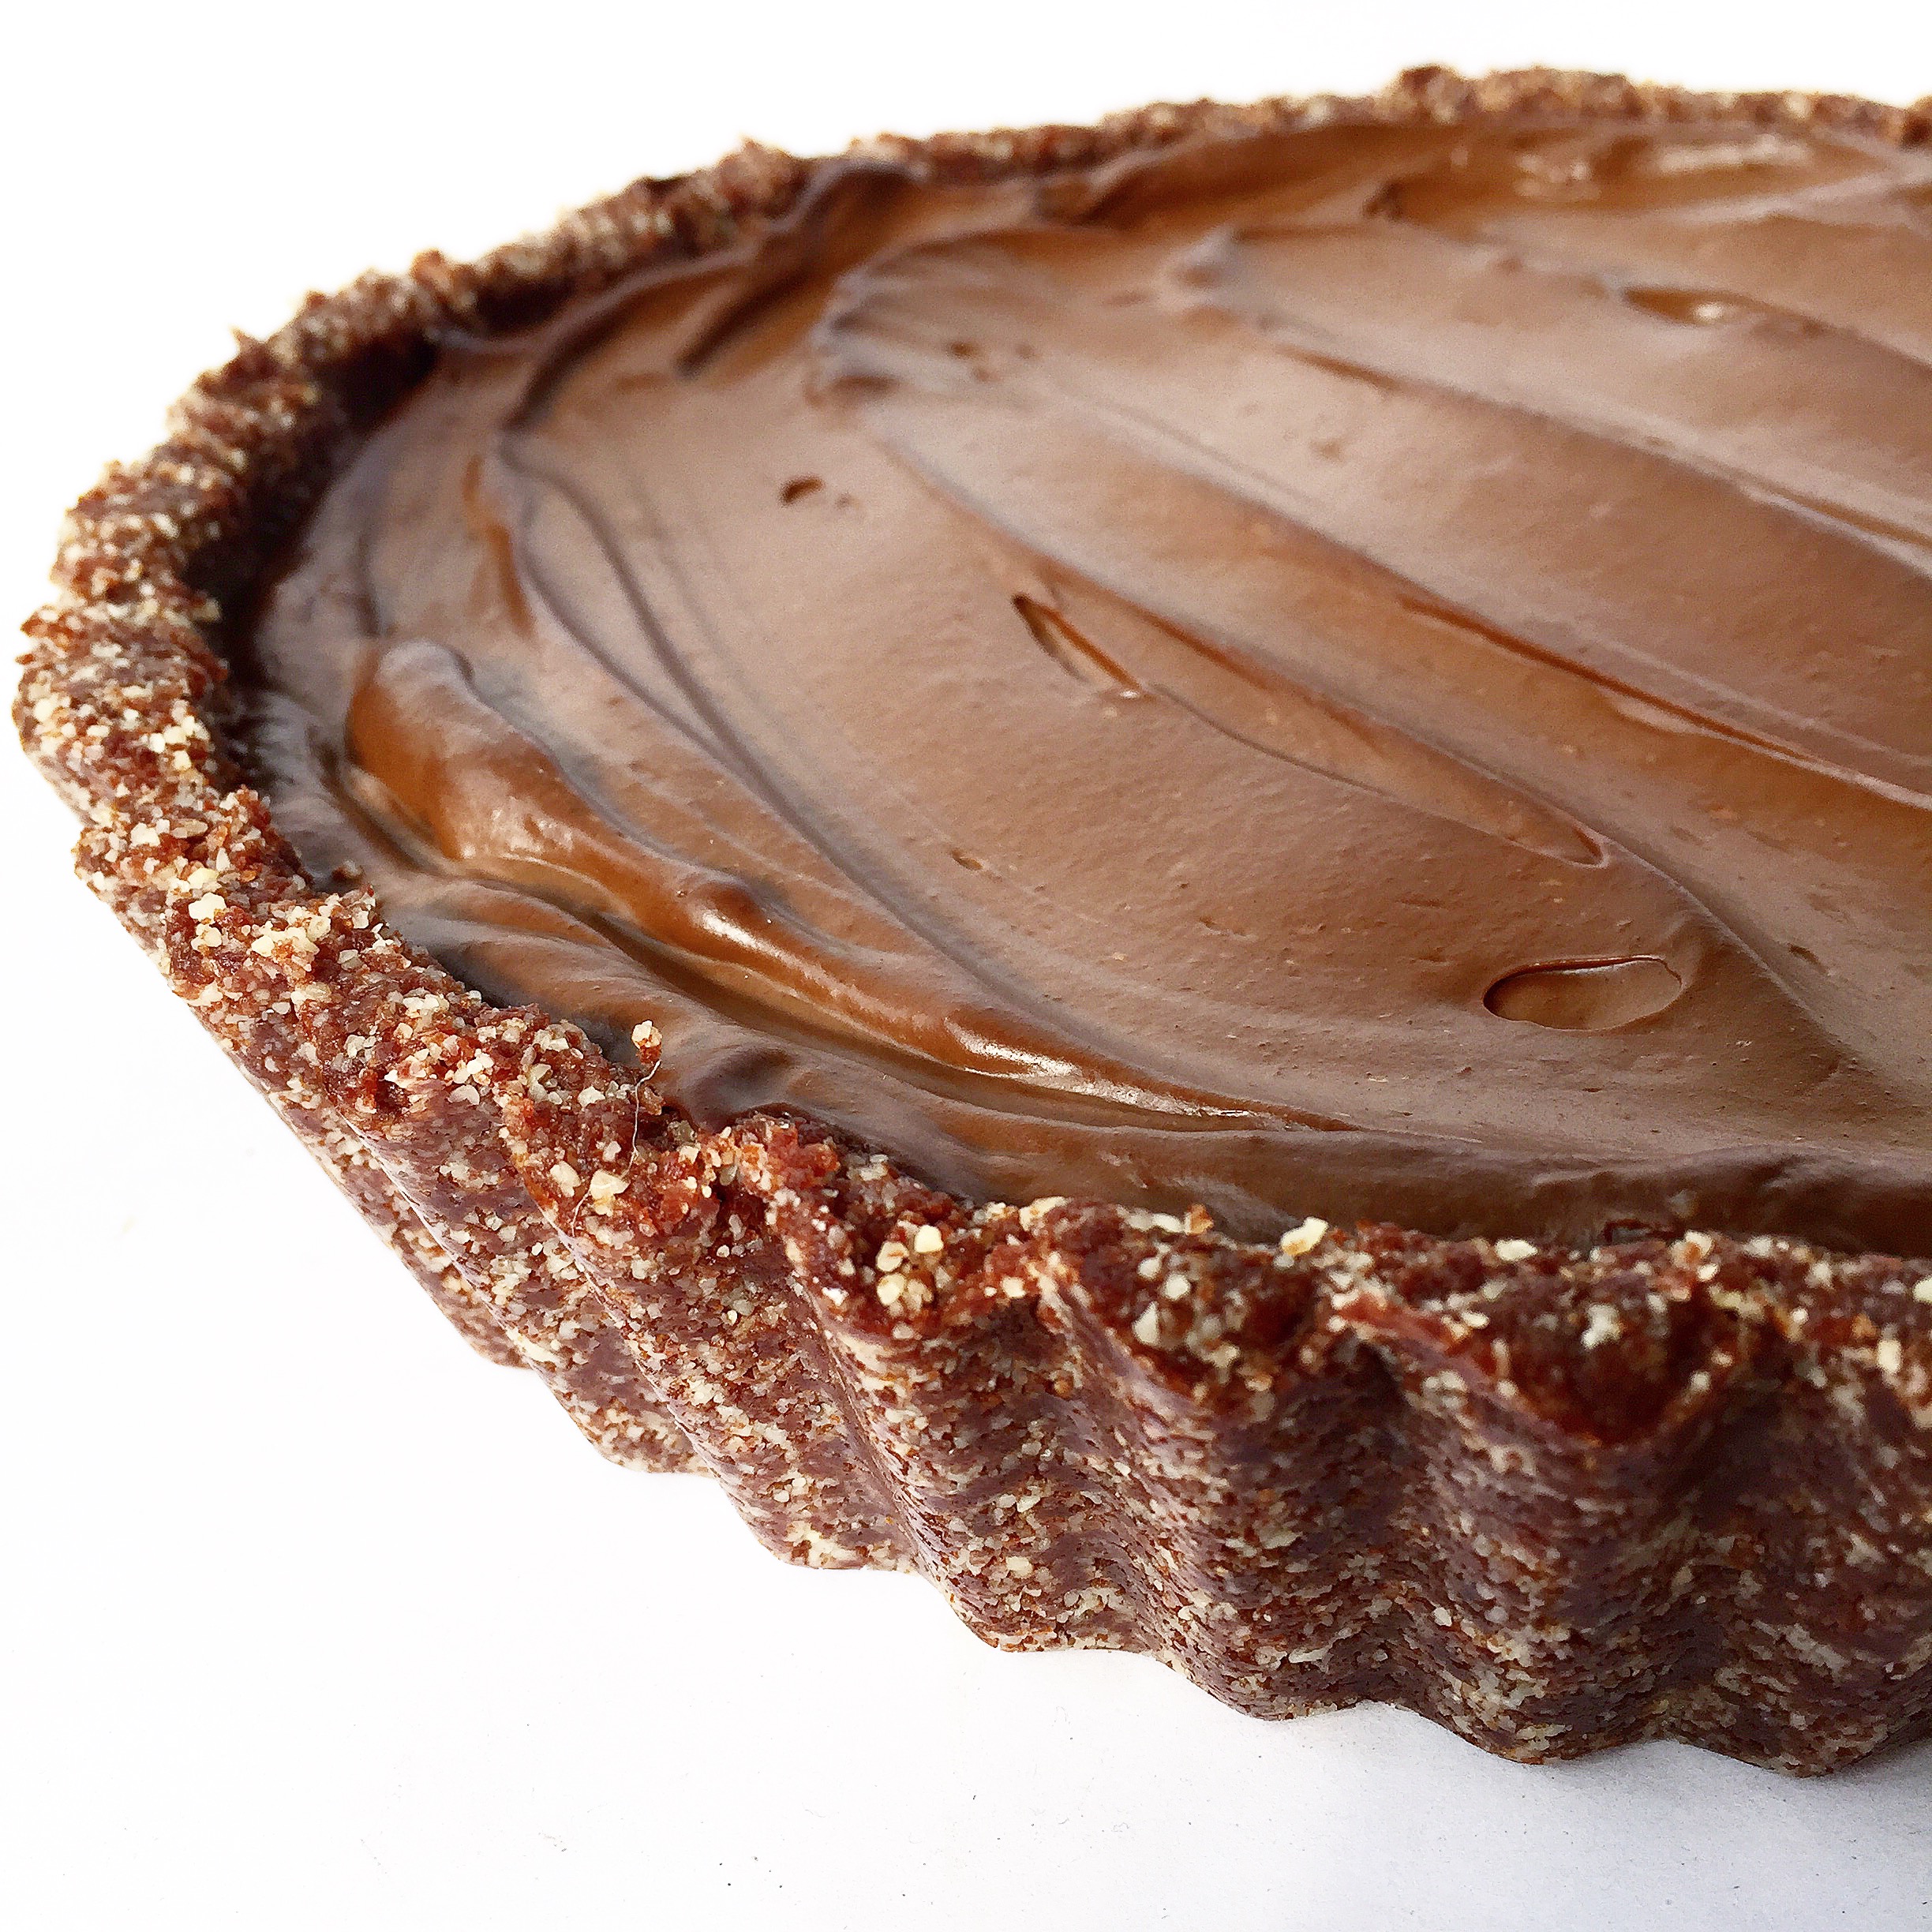
Chocolate Mousse layer bottom layer:
1 cup cashews (soaked overnight)
2 tbsp cocoa powder
4 tbsp organic maple syrup
1/3 cup ground almonds
5 tbsp almond milk.

Peanut butter cream middle layer:
The cream from the top of two tins of coconut milk or 1 can of coconut cream
1/3 cup natural peanut butter
1 tsp maple syrup

Peanut butter pies 1

Top layer:
Spoon about 10 tbsp peanut butter into a bowl and keep in the fridge overnight.

Method

Start by adding all the bottom layer ingredients to the blender and blend well. If it is too dry add some more almond milk. It will either go like a crumble or like a mousse depending on your blender, each is fine. Add more milk depending on your preference.

Place muffin cases in a cupcake baking tray and scoop out about a tablespoon and a half per muffin case. Once they’re all filled and the mixture is all finished up, place in the freezer for about 45 minutes or until fairly hard.

Once they’re in the freezer you can take the coconut cream out the fridge and whip it with an electric whisk until stiff, then mix in the peanut butter and maple. Put it in a bowl and place in the fridge until your bottom layers are ready to come out the freezer.

Once the mousse mixtures are ready, take them out the freezer and spoon a heaped tbsp of the peanut butter cream mixture on top of each one then put back in the freezer for an hour.

Once ready, wash your hands thoroughly then spread a bit of the peanut butter that has been in the fridge overnight over each of the pies.

Remove them from the cupcake tray and place them in a large container in the fridge. They will be too hard if you leave them in the freezer but the fridge will give them a mousse-like consistency.

Peanut butter pies 3

Enjoy!

Love,
Lauren

Vegan White Chocolate Cookies

White choc cookies 1

Pregnancy cravings have struck! I am craving cookies and biscuits like never before, especially in the afternoon. I’ve given in and had a few ‘naughty’ Belgian chocolate covered biscuits because I don’t agree with depriving yourself to the point of being miserable. I’d say that my healthy lifestyle makes up for 80% of the time, and the other 20% is when I eat out or at other people’s houses or fancy a treat. I don’t want to be the person who goes out for dinner and can’t have anything on the menu. Since cleansing myself and getting into remission, I no longer have any intolerances so my body accepts everything, I just don’t agree with eating all that unhealthy stuff all the time. But every now and then, if I fancy a biscuit, I have it! That being said, the cravings have got a bit mad so I had to make some healthy ones to keep at home and these really do satisfy the craving 🙂

Ingredients

1 can chickpeas, rinsed then patted dry
2 tbsp organic natural peanut butter (I use Meridian)
3 tbsp almond milk
1 tbsp coconut oil
3 tbsp maple
1 tbsp sized chunk of cacao butter
3 tbsp buckwheat flour
1 tbsp coconut palm sugar
1 tsp baking powder
1 tsp bicarbonate of soda (not essential, but I find it gives the outer layer of the cookie a crunchier texture)
Pinch of Himalayan or Oryx salt (I used Oryx desert salt)
Generous handful of vegan white chocolate chips (or any chocolate chips of your choice)

Method

Preheat oven to 180 (gas mark 6) and line a baking tray with baking paper and grease it slightly with coconut oil.

Put the chickpeas, peanut butter, almond milk and coconut oil in a food processor and blend until smooth.

Then add the maple, cacao butter, buckwheat flour, coco sugar, baking powder, bicarb and salt and process again until smooth and sticky.

Transfer the mixture to a bowl and add the chocolate chips and mix in.

Take cookie sized balls of the mixture in your hand, roll then press down to a cookie shape on the prepared baking tray. Dampen your hands slightly if it is too sticky. Repeat until mixture is finished.

Put in the oven for 12-15 minutes or until you see they are very slightly golden but do not over bake. They will continue to harden once they come out the oven. Transfer baking sheet that they are on, onto a cooling tray or wire rack until fully cooled.

Served best with a cold glass of almond milk!

Enjoy!

Love,
Lauren

Paleo Brownies

Paleo Brownies

These brownies are gluten- and grain-free, and by using stevia and only a small amount of honey to sweeten they are very low in carbs too. The use of almonds, flax, egg and avo means that they’re a decent source of protein; and the coconut oil, along with the flax, is great for controlling cholesterol. A truly guilt-free treat!

Ingredients

65g raw cacao paste
80g organic virgin coconut oil
60ml raw almond butter
60ml raw honey
2 eggs
1/2 cup ripe avo
2 tsp vanilla extract or 1 tsp vanilla powder
1 cup ground almonds
60ml ground flax seed
1 tsp stevia powder
1 tsp ground cinnamon
a pinch of Oryx Desert Salt
1 tsp aluminium-free baking powder
1/4 cup chopped raw pecan nuts

Method

Preheat the oven to 180C and grease a square baking dish with coconut oil.

Place the cacao paste, coconut oil, almond butter and honey in a glass or steel bowl which can fit over a saucepan. Fill the saucepan with water and bring to a simmer. Place the bowl over the saucepan, gently melting the ingredients.

Mash the avo with a fork until smooth. Whisk the egg and vanilla, and combine with the avo. Set aside.

Combine the ground almonds, ground flax, stevia, cinnamon, salt and baking powder. Set aside.

Once the chocolate mixture is completely melted and whisked together, slowly pour it into the egg mixture whilst whisking vigorously, to prevent the heat from scrambling the egg. Stir in the dry ingredients and the chopped pecans.

Spread the batter into the baking dish and bake for about 20 – 25 minutes. Allow to cool before cutting into squares.

Health & happiness!

Love,
Raine

Double Chocolate Cookies

Double Chocolate Cookies

It’s tough being pregnant and health-conscious! But what time could be more important than now to watch what I eat? The growth and health of my baby is solely dependent on me – that’s a lot of pressure! So I need to make sure I’m consuming only the healthiest, most nutritious organic produce but that’s not always easy; as we know, everything healthy takes preparation. I must admit, I have succumbed to the odd store-bought chocolate biscuit over the last few weeks as the serious chocolate cravings hit, but I try to make a batch of something sweet yet healthy once a week or once a fortnight so I have stuff on hand.

Today we looked after our 18 month old niece (good practice!) and while she had her afternoon nap I whipped up these bad boys, adapting from a recipe by Wholesome Patisserie. Not only did they 100% fully satisfy my craving (and I’m not lying, they really did – even more so than the store-bought processed stuff!) but my niece loved them too and we got to have them warm out the oven when she woke up. That’s what I call Sunday afternoon bliss! I hope you like them as much as we all did 🙂

Ingredients

Wet Ingredients:
1 heaped tbsp ground flax seeds
1/4 cup coconut oil
1/4 cup almond butter
1 and quarter cups coconut palm sugar
1 tsp vanilla bean paste

Dry Ingredients:
1/2 tsp baking powder
1/2 tsp bicarbonate of soda
1/4 tsp Himalayan or Oryx salt
3 heaped tbsp raw cacao powder
1 1/2 cups buckwheat flour
2 tsp almond milk
Half cup dairy free (or your choice of) chocolate chips

Method

Preheat oven to 180 and line 2 baking trays with parchment paper.

In a large mixing bowl, mix together the ground flax and 3 tbsp filtered water and set aside for 2-3 minutes or until it has thickened up. Then whisk the flax egg one final time.

Now add the wet ingredients to the same bowl with the flax egg; solid coconut oil, almond butter, brown sugar, coconut sugar and vanilla. Beat the mixture until smooth and well combined.

Add in the baking soda, baking powder, salt and cacao, beat the mixture well. You may have to knead a bit with your hands to get it fully incorporated, then beat or knead in the buckwheat flour with the almond milk until smooth and well combined.

Now mix in the chocolate chips.

Take a small piece in your hands and roll into a ball then flatten into a cookie shape and place on prepared baking tray. Make sure to leave enough room between each cookie as they will rise.

Put them in the oven for 12-15 minutes then remove them and leave to cool on a cooling rack for 5 minutes. After that you can either eat them warm or wait until fully cooled before storing them in an airtight container.

Enjoy the decadence!

Love,
Lauren

Fig, Berry and Coconut Cake

IMG_0938

I love fresh figs, and they’re even better roasted with a bit of honey. This cake is very simple and quick to make, as well as being wheat-free, dairy-free and refined sugar-free. Perfect for afternoon tea 🙂

Ingredients

60ml raw honey, plus a little extra
60ml organic coconut blossom sugar
125ml organic virgin coconut oil
2 free-range eggs
1/2 tsp organic vanilla extract
1/4 tsp Oryx Desert Salt
2 tbsp acaì powder
2 tbsp tapioca starch
1 cup organic or homemade coconut flour
1 tsp aluminium-free baking powder
1/2 cup frozen mixed berries
2 large fresh figs

Method

Preheat the oven to 180 C.

Cream the honey, sugar and coconut oil with an electric beater. Add the eggs one at a time while beating. Add the vanilla, salt, acaì powder and tapioca starch and beat well. Add the coconut flour and baking powder, and lastly stir in the berries.

Spread the batter into a 20cm cake tin lined with baking paper or a silicon liner. Cut the figs into quarters lengthways and push them into the batter in a neat circle, with the inside of the fig facing upwards. Drizzle a little honey over the figs.

Bake for about 30 minutes, or until the cake is golden, the figs caramelised and a skewer comes out clean. Leave to cool before turning out.

Health and happiness!

Love,
Raine

Goji and Baobab Bars

Goji & Baobab Bars

For those of you who have been saying that some of our recipes are a bit intimidating, here’s the perfect place to start. These energy bars are so simple to make, all you need is a food processor, no other techniques required!

Ingredients

1 cup goji berries
1/2 cup raw brazil nuts
6 – 8 fresh medjool dates (about 125g)
2 tbsp baobab powder
1/2 tsp Oryx Desert Salt
4 tbsp ground flax
1/3 cup organic virgin coconut oil
2 tbsp raw honey

Method

Place the goji berries and brazil nuts in a food processor and process into a rough crumb. Add the dates, making sure to remove the pips and process again. Add the baobab powder, salt, and ground flax and process to combine. Finally add the coconut oil and honey and process until everything is well combined and sticky but with a rough texture.

Spread evenly in a loaf tin lined with clingfilm (for easy removal) and refrigerate until set. Cut into bars and keep refrigerated.

Health & happiness!

Love,
Raine

Roasted Lemon Ice Cream

Roasted Lemon Ice Cream

My new favourite thing to do with lemons is to roast them. The natural sugar in the lemons caramelises, giving it a beautiful flavour somewhat similar to preserved lemons. This egg-based (but dairy-free) ice cream is packed full of an intense lemon flavour, the slight bitterness of which is off set by the honey. It pairs beautifully with my Raw Chocolate Tart, or just some shavings of raw chocolate.

Ingredients

380g whole lemons (about 3)
125ml raw honey
125ml organic virgin coconut oil
250ml almond or coconut milk
1/2 tsp organic stevia leaf powder
1/2 tsp organic vanilla powder or 1 tsp vanilla extract
pinch of himalayan salt
4 egg yolks
2 whole eggs

Method

Preheat the oven to 180 C.
Cut the knobbly end off the lemons and slice into quarters lengthways. Cut off the pithy white membrane which runs through the middle of the lemon and remove all pips.

Lemon Ice Cream 2

Place the lemons in an ovenproof dish and roast for about 1 hour, until the lemons are soft and slightly caramelised. Double check that there are no pips as adding these to the blender could ruin the flavour.

Place all the ingredients in the blender, adding the eggs last so that they don’t start to cook when they come into contact with the hot lemons. Blend until completely smooth. Ice cream is traditionally made with raw eggs, but if you’re put off by the thought of raw egg, continue blending until the mixture heats up to 65 C. You can measure this with a thermometer if you’re really worried, but basically if there is steam coming off the mixture the egg is cooked. You can also taste the difference when the egg is cooked.

Place the mixture in the fridge until cooled, and then put it into an ice cream machine to churn until frozen. If you don’t have an ice cream machine you can simply put it in the freezer and mix with a whisk every 30 minutes to break up crystals, until almost frozen, at which point you can leave it to freeze till set.

Health & happiness!

Love,
Raine

Peanut Butter & Coconut Blondies

Peanut Butter Blondies

I saw a recipe for white chocolate blondies that looked divine but we don’t like to use nasties in our recipes, as you know, so I thought I’d make my own healthy ones 🙂 These are moist, gooey, sweet and scrumptious! If you are keeping Passover, they are also kosher for Passover and really not difficult to make.

Ingredients

1 tbsp coconut oil
50g cacao butter
3 tbsp organic natural peanut butter
3 eggs
Pinch Himalayan salt
70g coconut palm sugar
2 tbsp pure maple
1 tsp vanilla extract
200g ground almonds
Desiccated coconut to sprinkle

Method

Preheat the oven to 180.

Melt the coconut oil and cacao butter in a heat-proof bowl over a saucepan with boiling water. Once it’s melted, add the peanut butter and stir until it all melts in together.

Remove from heat and set aside.

Beat the eggs in a large bowl and once beaten, add the coco palm sugar and whisk with a fork until totally combined. Then add the salt, vanilla and maple and mix.

Add the peanut butter mixture and mix well, then add the ground almonds and mix until combined.

Line a square baking tray with baking paper, grease with some coconut oil and pour the mixture in and flatten it out.

Sprinkle some desiccated coconut on top and put in the oven for 20-25 minutes. In my oven it only needed 20. You want it to be moist but cooked through but don’t over cook otherwise it will go dry.

Enjoy!

Love,
Lauren

Raw Chocolate Tart

Raw Chocolate Tart

This is a favourite with my family and friends, and no one can ever believe what the main ingredient is… avocado! Don’t let that put you off – it is rich, creamy and delicious; everything you want from a chocolate tart. And it’s so simple and easy to make.

This year I made it for Pesach dinner (we don’t eat wheat during Pesach and our desserts always have to be dairy-free as we don’t mix meat and milk.)
Word of advice: don’t tell people that there’s avo in it until they’ve tried it!

Ingredients

Crust:
2 cups whole raw almonds
60ml raw cacao powder
1/4 tsp himalayan salt
150g fresh medjool dates
2 tbsp organic virgin coconut oil

Filling:
500g ripe avo flesh (about 4 or 5 avos)
180ml raw cacao powder
60ml organic virgin coconut oil
40g raw cacao butter, gently melted
180ml organic maple syrup
1/4 tsp himalayan salt
1/4 tsp organic stevia leaf powder
1 tsp organic vanilla extract or 1/2 tsp vanilla powder

Method

Remove the pits from the dates and chop them up. Place all the ingredients for the crust in a food processor and blend until you have a fine crumb that sticks together when pressed. If the mixture seems dry just keep processing until it’s sticky. Turn it out into a 23cm loose-bottom flan tin or glass serving dish. Press the crumb evenly across the bottom and up the sides of the tin, making sure that the top edges are straight and even. Refrigerate.

Place all the ingredients for the filling in a high-speed blender and blend until completely smooth, but be careful not to blend for so long that the mixture heats up.
Pour into the set crust and use a spatula to make swirly patterns on top or just smooth it out, as you prefer. Refrigerate overnight or minimum 4 hours.

Health & happiness!

Love,
Raine