Turmeric Hummus

Turmeric Hummus

The search for healthy snacks is never ending in my house. I don’t like big meals so I tend to eat little and often so there is nothing better for me than some homemade hummus with some carrot or celery sticks or some gluten-free crackers. Check out my roasted red pepper hummus – that one was to die for (and the picture is way better than this one!) I didn’t have too much time today, I just needed to blitz it in the blender and go. I wanted to use turmeric as it is such an amazing anti-inflammatory and I try to use it in as much food as I can.

Ingredients

2 tins organic chickpeas (drained and rinsed)
Quarter cup purified water
2 tbsp tahini paste
5 tbsp lemon juice
2 tbsp olive oil
Half tsp Himalayan salt
Half tsp garlic salt
1 tbsp turmeric

Method

Simply blend all ingredients together in a high speed blender until completely smooth – it really is as easy as that! Enjoy with gluten free bread, crackers, rice or quinoa cakes or veggies.

Enjoy!

Love,
Lauren


Pasta with Sweet Potato and Sage Sauce

Sweet Potato Sage Pasta

Raine and I seem to be so in sync with each other that even though we’re on other sides of the planet, we both made a variation of the same dinner tonight! So she has posted her Butternut & Sage Pasta and here is mine, made with sweet potatoes instead…

People always ask me what can you make for dinner when you’re vegetarian, so I like to experiment with easy, tasty and healthy recipes that people love. This is one of them. The sage is probably the best part of this recipe – I just love the taste. This recipe is seriously indulgent but gluten free and dairy free as well as full of nutrients.

Ingredients

Brown rice pasta – enough for two servings
1 sweet potato
About 10 sage leaves
Handful pine nuts
1 tbsp extra virgin olive oil
2 cloves garlic
Half cup almond milk
Garlic salt
Himalayan salt
Black pepper

Method

Peel and chop the sweet potato then steam or boil until soft enough to mash.

While it’s boiling, heat 1 tbsp oil in a non-stick pan, then add the garlic, pine nuts and sage and cook until pine nuts are roasted and sage is cooked. Once this mix is ready, put in a bowl and set aside.

Start boiling your pasta with a pinch of Himalayan salt. Brown rice pasta usually takes around 8 minutes.

While this is boiling, drain your sweet potato and mash it. Add it to the pan (which you don’t need to wash after the sage and pine nuts) with the milk and mix on a low light until it resembles a thick sauce.

Do not over-cook the pasta. As soon as it’s ready, add it to the pan with the sweet potato and mix it all in, then add the garlic, pine nuts and sage, some garlic salt and pepper (and salt to taste if you want) and mix it all around for about a minute or two, until hot, then serve.

Have a good week everyone.

Love & health,
Lauren

Chai Ginger Snap Cookies

Chai Ginger Snap Cookies 1

I love the flavour of my vanilla chai tea from Pukka, and I used it when I made my healthy pumpkin pie for Thanksgiving and it worked a treat so I thought I’d use it for these cookies.

The gingery taste is so yummy to me, and as a true Brit, the first thing I did was dip it into my tea, and it was heaven!

They literally need no more than 8 minutes in the oven. I left mine for 10 and you can see that some of them are a little burnt (still nice dipped into tea though!) So really watch the clock on these…

Ingredients

1/3 cup honey
3 tbsp coconut palm sugar
2 tbsp organic vegan non hydrogenated margarine
1 tbsp coconut oil and extra for greasing
1/2 tsp vanilla extract
5 tbsp almond milk
1 chai or vanilla chai teabag
2 and quarter cups ground almonds
4 heaped tbsp buckwheat flour
1.5 tsp bicarbonate of soda
1 tsp ground cinnamon
1 tsp ground nutmeg
3 tsp ground ginger

Method

Preheat the oven to 180.

Start by putting the honey in a small saucepan over a low heat and leave for around 5 minutes until it bubbles and turns darker. At this point, add the margarine, coco sugar, coconut oil, almond milk and vanilla and mix until well incorporated.

Then add the teabag. Give it a few dunks then remove from the heat and let it steep while you take care of the dry ingredients.


In a bowl add the ground almonds, buckwheat flour, baking soda and the spices and mix well.

Remove the teabag from the honey mixture and pour the wet ingredients over the dry ingredients. Mix very well, making sure you get all the flour from the bottom.

Line a baking tray (you will probably need 2 baking trays) with baking paper, grease with some coconut oil and then here’s the bit that will make this easier for you: put some coconut oil on a tablespoon (so that you don’t dirty the tub of coconut oil) and grease your hands all over. Once your hands are well greased, take a small bit of the mixture in your hands to form a small ball then put it on the baking tray. Do this until the mixture is finished and then wash your hands if they have too much mixture on, dry and re-grease them with coconut oil then flatten them all with your fingers until they are smooth and fairly flat but with a bit of bounce to them.

Bake for 8 minutes. Remove from oven and put on a wire rack to cool.

Enjoy with a turmeric latte for extra anti-inflammatory goodness!

Love and light,
Lauren

Creamy Cashew Yoghurt

Cashew Yoghurt

I love yoghurt and I think it’s one of the things I found I missed most when cutting out dairy. But don’t fret! We can make our own dairy-free version of course! And I used cashews here. Mainly because cashews go really nice and creamy and are also quite sweet so they make a great yoghurt. The magnesium content in cashews also helps keep our bones strong and are packed with flavanols which starve tumours and stop cancer cells from spreading, which is essential in this day and age with all the cancers around.

I added 2 probiotic capsules to this also, firstly to help keep my gut strong (read about that here) but also to help build yoghurt cultures in the yoghurt, so it’s not just a cashew cream.

In order for nuts to survive, nuts contain inherent toxic inhibitors that protect the plant from germination until the ideal conditions are present (nature is amazing!) It is not until they get wet and there is sufficient moisture that they germinate. It can wreak havoc on your digestive system if you don’t soak them because these protective enzyme inhibitors do not digest in our bodies, your body will fight them, so you must soak them to release these toxins. Not soaking nuts first will also inhibit the absorption of nutrients. I suggest soaking overnight but 4 hours will do it.

You can top this with anything you like, I used strawberries, sunflower seeds and hazelnuts.

Ingredients

1 cup cashews
1 and quarter cup purified water
2 dates
2 tsp organic natural maple
1 tsp vanilla essence
2 probiotic capsules

Method

First, you must soak your cashews in purified water for AT LEAST 4 hours. Soak overnight if you can. Do not omit this step. (See above for explanation). Once the nuts are ready, drain and rinse, then put them in the blender with the water and blend for around 7-10 minutes. You need it to go super smooth and creamy. If you have a high-speed blender like a Vitamix, the mixture will heat up like a soup, don’t worry.

After around 4 minutes of blending, add the rest of the ingredients and proceed to blend until completely smooth like a yoghurt. Add more water if it’s too thick.

Store in a sealed container in the fridge (once it has cooled) for up to four days and enjoy with your favourite toppings.

Happy weekend everyone!
Love,
Lauren

Homemade Almond Milk

almond-milk

If you would like to read about why dairy is bad for you and why I don’t have it myself and why I don’t give it to my baby, read this article about why dairy is bad for you. I do not recommend replacing dairy with soy, even if you’re buying organic non-GMO soy products. Soy beans naturally contain isoflavones, which function as phytoestrogens. These mimic your body’s own oestrogen, therefore it’s as though you have increased oestrogen production. It’s never a good idea to mess around with your hormones. Furthermore, soy beans may have health benefits in their natural, whole state, but most of the dairy-replacement products made from soy are very processed. My rule of thumb is that processed is bad, and this is the major theory behind the “raw food” and “clean eating” movements. I don’t think that eating organic tofu once in a while will have a bad effect, but for most people whatever they use to replace dairy is something they will be eating every day. So you need to choose something which will contribute to your health, not hinder it!

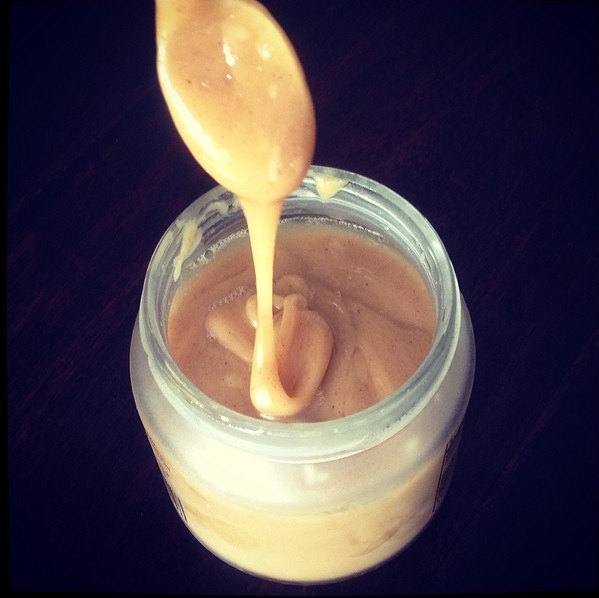
For me, the best alternative to cow’s milk is almond milk. It’s just so damn yummy! The health benefits of almond milk include improved vision, weight loss, stronger bones and muscles, and a healthy heart. It helps to maintain ideal blood pressure and is good for your kidneys. Almond milk (or any other nut milk) is such a great substitute for cow’s milk that you won’t even miss it. In fact, once you’re used to having nut milk the taste of cow’s milk is quite unpleasant. 

Nut milk is really simple to make, and once it becomes part of your routine, no big deal, you’re ready to move onto the next step of cleaning up your diet 🙂

Ingredients

1 cup raw almonds
water for soaking
900ml purified water
1/4 tsp himalayan salt
1/4 tsp vanilla powder or 1/2 tsp vanilla extract
3 – 4 dried dates, or 1 tbsp raw honey or organic maple syrup

Method

Firstly, soak the almonds in water overnight or minimum 4 hours. Don’t skip this step! Almonds contain an enzyme which inhibits digestion so it’s important to soak them first. Drain the water off and rinse them.
Time-saving tip: if you own a dehydrator, soak a kilogram of almonds in one go and then dehydrate them. That way your almonds are pre-soaked and you can make milk without any forethought!

Now put all the ingredients in a blender, and blend well. In a high-speed blender 30 seconds is enough, but it may take longer in a regular blender.

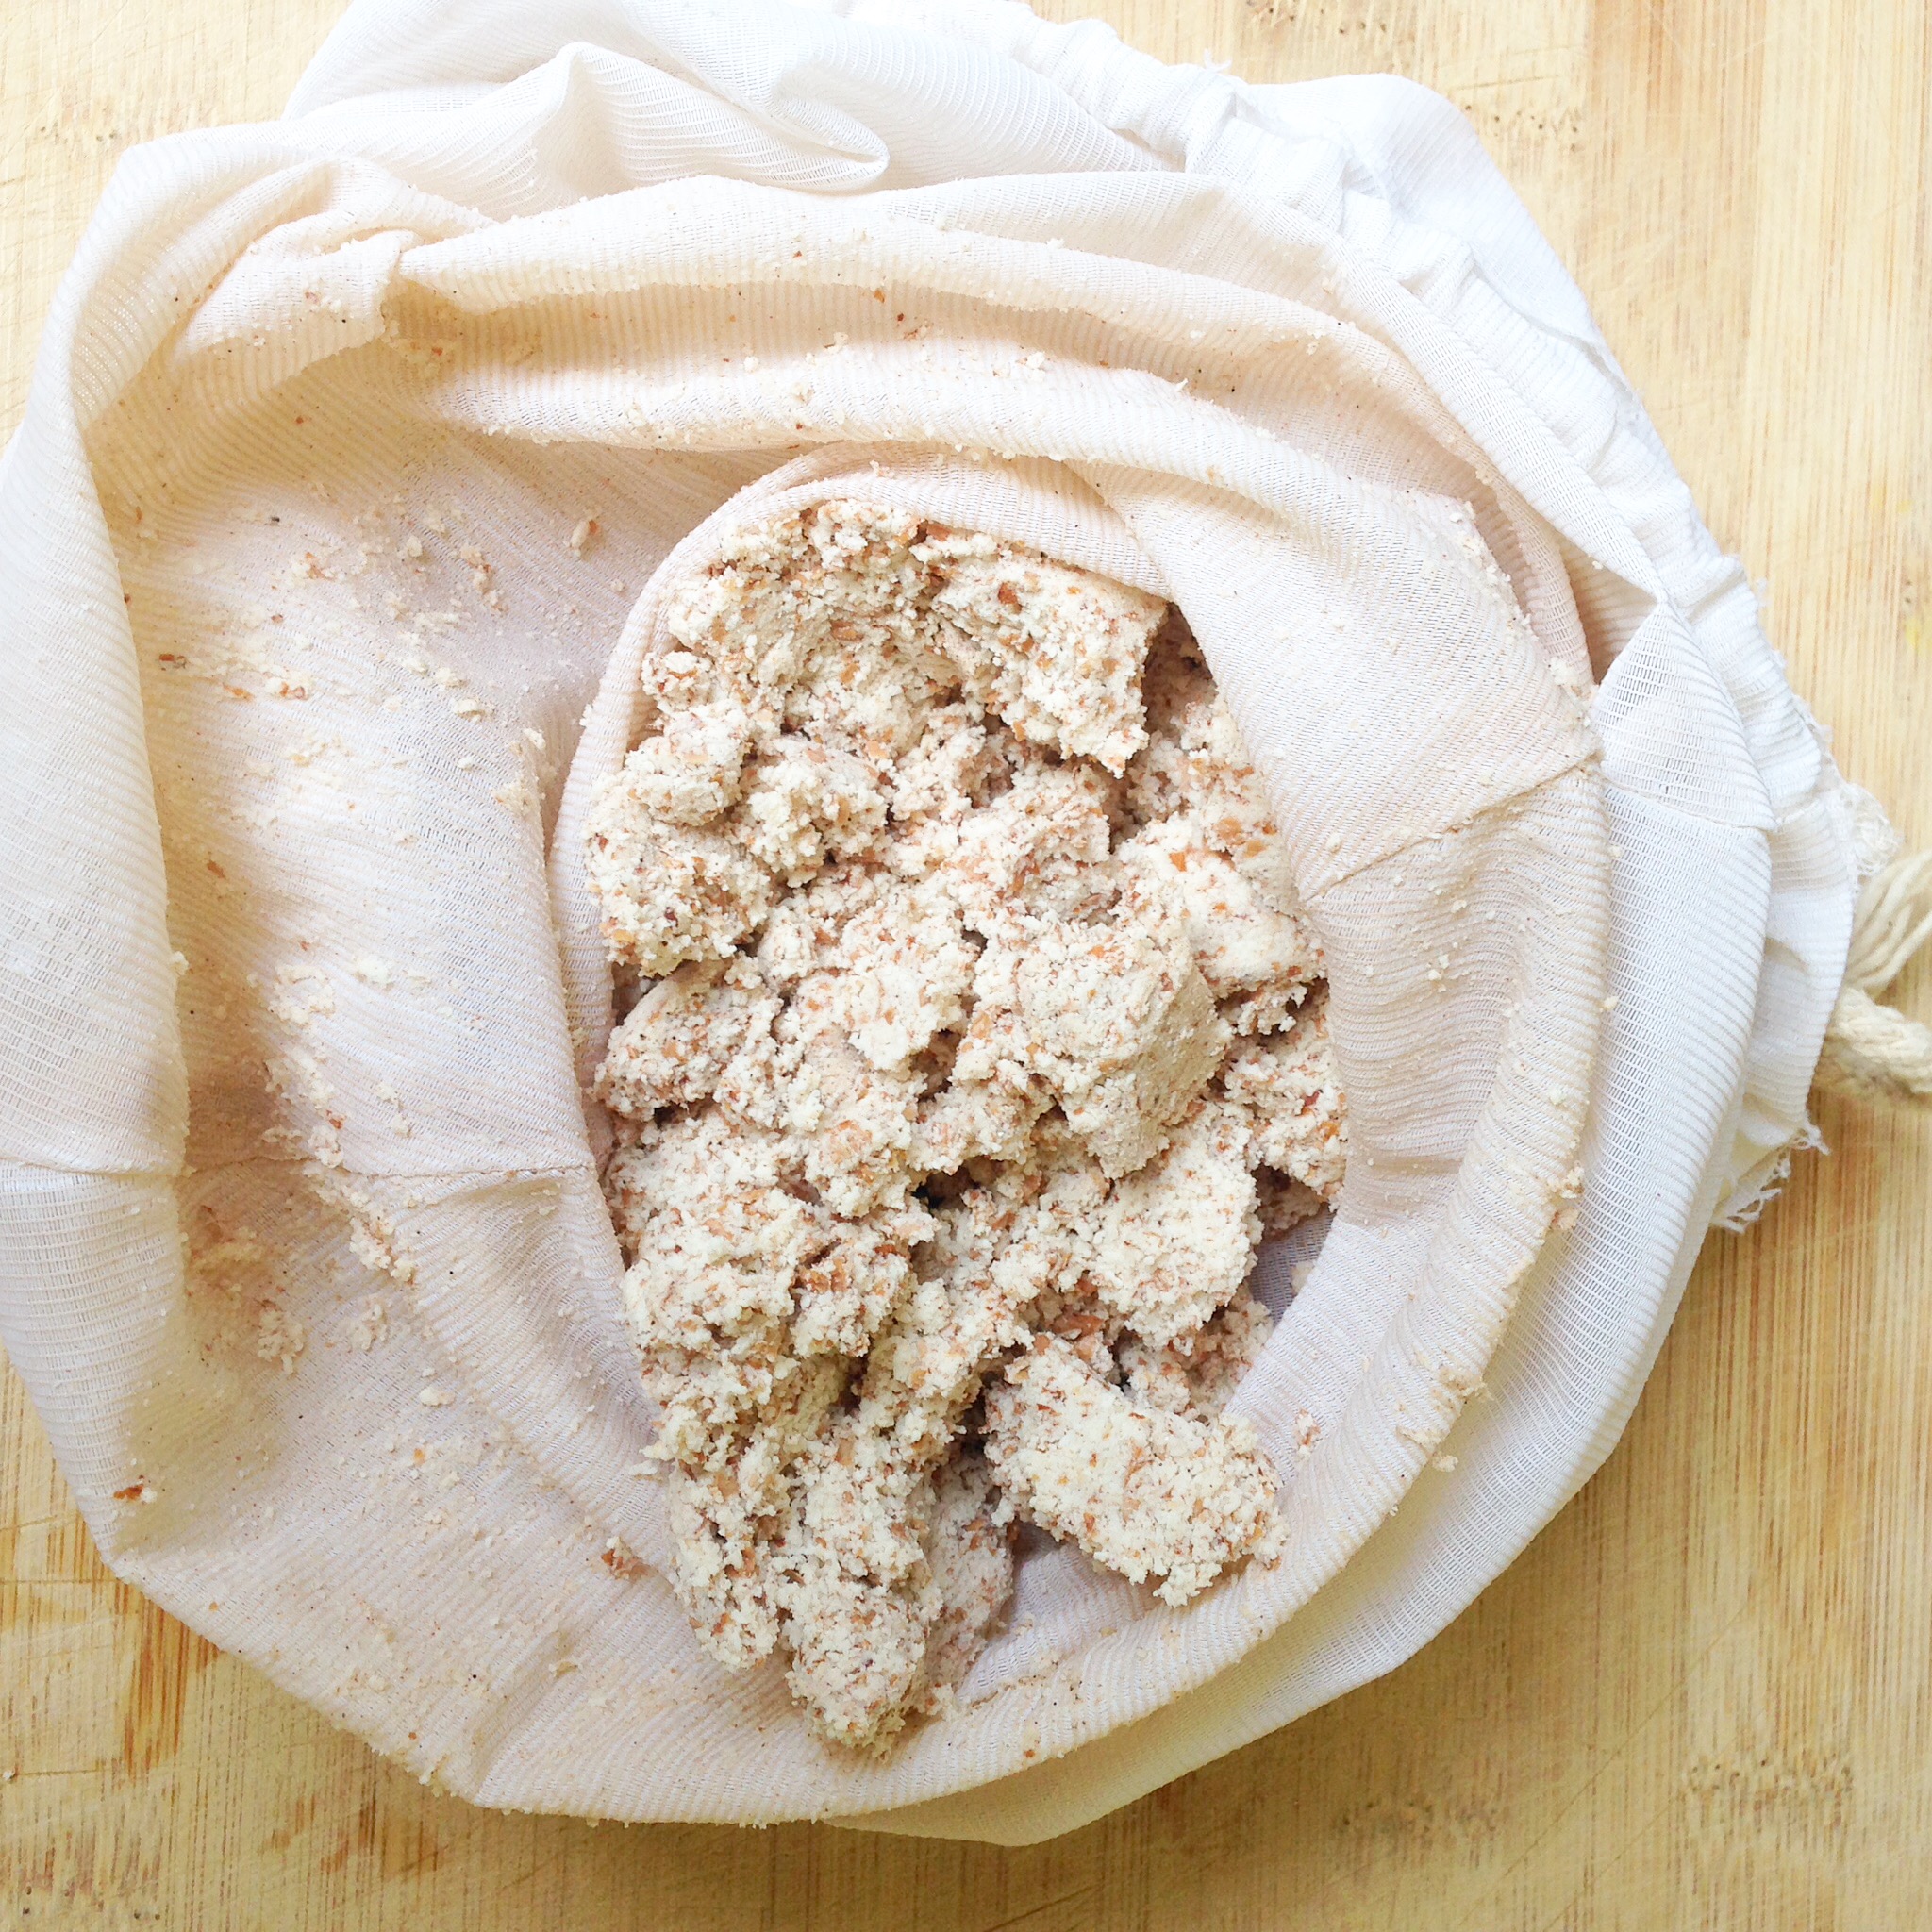
Strain the liquid through a nut milk bag (available at health shops or online) or use a clean piece of cheesecloth or muslin. Keep refrigerated and use within 3 – 4 days. You could play around with flavour by adding cinnamon, or raw cacao powder for chocolate milk!

almond milk2

What you have left over after straining off the liquid is called almond pulp. In Raw food preparation we dry this out in a dehydrator to get almond flour (as opposed to store-bought almond flour, which is usually ground, blanched almonds.)

If you don’t have a dehydrator you can spread it out on a baking tray and put it in your oven on a low heat until it dries. Then process it in your blender to a fine flour. Keep in an airtight container. If you live in a very hot or humid place I recommend keeping it in the fridge. You can use this for gluten-free baking, as I do in my Banana Bread.

almond milk3

Health and happiness!

Love,
Lauren

Basil Pesto

IMG_0007

This is my dairy-free version of pesto (traditionally you would add parmesan,) and using a combination of cashews and sunflower seeds makes it more economical.  If you have pine nuts, feel free to use them! If you have a nut allergy you could replace the nuts with more seeds.
This will keep in a jar in the fridge for about a week, or you could make a big batch when you have lots of basil and freeze it in smaller portions. I often freeze sauces in an ice tray, and then put the cubes into a freezer bag. That way you can just defrost a few cubes at a time, instead of the whole lot.

I’ve given alternatives in case you feel like a change, or if you don’t have the correct ingredients on hand.

Ingredients

80g fresh basil leaves (or replace 40g with fresh spinach)
1/2 cup raw cashews (or macadamias)
2 tbsp raw sunflower seeds (or pumpkin seeds)
2 cloves garlic
1/2 tsp Himalayan salt
1 tbsp nutritional yeast
juice of 1 lemon, or to taste
1/2 cup extra virgin olive oil

Method

I like my pesto chunky so I make it in a food processor, but you could do it in a blender if you prefer it smoother. Simply throw in all the ingredients and pulse until you have the desired consistency. As with all our dips & sauces, taste for seasoning and adjust if necessary to the way you like it!
I find that this makes the perfect consistency for using as a dip or spread, but if you want to use it as a sauce for gnocchi for example, add a few drops of water just to loosen it up a bit.

Health and happiness!

Love,
Raine

Raw Caramel

photo.PNG

Creamy, gooey, sweet caramel… it must be unhealthy, right? Not this one! And it’s super easy to make too – no more standing over the stove forever to get your caramel just right. This goes wonderfully with No-fry Chocolate and Maca Pancakes, drizzled over slices of apple, as a centre for raw chocolates or just by the spoonful!
I like to make up a batch and keep it in a glass jar for whenever I might need it. Keep refrigerated in very warm weather as it will melt and separate, otherwise in the pantry is fine.

Ingredients

50g organic virgin coconut oil
70g raw almond butter
100g runny raw honey or 85ml organic maple syrup
1/2 tsp vanilla powder
1/4 tsp Himalayan salt

Method

Place all the ingredients into your blender and blend for a couple of minutes. You want everything to melt together into a creamy consistency, and the mixture will change colour as you do this. It’s important to blend for long enough, as opposed to just mixing everything together, to get the right consistency. If it doesn’t look right yet just keep on blending!

Health and happiness.

Love,
Raine

Rhubarb & Raspberry Crumble

rhubarb crumble

Magical food
Wonderful food
Heavenly food
Beautiful food
Food, Glooorrriiiooouuusss Fooooood!

That Oliver Twist sure knew what he was talking about didn’t he! We just love food! And we especially love desserts. And we especially ESPECIALLY love desserts that are guilt free! All of our desserts here at Two Kitchens will be gluten free, refined sugar free and dairy free. Look at this picture, could you tell the difference?! This is heavenly!! Nutritious also as the nuts supply our bodies with essential fatty acids and protein, and believe it or not, rhubarb has huge amounts of health benefits. It aids weight loss, improves digestion, is great for the skin, has cancer preventing properties, improves circulation, and, can you believe, helps prevents Alzheimer’s Disease! What’s not to love??

Ingredients

For the rhubarb:

475g rhubarb, cut into 5cm pieces
the juice of 1 1/2 oranges (reserve the zest for the crumble)
125ml raw honey
1/3 cup dates, chopped
pinch of himalayan salt
100g raspberries (fresh or frozen)

For the crumble:

1 cup rolled oats
1/3 cup ground flaxseed
1/2 tsp himalayan salt
1/2 tsp vanilla powder or 1 tsp vanilla extract
1/2 tsp ground cinnamon
the zest of 1 lemon (plus the orange zest you’ve reserved)
½ cup almonds, soaked for 6 hours
60ml coconut oil
40ml raw honey

Method

Firstly, remember to pre-soak the almonds. Drain, rinse & pat them dry.

Preheat the oven to 180 C.

In a saucepan combine all the rhubarb ingredients, except for the raspberries. Simmer for 5-10 minutes until tender. Stir in the raspberries, and pour into an oven-proof dish.

For the crumble, put the oats, ground flaxseed, salt, vanilla, cinnamon, orange and lemon zest and almonds into a food processor. Process until a crumb-like texture forms. Add the coconut oil and honey and combine well. Spread over the rhubarb mixture.

Bake for 20 – 30 minutes until the crumble is golden and the sauce is bubbling up around the edges. Best served warm, but also delicious served at room temperature for breakfast the next day, with some coconut yoghurt!

Health & happiness!

Love,
Lauren & Raine