Raspberry Coconut Chia Pudding

Chia Pudding with raspberries

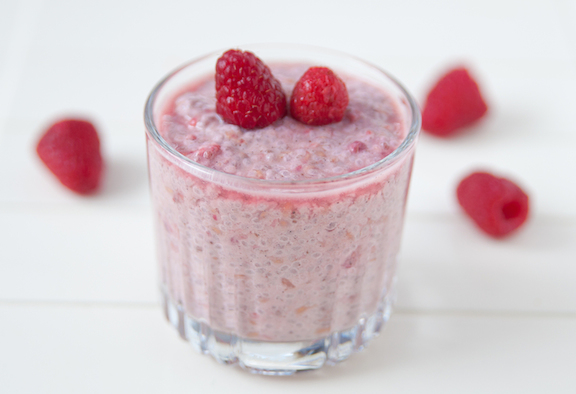
Chia seeds are the ultimate health food. Although they contain carbohydrates, most of their carbohydrates are not digested by the body as carbohydrates but as fibre, so it speeds up the metabolism and gives you energy at the same time. They are also loaded with anti-oxidants and omega-3 fatty acids; gram for gram, chia seeds contain more omega-3 than salmon, and they are just an excellent source of protein.

Being a vegetarian doesn’t just mean you don’t eat meat but eat everything on the side, you have to make a conscious effort to know about where to get your protein from and this was a learning curve for me but I make sure I get all my protein from plant-based sources and believe it or not, these sources of protein are actually absorbed better by humans than protein from meat. So chia puddings are the way forward!

Great for baby breakfast!

Ingredients

2 tbsp chia seeds
The creamy bit from 1 can coconut milk (must be the original kind, not light or lower fat) I find the Blue Dragon brand to have the creamiest cream.
5 or 6 raspberries
1 tsp agave nectar (optional)

Method

Mix all the ingredients in a small bowl, making sure to get an even coating of the chia seeds. Cover with cling film and leave in fridge overnight. If you like it sweet you can add the agave, if not, you can omit this.

Enjoy on its own, as a yoghurt, with granola or as a dessert.

Love,
Lauren

Homemade Maple & Pecan Granola

Maple Pecan Granola.JPG

As you can probably tell by now, I’m a massive breakfast fan. When I started teaching myself about diet, I was so shocked to find out what nasties were in all the usual breakfast cereals; you know, the ones claiming to be ‘the best way to start your day’… they’re basically cardboard and sugar, with heaps of additives and chemicals. I wish the information was more accessible so people knew not to give this stuff to their kids.  Honestly guys, if you want to give your kids the right start to their day, throw away all those boxes of artificial cereals, even the ones claiming to be healthy, and make your own. It really is so easy and CHEAP! I make a huge batch of this and divide it between a few of these jars that I buy from Tesco or Ikea and it keeps fresh for ages… You can serve it with yoghurt – dairy or dairy-free, whatever your preference, or any number of nut or other milks. Add fruit, seeds, anything – kids will love it! For other breakfast ideas check out the breakfast page and the smoothie page. Braxton usually has a smoothie for breakfast most days, packed with superfoods.

Ingredients (for one jar)

4 cups organic rolled oats
1 cup pecans, crushed to about quarter size in a pestle and mortar
1 cup organic natural maple syrup (the real stuff, not the one full of rubbish!)
Half cup sunflower seeds (optional but great for extra calcium)

Method

Preheat oven to 180 degrees then simply put all the ingredients into a large bowl and mix until all the oats are coated with the syrup.

granola2

Line a baking tray (you may need two trays) with baking paper and place in oven for twenty minutes. Give it a mix around then bake for a further twenty minutes, checking after ten minutes. You want it to go brown and crispy but you don’t want it to burn and some ovens work faster than others.

Love & health,
Lauren


Swede and Courgette Soup

swede courgette soupYou’ll find with most of my soups they literally consist of whatever vegetables I have lying around – I don’t plan them. It was freezing on Sunday and we really fancied soup so I looked in my fridge and I had two courgettes, and I looked in the pantry and there was a swede. So here you have it, a nutritious, delicious, warming soup for winter 🙂

Ingredients

1 large swede, peeled and chopped
2 courgettes, sliced
1 onion
1 cup water
1 cup almond milk
1 tsp cumin
Salt and pepper to taste
Half tsp coconut oil

Method

Heat the oil in a large saucepan, then add the onion and cook until transparent, just over a minute. Then add the courgettes and swede and coat in the oil.

Add water and almond milk, bring to the boil then reduce the heat to a simmer. Add the cumin, salt and pepper, give it a good stir and put on the lid.

Leave for an hour until vegetables are really soft. Once ready, use a handheld blender to blend in saucepan (if you don’t have one, transfer to a food processor). Blend until smooth then taste. Add more salt, pepper or cumin if needed.

Serve immediately or keep it in a container in the fridge (once cooled) for up to four days and heat just as much as you need each time. You can top it with chopped chives and some sumac like I did if you like.

Love,
Lauren


Healthy ‘Nutella’

nutella

As healthy as I try to be, as much as I now have no problem staying away from all things artificial, (I now genuinely prefer the taste of real foods) I still cannot stay away from Nutella; I just love it! So we set about creating the perfect healthy hazelnut chocolate spread. Because raw cacao is a perfect source of protein, as are hazelnuts, this is actually a great post-workout snack! Hazelnuts are a great source of Vitamin E so it’s also wonderful for the skin. I also use it to layer my breakfast parfaits 🙂

Ingredients

A cup and a half of hazelnuts (soaked for at least 6 hours or overnight. Do not omit this step)
Quarter cup of purified water
Quarter cup of raw cacao
Just over a quarter cup of pure maple syrup
Half tsp vanilla essence

Method

Put the hazelnuts on a baking tray and bake for 20 minutes. Leave to cool for 5 minutes then put them in the food processor and blend until completely smooth.

Now add the cacao, vanilla and maple, blend again then gradually add the water. Add more water if it’s too thick and add more maple if it needs to be sweetened. Follow your instincts!

Enjoy!

Love,
Lauren

Blood Orange & Jaffa Orange Juice

blood and jaffa

These winter days (in London, not in South Africa where Raine is sunning herself!) need lots of vitamin C and anti-oxidants, so some days I may make a fruit juice instead of a green vegetable juice. Today I really craved oranges and the lovely people at Abel & Cole sent me a box full of them!

Ingredients

3 Jaffa oranges
3 blood oranges

orange

Method

Peel the oranges, leaving the pith on, and juice! Simples!

Love,
Lauren

Anti-Inflammatory Parsnip & Turmeric Soup

parsnip turmeric

As you may well know about me already, the disease I had was rheumatoid arthritis. The pain was unbearable but the swelling, the fluid, inside the joints was the worst thing – it was so uncomfortable. I used to explain that it felt like jelly in between the joints as they moved – eugh! I never want that feeling back so I make sure I eat a lot of anti-inflammatory foods, turmeric being one of the top ingredients. My husband loves soups and they are so easy to make and such a great thing to have in the fridge during the winter. I usually try and make one a week and then I know I have lunch for a good few days. This week I had some parsnips left that were going to go bad if I didn’t use them soon so I decided to make a gorgeous winter-warmer anti-inflammatory soup.

Ingredients

5 parsnips, peeled and chopped
2 potatoes, peeled and chopped
1 onion, chopped
Half tsp coconut oil
3 tbsp turmeric
1 cup boiling water
1 cup almond or coconut milk
Salt and pepper to taste

Method

Start by heating the coconut oil in a large saucepan. Once it’s hot, add the onion and leave for around a minute, stirring occasionally, until it becomes transparent. Then add the potatoes and parsnips and coat them with the oil.

Once coated, add the water and coconut or almond milk. Give it a good stir, then add the turmeric and salt and pepper to taste. If you don’t like it too thick, you can add more water or almond milk and you can adjust the amount of turmeric you use depending on your preference.

Turn down heat, put on the lid and leave to simmer for around an hour. Once all the vegetables are super soft, take off the heat and either transfer to a blender or use a handheld blender – my preference – and blend until smooth. Taste it now and see if you need to add salt or pepper. Serve straight away or keep it in the fridge (once cool) and reheat just as much as you need each time.

Enjoy!

Love,
Lauren

Roasted Aubergine with Greek Yoghurt and Chives

aubergine (2)

Another one of my staples growing up was the aubergine. Honestly, my mum can do about 150 things with an aubergine! But I just wanted a simple dinner tonight, so I simply roasted it. Aubergines are rich in antioxidants, specifically nasunin which is found in the skin. Nasunin is what gives it its deep purple colour. As well as being a great antioxidant, it also protects the lipids (or fats) in brain cell membranes so if you’re feeling a little forgetful, get some aubergine down you! This has Greek Yoghurt so it is vegetarian but not vegan. For a vegan aubergine recipe, try our Roasted Aubergine with Tahini

Ingredients

1 aubergine (per person)
2 tsp extra virgin olive oil
2 cloves garlic, crushed
Himalayan salt and black pepper
Greek yoghurt
2 tbsp chives, chopped

Method

Preheat your oven to 180. Wash the aubergine and pat dry with a towel. Slice the aubergine lengthways down the middle. Next, take your knife and make deep criss cross incisions.

images

Brush the olive oil over the whole aubergine, both sides, then face them upwards on a baking tray and spread one crushed garlic clove on one half, and one on the other, then add salt and pepper.

Bake for twenty minutes, then turn them over and bake for another twenty minutes. Turn over once more and bake for a further ten minutes. You want to make sure the inside is really soft.

Once ready, add a dollop of Greek yoghurt on each half and sprinkle with chives.

Enjoy!

Love,
Lauren

Roasted Red Pepper Hummus

roasted red pepper hummus

Growing up, my cooking influences came predominantly from the Middle East / Mediterranean (Morocco and Israel) so we ate a lot of hummus! The staples of any of our meals were parsley, garlic, olive oil, coriander and paprika with lots of tomatoes and red peppers. So when I started roasting the peppers to make this dish, the nostalgia took me right back to my grandmother’s kitchen in Israel when I was a kid. Topped off with the parsley at the end, I may as well have been in 1988 for those few minutes! I closed my eyes and inhaled the beautiful nostalgic smells.

I just love hummus. It’s always been in my fridge and I like to try and make variations of it, whilst keeping to the original Vaknine family recipe – simple and healthy.

Chickpeas are an AMAZING source of protein so this is great as a post-workout snack or just as a mid-morning snack when you get a bit peckish, perhaps with some carrots, celery or some homemade crackers!

Ingredients

2 cups chickpeas (I use raw organic ones, in which case you need to soak them overnight, then cook them in a saucepan for about two hours. If you are using tinned, you simply need to drain them and you’re good to go)

1 red pepper
3 tbsp lemon juice
3 tbsp olive oil
1 tbsp tahini paste
Quarter cup of water
1 tbsp paprika
1 tsp cumin
Half tsp garlic salt
Half tsp Himalayan salt

To serve:
Drizzle of olive oil
1 tbsp parsley, finely chopped
Sprinkle of paprika or sumac

Method

Start by pre-heating your oven to 180. Cut the pepper up (removing all the seeds) into smallish pieces then place on a baking tray and roast for about fifteen minutes or until quite soft. Once ready, leave to cool for five minutes.

While this is cooling, place all the other ingredients into a blender or food processor and blend until super smooth. Taste it, and add more cumin, garlic, lemon or salt if needed. Trust your instincts and your taste buds.

Add red pepper to blender and blend again until completely smooth.

Lastly, add to a bowl, drizzle a little olive oil, some parsley and a sprinkle of paprika or sumac on top. Serve, and enjoy!

Love,

Lauren

Garlicky Green Beans

green beans

You may not think so because of their vibrant green colour, but green beans (or string beans) are very high in carotenoids (what you usually expect from orange or red veggies like carrots and tomatoes.) The expected orange or red is hidden by exceptionally high levels of chlorophyll. Carotenoids help to prevent cancer and are also important for heart health. Chlorophyll has many benefits, one of which is promoting iron levels. Green beans are also rich in silicon, which is important for bone health and the formation of connective tissue.

Health benefits aside, they are one of my favourite vegetables and can be prepared in many different ways. This is one of the quickest (and most delicious!) ways I know to prepare beans. I made this as an accompaniment to my Creamy Porcini Pasta last night.

Ingredients

75ml olive oil

juice of half to a whole lemon

4 big cloves of garlic, finely chopped

Himalayan crystal salt and black pepper to taste

350g green beans

Method

Combine the olive oil, juice of half a lemon and garlic to make a dressing. Blanch the beans in rapidly boiling water for just a few minutes until they turn a vibrant green. Don’t over cook them! They must still have a bit of a bite. Strain the water off the beans and then immediately toss them in the dressing. Season to taste and add more lemon juice if necessary (I like a lot of lemon.) These can be served hot or left to marinate and served at room temperature.

Love,

Raine

Creamy Porcini Pasta with Crispy Sage

photo 2

Who doesn’t love a good creamy pasta? You may think that when you switch to a healthy lifestyle it’s something you’ll have to give up permanently. But I’ve got good news… you CAN enjoy a delicious and satisfying bowl of pasta, and know that you’ve nourished your body with the good stuff!

Mushrooms have many medicinal properties and make a great substitute for meat.

This recipe is dairy-free, wheat- and gluten-free and vegan. I use raw cashew nuts to make my “cream” for this sauce and nutritional yeast adds a cheesy flavour. You could use any gluten and wheat-free pasta, such as buckwheat, brown rice or amaranth pasta.

Ingredients

2/3 cup of raw cashews

1 1/4 cup of water

2 tbsp nutritional yeast

1 tsp Himalayan crystal salt

a handful of fresh sage

250g quinoa pasta

Organic and virgin coconut oil or extra virgin olive oil for frying

250g porcini mushrooms

120g shiitake mushrooms

3 big cloves of garlic, finely chopped

truffle oil and fresh lemon to finish

Method

Place the cashews, water, nutritional yeast and salt in a blender and blend until completely smooth.

Cook the pasta according to package instructions.

Slice the mushrooms and saute them in coconut or olive oil. Once they start to brown nicely, add the garlic and continue to fry for a few minutes. 

In a separate pan, fry the sage in some oil for a few minutes until it turns crispy.

Season the sauce to taste with black pepper and salt if necessary. Toss the pasta and sauce together and serve topped with a few crispy sage leaves. Finish with a drizzle of truffle oil and a squeeze of lemon if desired.

Enjoy!

Love,

Raine