Chocolate Truffle Hearts

There is nothing inside these chocolates that makes them ‘truffles’ necessarily, it’s just that the mixture is so decadent that when it sets thickly – as it does in the heart-shapes moulds I have because they’re so deep – it honestly tastes and feels like Belgian chocolate truffles melting into your mouth, and yet totally free of refined sugar, dairy, gluten, eggs and preservatives.

They look impressive but I’ll let you into a little secret: they are so easy to make! 4 simple ingredients and that’s it. All you need other than that is a saucepan, a spoon and a silicone heart mould. I used one similar to this.

Fancy treating your loved one? Or just want to keep something rich and decadent nearby for those days when you’re really craving chocolate? These are the ones!

Ingredients

5 tbsp coconut oil
5 tbsp raw cacao powder
2-3 tbsp maple syrup (depending on your preference of sweetness)
2 tbsp cashew butter

Method

Simply put all the chocolate ingredients into a saucepan and melt gently over a low heat, stirring often.

Once it’s melted, use a teaspoon to spoon into the little hearts and put it in the fridge to set for a couple of hours then turn out and store in a container in the fridge.

Devour!

Love & health,
Lauren

Rose Pistachio Chocolate Bark

There is nothing more satisfying than taking a bite out of a chunk of chocolate, and indeed nothing more satisfying at all than knowing that that chocolate is made of only pure, natural, healthy ingredients than not only are not detrimental to your health, but are in fact beneficial to your health.

I usually make my chocolate truffle hearts when I want good old plain chocolate instead of brownies or cakes or cookies, but this time I thought, You know what, just shove the entire mixture into a silicone baking tray and let it set like that instead of putting it into individual moulds.

I love the combination of rose and pistachio, I think it must be something to do with my Moroccanness! so I decided to put a touch of rose water, just enough to taste it faintly on the tongue, but not enough to take away from the exquisiteness of the chocolate, and the pistachios give it a bit of crunch and a touch of savoury to mix in with the sweetness.

As you take a bite out of it, you will honestly feel like that girl in the Magnum adverts, how she looks when she takes a sensuous bite out of the (rubbish-filled) ice cream; it’s heavenly! And so easy to make my son could probably do it…

So I invite you all to join in the raw chocolate revolution! 🙂

Ingredients

5 tbsp coconut oil
5 tbsp raw cacao powder
2-3 tbsp maple syrup (depending on your preference of sweetness)
2 tbsp cashew butter

Optional fillings:
1/2 tsp rose water
Small handful pistachios, crushed roughly
Small handful coconut chips

Method

Simply put all the chocolate ingredients (not the fillings) into a saucepan and melt gently over a low heat, stirring often. Add the rose water if desired.

Once it’s melted, pour it into a baking paper-lined silicone baking tray and sprinkle the fillings into it.

Put it in the fridge to set for a couple of hours then cut or break into chunks.

Devour!

Love & health,
Lauren

Raw Vegan Bounty Bites

raw-vegan-bounty-bites

My favourite EVER chocolate was Bounty – I’m obsessed with anything coconut so this really is an indulgence for me. I made these a few years ago before starting the blog but never photographed them or wrote down the recipe so thought I’d try to perfect them now so you can all share in their splendor! They are simply mouth-watering; so delicious but also kind of light and fluffy so they don’t make you feel sick. Everyone here loved them, hope you do too.

Ingredients

2 cups desiccated coconut
¼ cup ground almonds
½ cup coconut oil
The cream from the top of a can of full-fat coconut milk
¼ cup maple
1 tsp vanilla extract

Chocolate coating:
3 tbsp cacao powder
¼ cup maple syrup
1 tbsp cashew butter
¼ cup coconut oil (add more if it is too thick)

Method

Melt the coconut oil then mix all the ingredients except the chocolate in a bowl.

Line a plate or baking tray with baking paper then roll the mixture into small balls and put them on the prepared plate and put it in the freezer for an hour. (the baking paper will stop them sticking to the plate)

Make the chocolate sauce while it’s in the freezer. Take it off the heat once ready, take the balls out the freezer and immerse them, one by one, into the saucepan and coat them with the chocolate then put back on the plate. They will be best if you coat them twice, so once you’ve done them all once, re-immerse them.

Put them in the fridge to chill and store them in an airtight container in the fridge.

Love & health,
Lauren


Maca-Chilli and Lemongrass-Wheatgrass Chocolates

Chilli & Lemongrass Chocs

The mayans believed that cacao was the drink of the gods, and with good reason! Raw cacao is high in magnesium and all the B vitamins; it promotes cardiovascular health and aids digestion; it is high in anti-oxidants, neutralising free radicals in the body and thereby preventing cancer. Cacao also promotes mental well-being due to containing phenyethylamine and theobromine, organic compounds which stimulate the release of serotonin and dopamine in the brain. No wonder we feel so good after eating chocolate!

Making your own raw chocolate is simpler than you would think, and means you get all the incredible health benefits of raw cacao without the added sugar, dairy or chemical additives. Make sure to buy organic and raw cacao products, rather than regular cocoa, which has been processed and stripped of nutrients.

Ingredients

For the flavoured caramel centres:

50g organic virgin coconut oil
70g raw almond butter
100g runny raw honey or 85ml organic maple syrup
1/2 tsp vanilla powder
1/4 tsp Oryx desert salt
1 tbsp maca
a pinch of cayenne
5 drops organic lemongrass essential oil
1 tsp wheatgrass powder

For the chocolate:

75g raw cacao paste
25g raw cacao butter
30ml runny raw honey or organic maple syrup
1/4 tsp organic stevia leaf powder (alternatively, use an additional 30ml honey or organic maple syrup)
pinch of Oryx desert salt


Method

To make the caramel, place the coconut oil, almond butter, honey or maple, vanilla and salt into a blender and blend for a couple of minutes. You want everything to melt together into a creamy consistency, and the mixture will change colour as you do this. It’s important to blend for long enough, as opposed to just mixing everything together, to get the right consistency. If it doesn’t look right yet just keep on blending!

Divide the mixture in two. To one half add the maca and cayenne, and to the other add the lemongrass oil and wheatgrass powder. Taste each mixture for flavour – you may want to add another pinch of cayenne or a drop of lemongrass, according to your preference. Place the flavoured caramels in the freezer to set while you make the chocolate.

Place the cacao paste, cacao butter, honey or maple, stevia and salt in a glass or stainless steel bowl which can fit over a saucepan. Bring some water to a simmer in the saucepan, and set the bowl over it. The trick with chocolate is to only ever use gentle heat, and to heat all the ingredients together. If you try to melt the cacao over direct heat, or add cold honey to it once it’s been melted, it will seize. Use a whisk to stir the chocolate until everything is melted, well combined and glossy.

Fill your moulds with chocolate one third of the way, making sure to use only half of the chocolate.  If you don’t have moulds, ice trays work just as well. Place in the freezer until set. Now use a small spoon to make a little ball of the set caramel and drop into the centre of the mould, trying to avoid the sides of the mould. Use the maca-chilli caramel for half of the moulds and the lemongrass-wheatgrass caramel for the other half. Fill the moulds with the remaining chocolate so that it pours around the caramel, and covers it. Place in the freezer again until set.

These chocolates do need to be kept in the fridge as they can melt at room temperature. I keep mine in a glass jar, and they can last up to a month (at least, that’s the longest mine have ever lasted before being eaten!)

Health & happiness!

Love,
Raine


Chocolate Mousse

chocolate mousse

This sugar- and dairy-free dessert is so simple and quick to make, and guaranteed to impress. By using raw chocolate and only a small amount of honey you get a mousse which is rich in flavour and not overly sweet, but even kids love it.
You could use organic store-bought almond or coconut milk, but I much prefer the flavour of homemade. You can make coconut milk by blending 160g fresh mature coconut flesh with 350ml hot water and then straining it through a nut milk bag or muslin cloth (this will make 420ml of milk.) Check out the link below to see how to make almond milk.

Ingredients (serves 6)

420ml coconut or almond milk
150g raw chocolate (I use Gayleen’s Decadence Baking Slab, available at The Organic Emporium)
30ml raw honey
45ml organic virgin coconut oil
1/4 tsp Oryx Desert Salt
1/2 tsp vanilla powder or 1 tsp vanilla extract
3 egg yolks
1 whole egg

Method

If you’ve made the coconut milk yourself it should still be hot. If not, warm the milk in a saucepan until just below boiling point. Pour it into a high-speed blender, along with the chocolate, honey, coconut oil, salt and vanilla. Blend until the chocolate is melted and is well combined. With the blender running, pour the eggs into the blender through the hole in the lid. Continue to blend for another 2 minutes. At this point there should be steam coming off the mixture, thanks to having heated the milk, as well as the friction from the blender heating it further. Therefore the eggs will be cooked.

(If you’re not satisfied that the temperature is high enough to have cooked the eggs you can pour the mousse into a saucepan and cook it over very gentle heat, stirring continuously and never allowing it to boil. You need to be careful when using this method that you do not overcook the egg, thereby scrambling it. To check if it’s ready dip a spoon into the mixture and then wipe your figure down the back of the spoon. The mixture should not run down the line you have created when held horizontally.)

Pour the mousse into a pretty serving dish, or into individual bowls (I used champagne glasses.) Allow to cool to room temperature, then cover with clingfilm and refrigerate until set, preferably overnight. If you’re in a hurry you could place it in the freezer for a couple of hours and then transfer to the fridge. To serve, place halved strawberries on top of the set mousse.

Health & happiness!

Love,
Raine

Healthy Hot Chocolate

IMG_3581

Nothing’s better on a cold winter’s day (like we’re having in Joburg) than a comforting cup of hot chocolate. My version is dairy-free and sugar-free, and goes perfectly with my Gluten-free Biscotti. If you don’t like spice you can simply omit these, but they do compliment the natural flavour of cacao really well.

Ingredients 

500ml almond or coconut milk
2 star anise
pinch of ground cardamom
pinch of Oryx Desert Salt
pinch of vanilla powder
pinch of cayenne
2 tbsp raw cacao butter
2 heaped tbsp raw cacao powder
2 tbsp raw honey or organic maple syrup, or 1/4 tsp stevia powder

Method

Place the milk and the spices in a small saucepan. Bring to a gentle simmer, then remove from the heat and allow to steep for a couple of minutes, so that the flavours of the spices permeate the milk. Return to the heat just to bring it up to temperature. Remove the star anise, add the cacao butter, cacao powder and sweetener and use a small whisk to combine. Serves 2.

Try using hazelnut milk or brazil nut milk for a delicious alternative.

Health & happiness!

Love,
Raine

Raw Chocolate Tart

Raw Chocolate Tart

This is a favourite with my family and friends, and no one can ever believe what the main ingredient is… avocado! Don’t let that put you off – it is rich, creamy and delicious; everything you want from a chocolate tart. And it’s so simple and easy to make.

This year I made it for Pesach dinner (we don’t eat wheat during Pesach and our desserts always have to be dairy-free as we don’t mix meat and milk.)
Word of advice: don’t tell people that there’s avo in it until they’ve tried it!

Ingredients

Crust:
2 cups whole raw almonds
60ml raw cacao powder
1/4 tsp himalayan salt
150g fresh medjool dates
2 tbsp organic virgin coconut oil

Filling:
500g ripe avo flesh (about 4 or 5 avos)
180ml raw cacao powder
60ml organic virgin coconut oil
40g raw cacao butter, gently melted
180ml organic maple syrup
1/4 tsp himalayan salt
1/4 tsp organic stevia leaf powder
1 tsp organic vanilla extract or 1/2 tsp vanilla powder

Method

Remove the pits from the dates and chop them up. Place all the ingredients for the crust in a food processor and blend until you have a fine crumb that sticks together when pressed. If the mixture seems dry just keep processing until it’s sticky. Turn it out into a 23cm loose-bottom flan tin or glass serving dish. Press the crumb evenly across the bottom and up the sides of the tin, making sure that the top edges are straight and even. Refrigerate.

Place all the ingredients for the filling in a high-speed blender and blend until completely smooth, but be careful not to blend for so long that the mixture heats up.
Pour into the set crust and use a spatula to make swirly patterns on top or just smooth it out, as you prefer. Refrigerate overnight or minimum 4 hours.

Health & happiness!

Love,
Raine

Lemon & Basil Truffles

Lemon & Basil Truffles

I love to use savoury flavours in desserts, and in these truffles the basil compliments the lemon really well. They are perfect to finish off a dinner or to give as a gift. Put them in a pretty glass jar and tie a ribbon around the neck… people always appreciate something that you have made yourself!

Ingredients

200g creamed coconut (or coconut butter, not coconut oil)
zest of 3 lemons
30ml lemon juice
1 tbsp honey
1/2 tsp organic stevia leaf powder
pinch of organic vanilla powder or 2 drops vanilla extract
1 tbsp baobab powder
pinch of himalayan salt
2 tbsp chopped fresh basil
about 40g cacao butter
an empty egg carton and toothpicks

Method

Place all the ingredients except the basil and cacao butter into a food processor. Process until well combined. Then add the chopped basil and pulse to combine. If the mixture is very soft you can refrigerate it until it firms up. Take about a heaped teaspoon of mixture at a time and use your palms to roll it into a neat ball. Place on a plate as you go. You should get about 21 truffles. Place them in the freezer to harden.

In a small saucepan, gently melt the cacao butter (don’t be alarmed that it turns brown as it melts, this is normal.) You will need to melt more cacao butter than what you actually end up using – simply allow the remainder to set again and return to the packet. Spear a truffle onto a toothpick and then dip it into the melted cacao butter, swirling to remove any excess and ensure an even coating.

Lemon & Basil Truffles 2

Then stick the other end of the toothpick into an empty egg carton, allowing the cacao butter to set.

Lemon & Basil Truffles 3

Repeat with all the truffles. Once they have set you can give them a second coating if you like, and then keep them refrigerated. This is actually the first time I’ve made truffles in years and I really enjoyed the process, but if this seems like too much hard work for you, you can omit the last step of coating them in cacao butter!

Health & happiness 🙂

Love,
Raine

Choc-Chip Sweet Potato Cookies

Sweet Potato Choc Chip Cookies 1

If you’ve read my Joburg recommendations in the “Two Kitchens Loves” page, you’ll know that I am a big fan of the Organic Emporium in Bryanston. It has replaced regular supermarkets for my day-to-day grocery shopping. The owner, Debbie, is so passionate about the work she does, it’s hard not to get caught up in her enthusiasm!

Last week I was in the store and Debbie asked me to come up with a recipe for Wensleydale’s new organic Sweet Potato Flour. I made these gluten, sugar and dairy-free choc-chip cookies. They’ve been really popular with everyone’s who’s taste-tested them for me!

Sweet potatoes are naturally gluten-free and low-GI so the flour makes a great substitute for regular wheat flour. It is quite granular, so it gives the cookies a chunky texture. If you’d prefer a smoother texture you can grind the flour more finely in a blender. In the first batch I used a combination of honey and coconut sugar to sweeten; and in the second batch I replaced the coconut sugar with organic stevia leaf powder. Both worked equally well, so it’s just a matter of preference. If you’re watching calories I would recommend using the stevia.

Ingredients (makes about 20 cookies)

1/4 cup organic virgin coconut oil
1/4 cup organic coconut sugar OR 1/2 tsp organic stevia leaf powder
2 tbsp raw honey
2 tbsp nut butter (peanut, almond, cashew etc)
2 farm-raised eggs
1/4 tsp organic vanilla powder OR 1/2 tsp vanilla extract
1/4 tsp himalayan salt
1 tsp bicarbonate of soda
1 ripe banana, finely mashed with a fork
1/2 cup water
1/2 cup rolled oats
75g Gayleen’s Decadence Raw Chocolate Baking Slab, available at the Organic Emporium
1 1/2 cup Wensleydale’s Sweet Potato Flour, available at the Organic Emporium

Method

Preheat the oven to 180 C.

Make sure that the raw chocolate is cold from the fridge. Chop it up into small pieces for your “chocolate chips” and then return to the fridge. If left at room temperature it may start to melt.

Beat together the oil, coconut sugar or stevia, honey and nut butter. Add the eggs and beat well. Stir in the vanilla, salt, bicarb, banana and water. Add the oats and chocolate chips. Now stir in the sweet potato flour. You will notice that the flour is very “thirsty” and the dough will thicken quite quickly. Stir well so that there are no dry lumps of flour.

Line a large baking tray with silicone mats or baking paper. Place a heaped tablespoon of dough onto the tray and spread out into a neat circle, about 1.5cm thick. You can wet your fingers to prevent the dough from sticking to them. Repeat till all the dough is used up. The cookies will not spread during baking, so you can place them quite close together.

Bake for 15 – 20 minutes, until slightly golden and firm to the touch. Allow to cool completely before storing in an airtight container.

Health & happiness!

Love,
Raine

Raw Chocolate Hearts with Maca Caramel Centre

Maca Caramel Chocolates

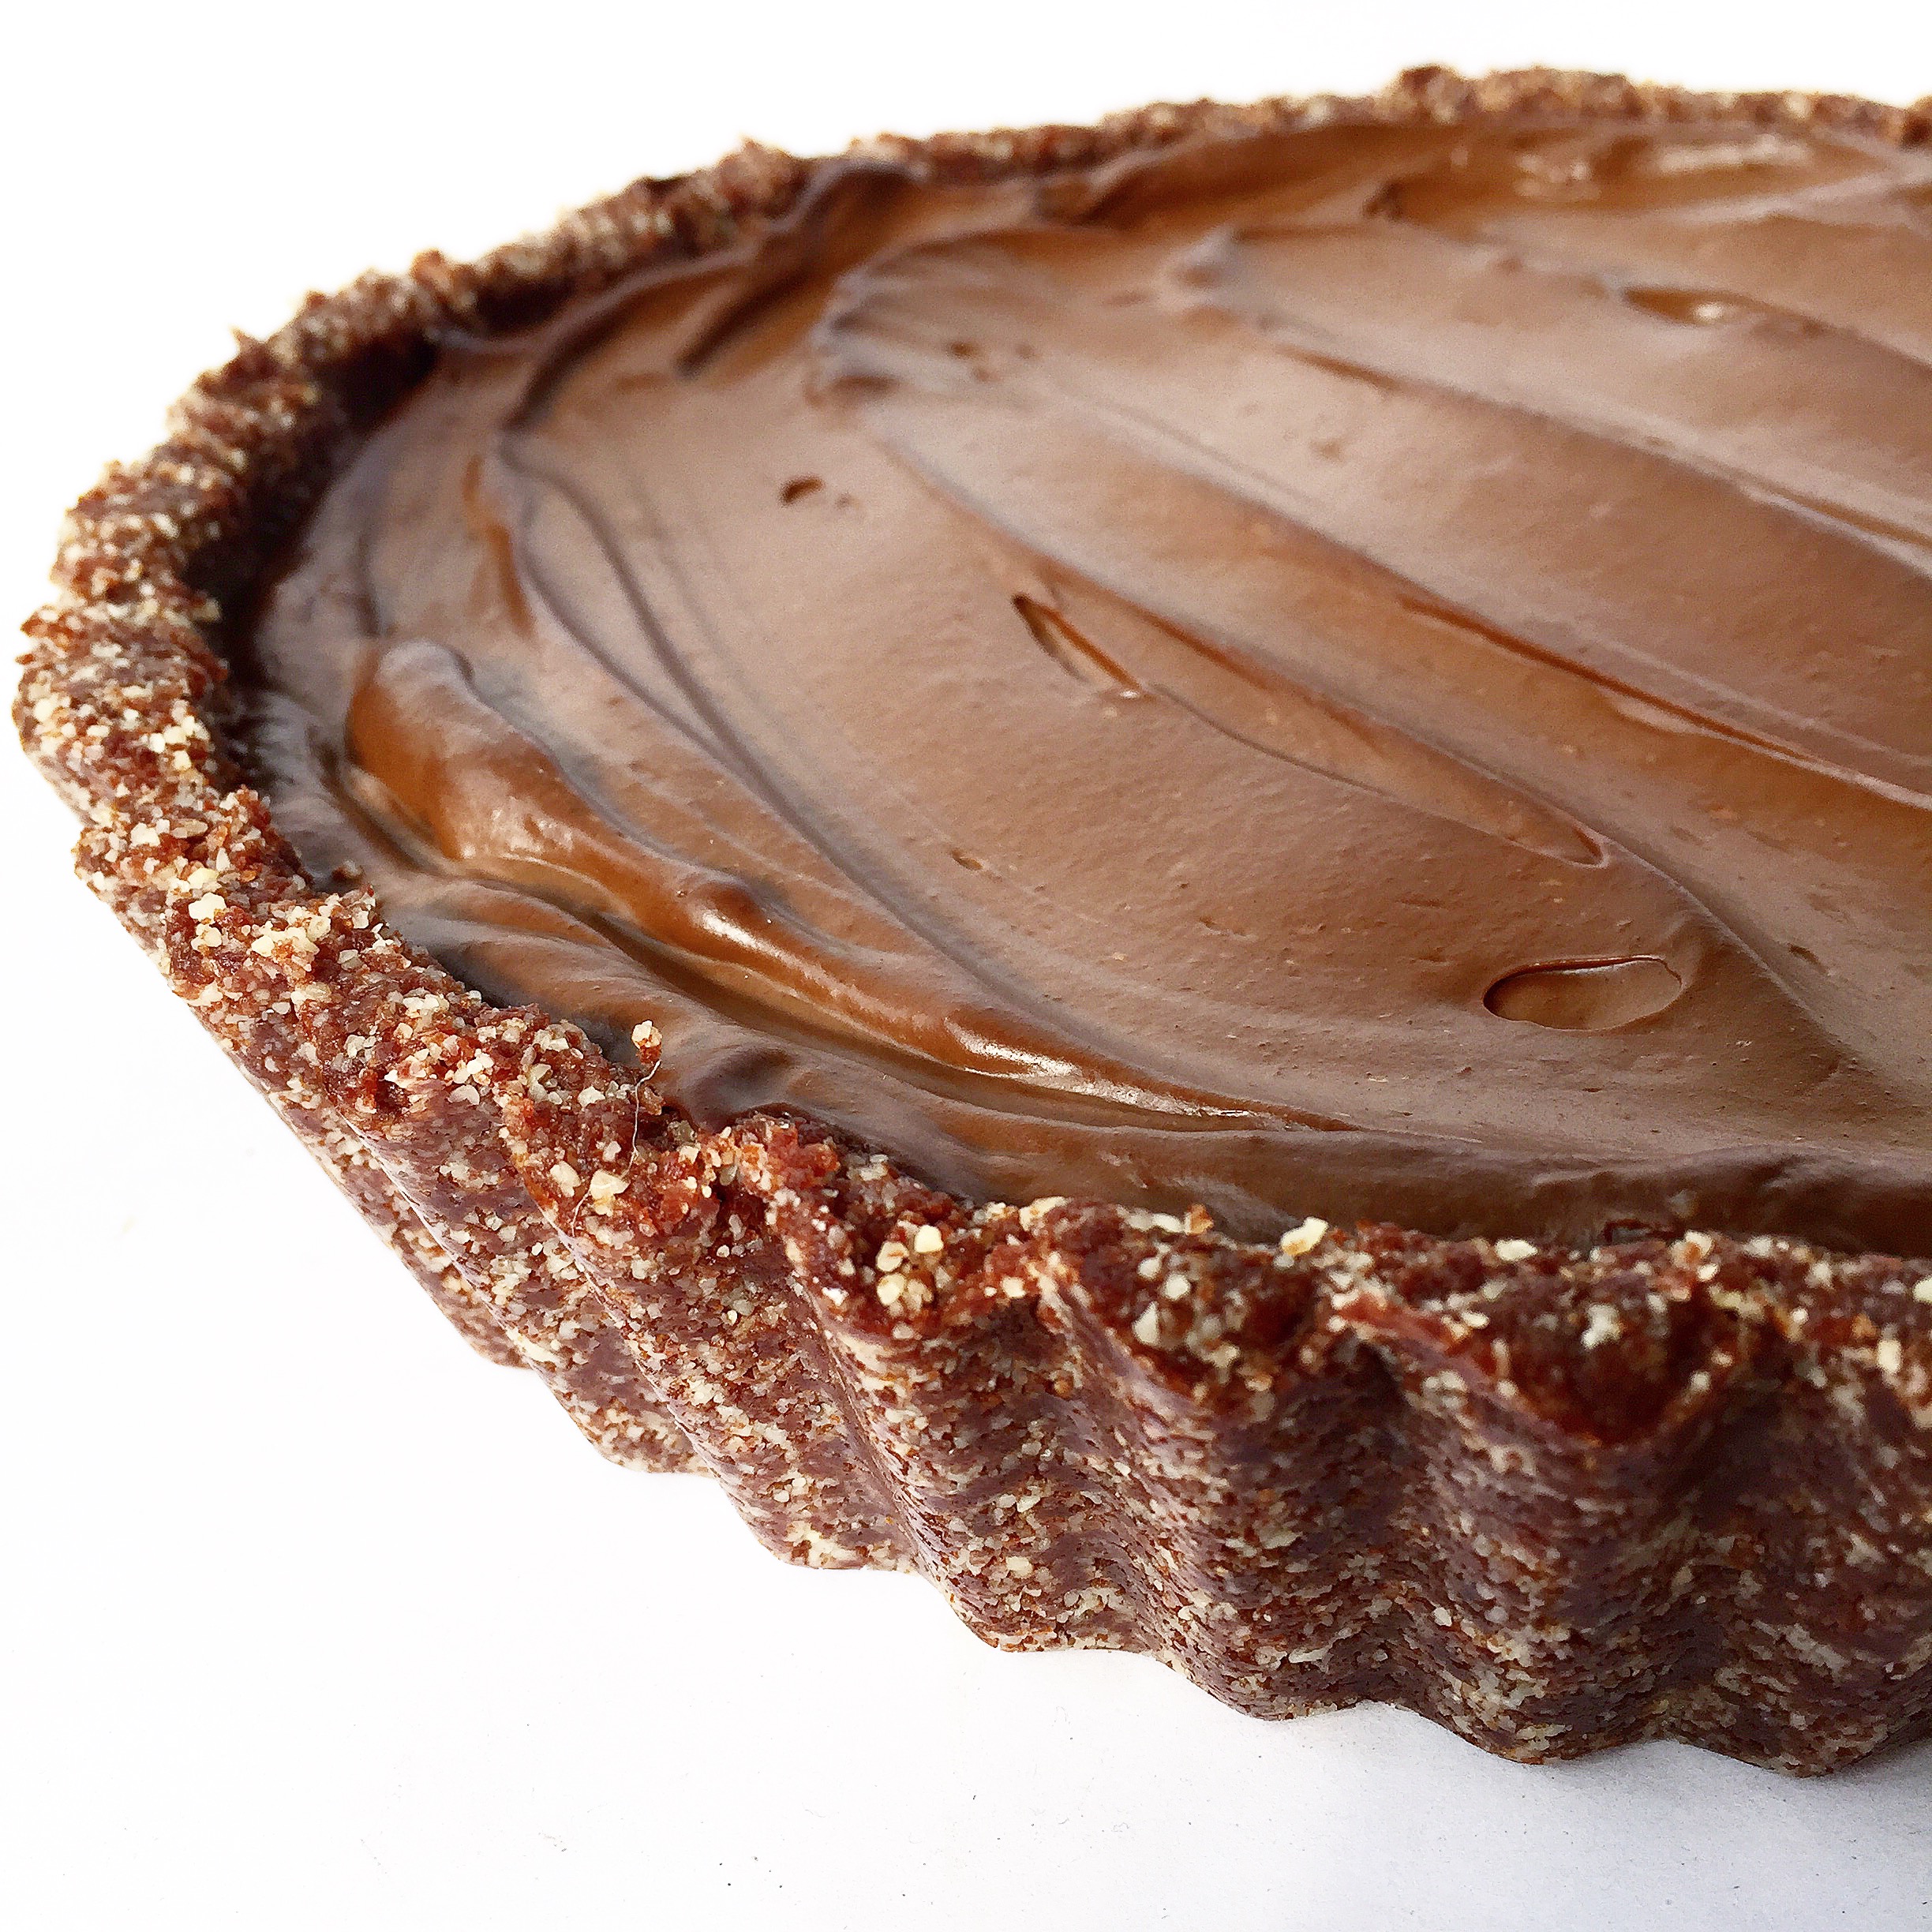
With Valentine’s Day just a week away I’m sure chocolate is on everyone’s mind. So I thought I’d show you that it doesn’t have to be unhealthy or “fattening.” Chocoholics round the world rejoiced when the experts started saying “chocolate is good for you.” But some of you may have been confused by this statement… after all, chocolate is full of sugar, right? So how do you get all those amazing benefits of raw cacao without the toxins of refined sugar, dairy and other additives such as emulsifiers and thickeners? Raw chocolate!

This was one of my favourite discoveries when I started this lifestyle… and it really is simple to make. By omitting all the bad stuff, and keeping the raw cacao at low temperatures so that you don’t destroy the nutrients, you’re giving your body one of nature’s most nutrient dense foods. Raw cacao is rich in anti-oxidants, is good for cardiovascular health and fights cancer. It also contains phenylethylamine, which is a mood enhancer. That explains the “feel good” effect of chocolate! 🙂

What is the difference between cacao and cocoa? Cocoa is what you probably grew up with… it is made from cacao beans but has gone through processing which means a loss of nutrients. To get the full benefits of the cacao bean, and a high-quality chocolate, make sure you only buy organic raw cacao products.

My chocolate recipe uses raw cacao paste as well as cacao butter. If these are not available to you, or you first want to see what this is all about before spending money on those products, you can make raw chocolate using coconut oil and raw cacao powder.

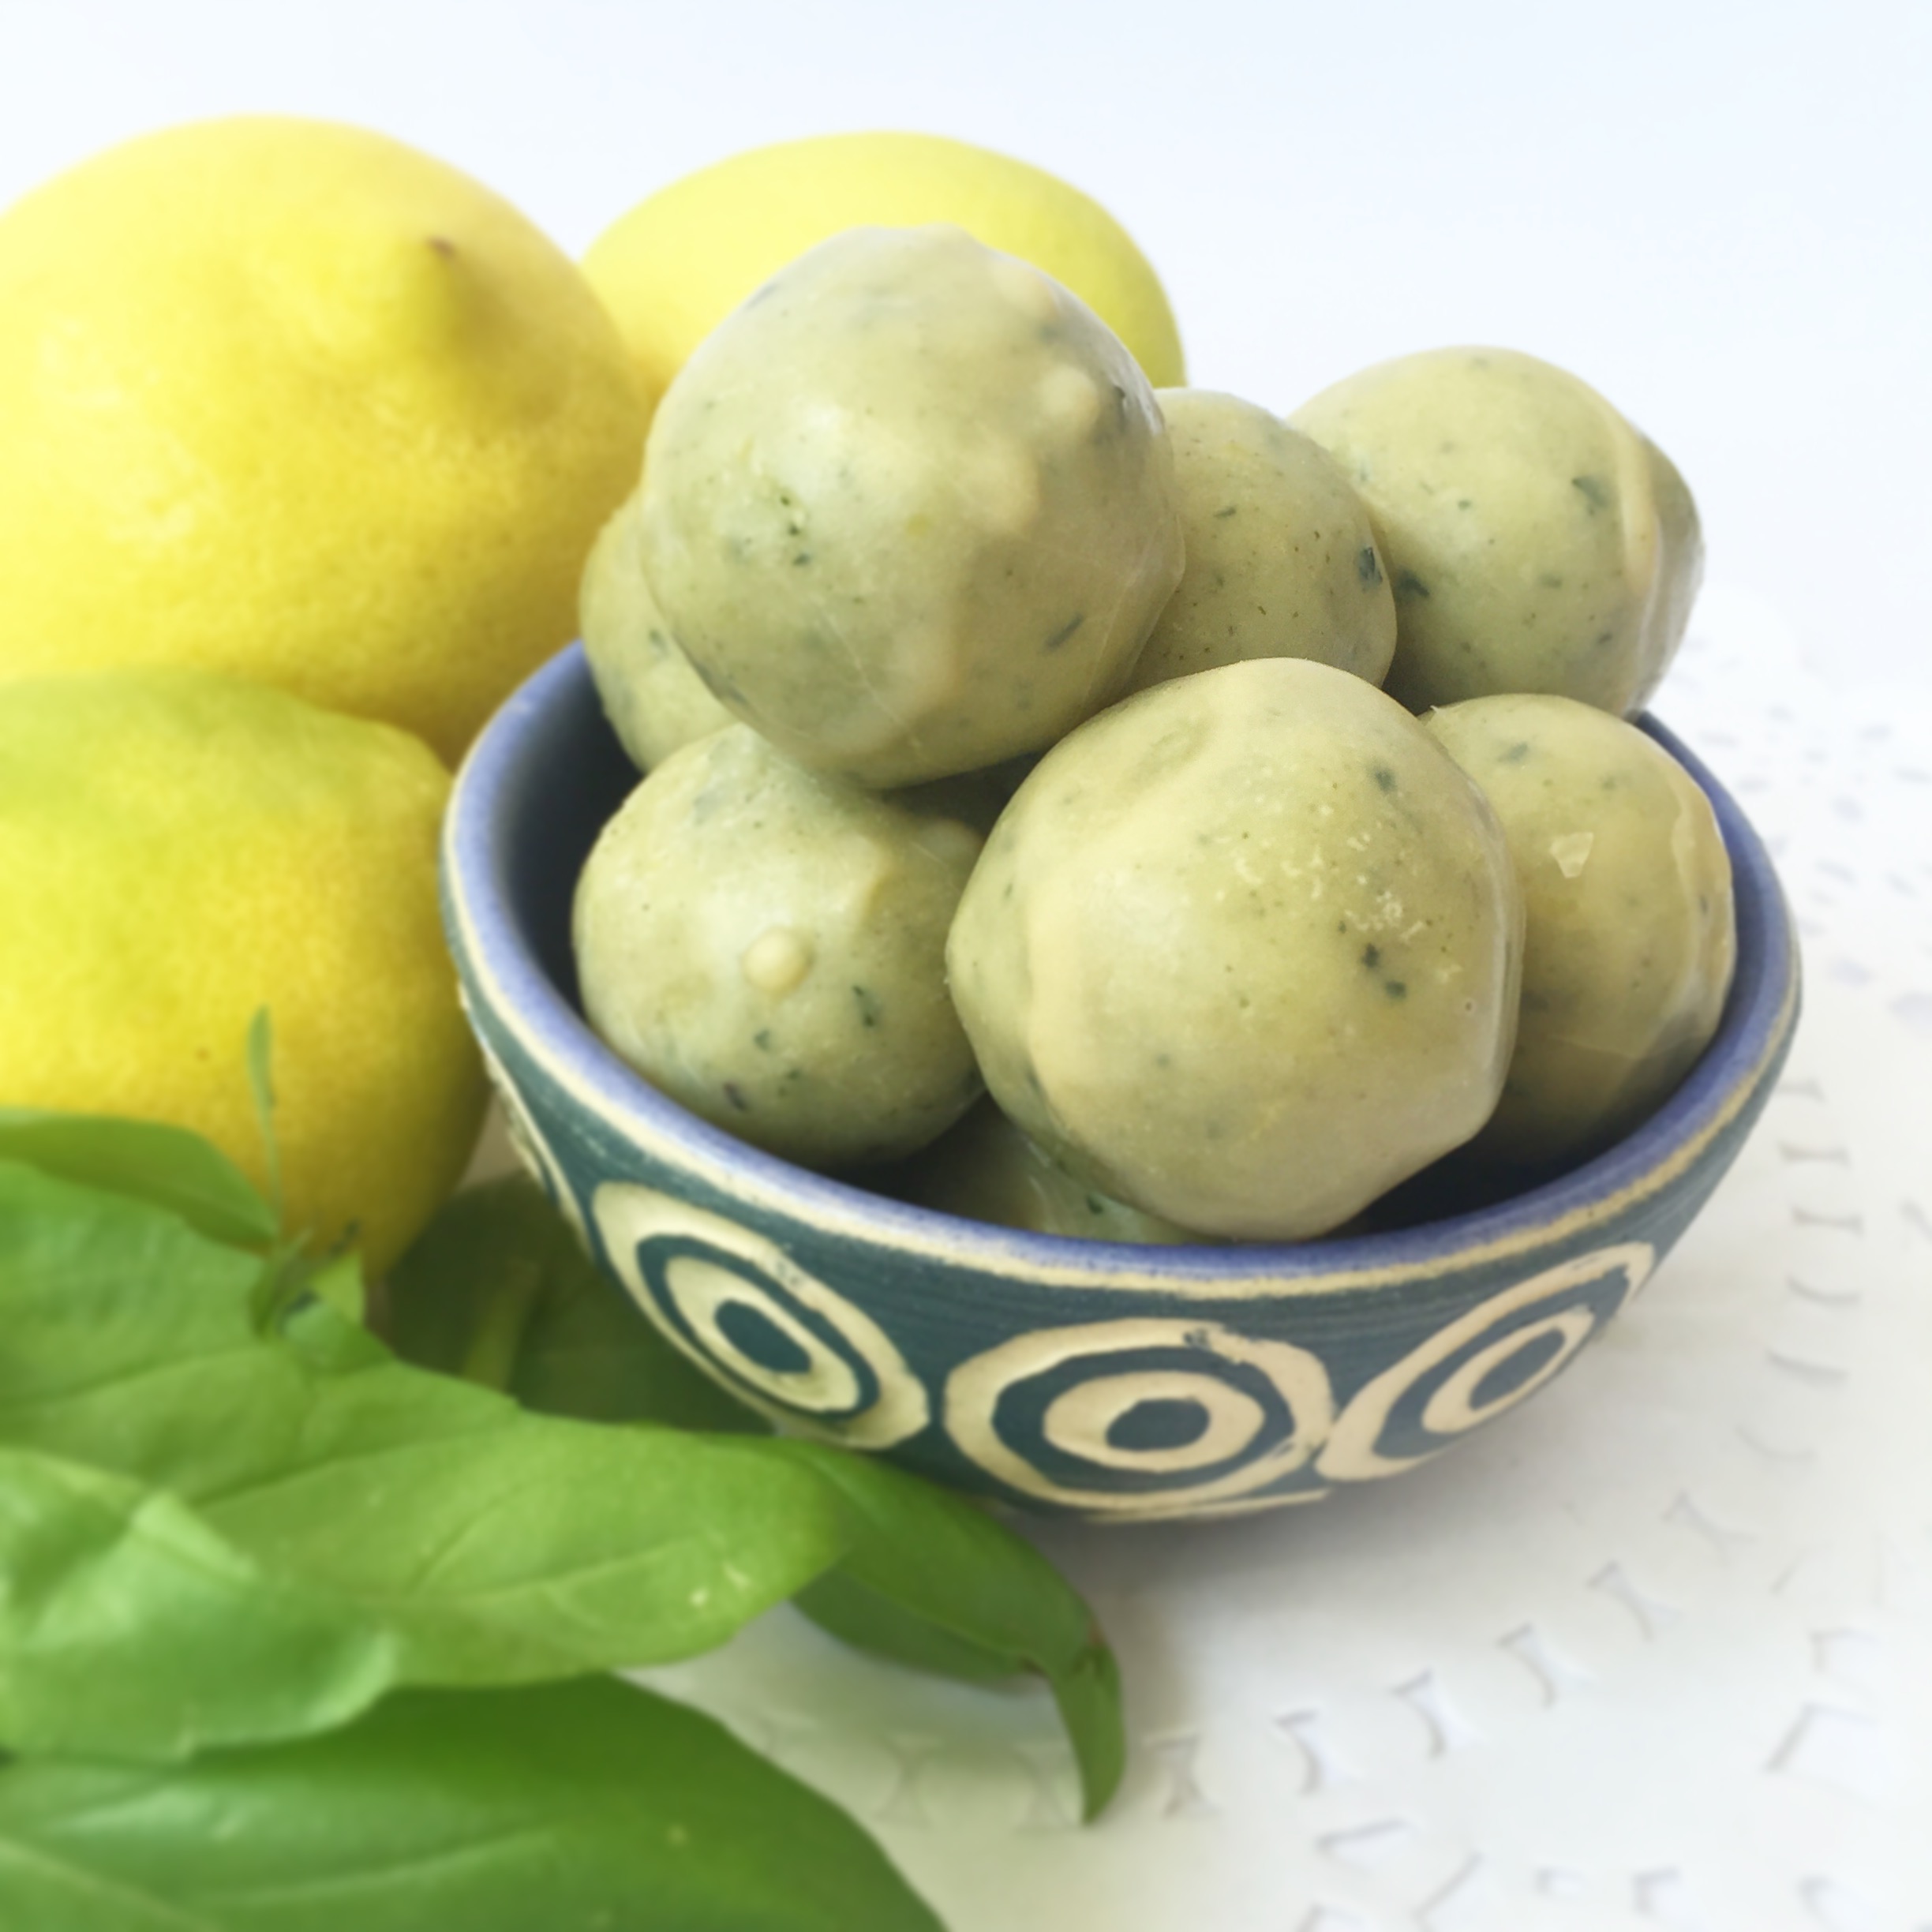
Maca is a root grown in Peru, which comes from the radish family. It has been revered for over 2000 years for its ability to provide stamina, mental clarity and aid fertility. It is believed to be an excellent aphrodisiac, particularly when paired with raw cacao. It has a bit of an odd taste (I must admit at first I didn’t like it!) but adding it to my raw caramel is a good way to start… the result is heavenly!

Ingredients

1 x Raw Caramel recipe
2 tbsp maca powder

Chocolate recipe #1:

75g raw cacao paste
25g raw cacao butter
30ml runny raw honey or organic maple syrup
1/4 tsp organic stevia leaf powder (alternatively, use 60ml honey or maple)
pinch of himalayan salt

Chocolate recipe #2:

90ml coconut oil
90ml runny raw honey or organic maple syrup
125ml raw cacao powder

Method:

Add the maca powder to the caramel ingredients when blending. Set aside.

For chocolate recipe #1, place all the ingredients in a glass or stainless steel bowl which can fit over a saucepan. Bring some water to a simmer in the saucepan, and set the bowl over it. The trick with chocolate is to only ever use gentle heat, and to heat all the ingredients together. If you try to melt the cacao over direct heat, or add cold honey to it once it’s been melted, it will seize. Use a whisk to stir the chocolate until everything is melted, well combined and glossy.

For chocolate recipe #2, place the coconut oil and honey or maple in a glass or stainless steel bowl which can fit over a saucepan. Bring some water to a simmer in the saucepan, and set the bowl over it. Gently melt the oil and honey, using a whisk to combine. Remove from the heat and add the cacao powder, using the whisk to combine well.

Fill your heart mould with chocolate one third of the way. If you don’t have moulds, ice trays work just as well. Place in the freezer until set. Now use a small spoon to drop some caramel onto the set chocolate, trying to avoid the sides of the mould.

Maca Caramel Chocolates 2

Place in the freezer again for a few minutes to harden, so that pouring more chocolate over the caramel doesn’t melt it. If your chocolate is no longer pouring consistency, heat it gently again over the simmering water. Fill the moulds with chocolate so that it pours around the caramel, and covers it. Place in the freezer again until set. These chocolates do need to be kept in the fridge as they can melt at room temperature, especially if you’ve made the coconut oil version. I keep mine in a glass jar, and they can last up to a month (at least, that’s the longest mine have ever lasted before being eaten!)

I hope these will put you in the mood for Valentine’s Day!

Health & happiness.

Love,
Raine