Homemade Coconut Yoghurt

Coconut Yoghurt

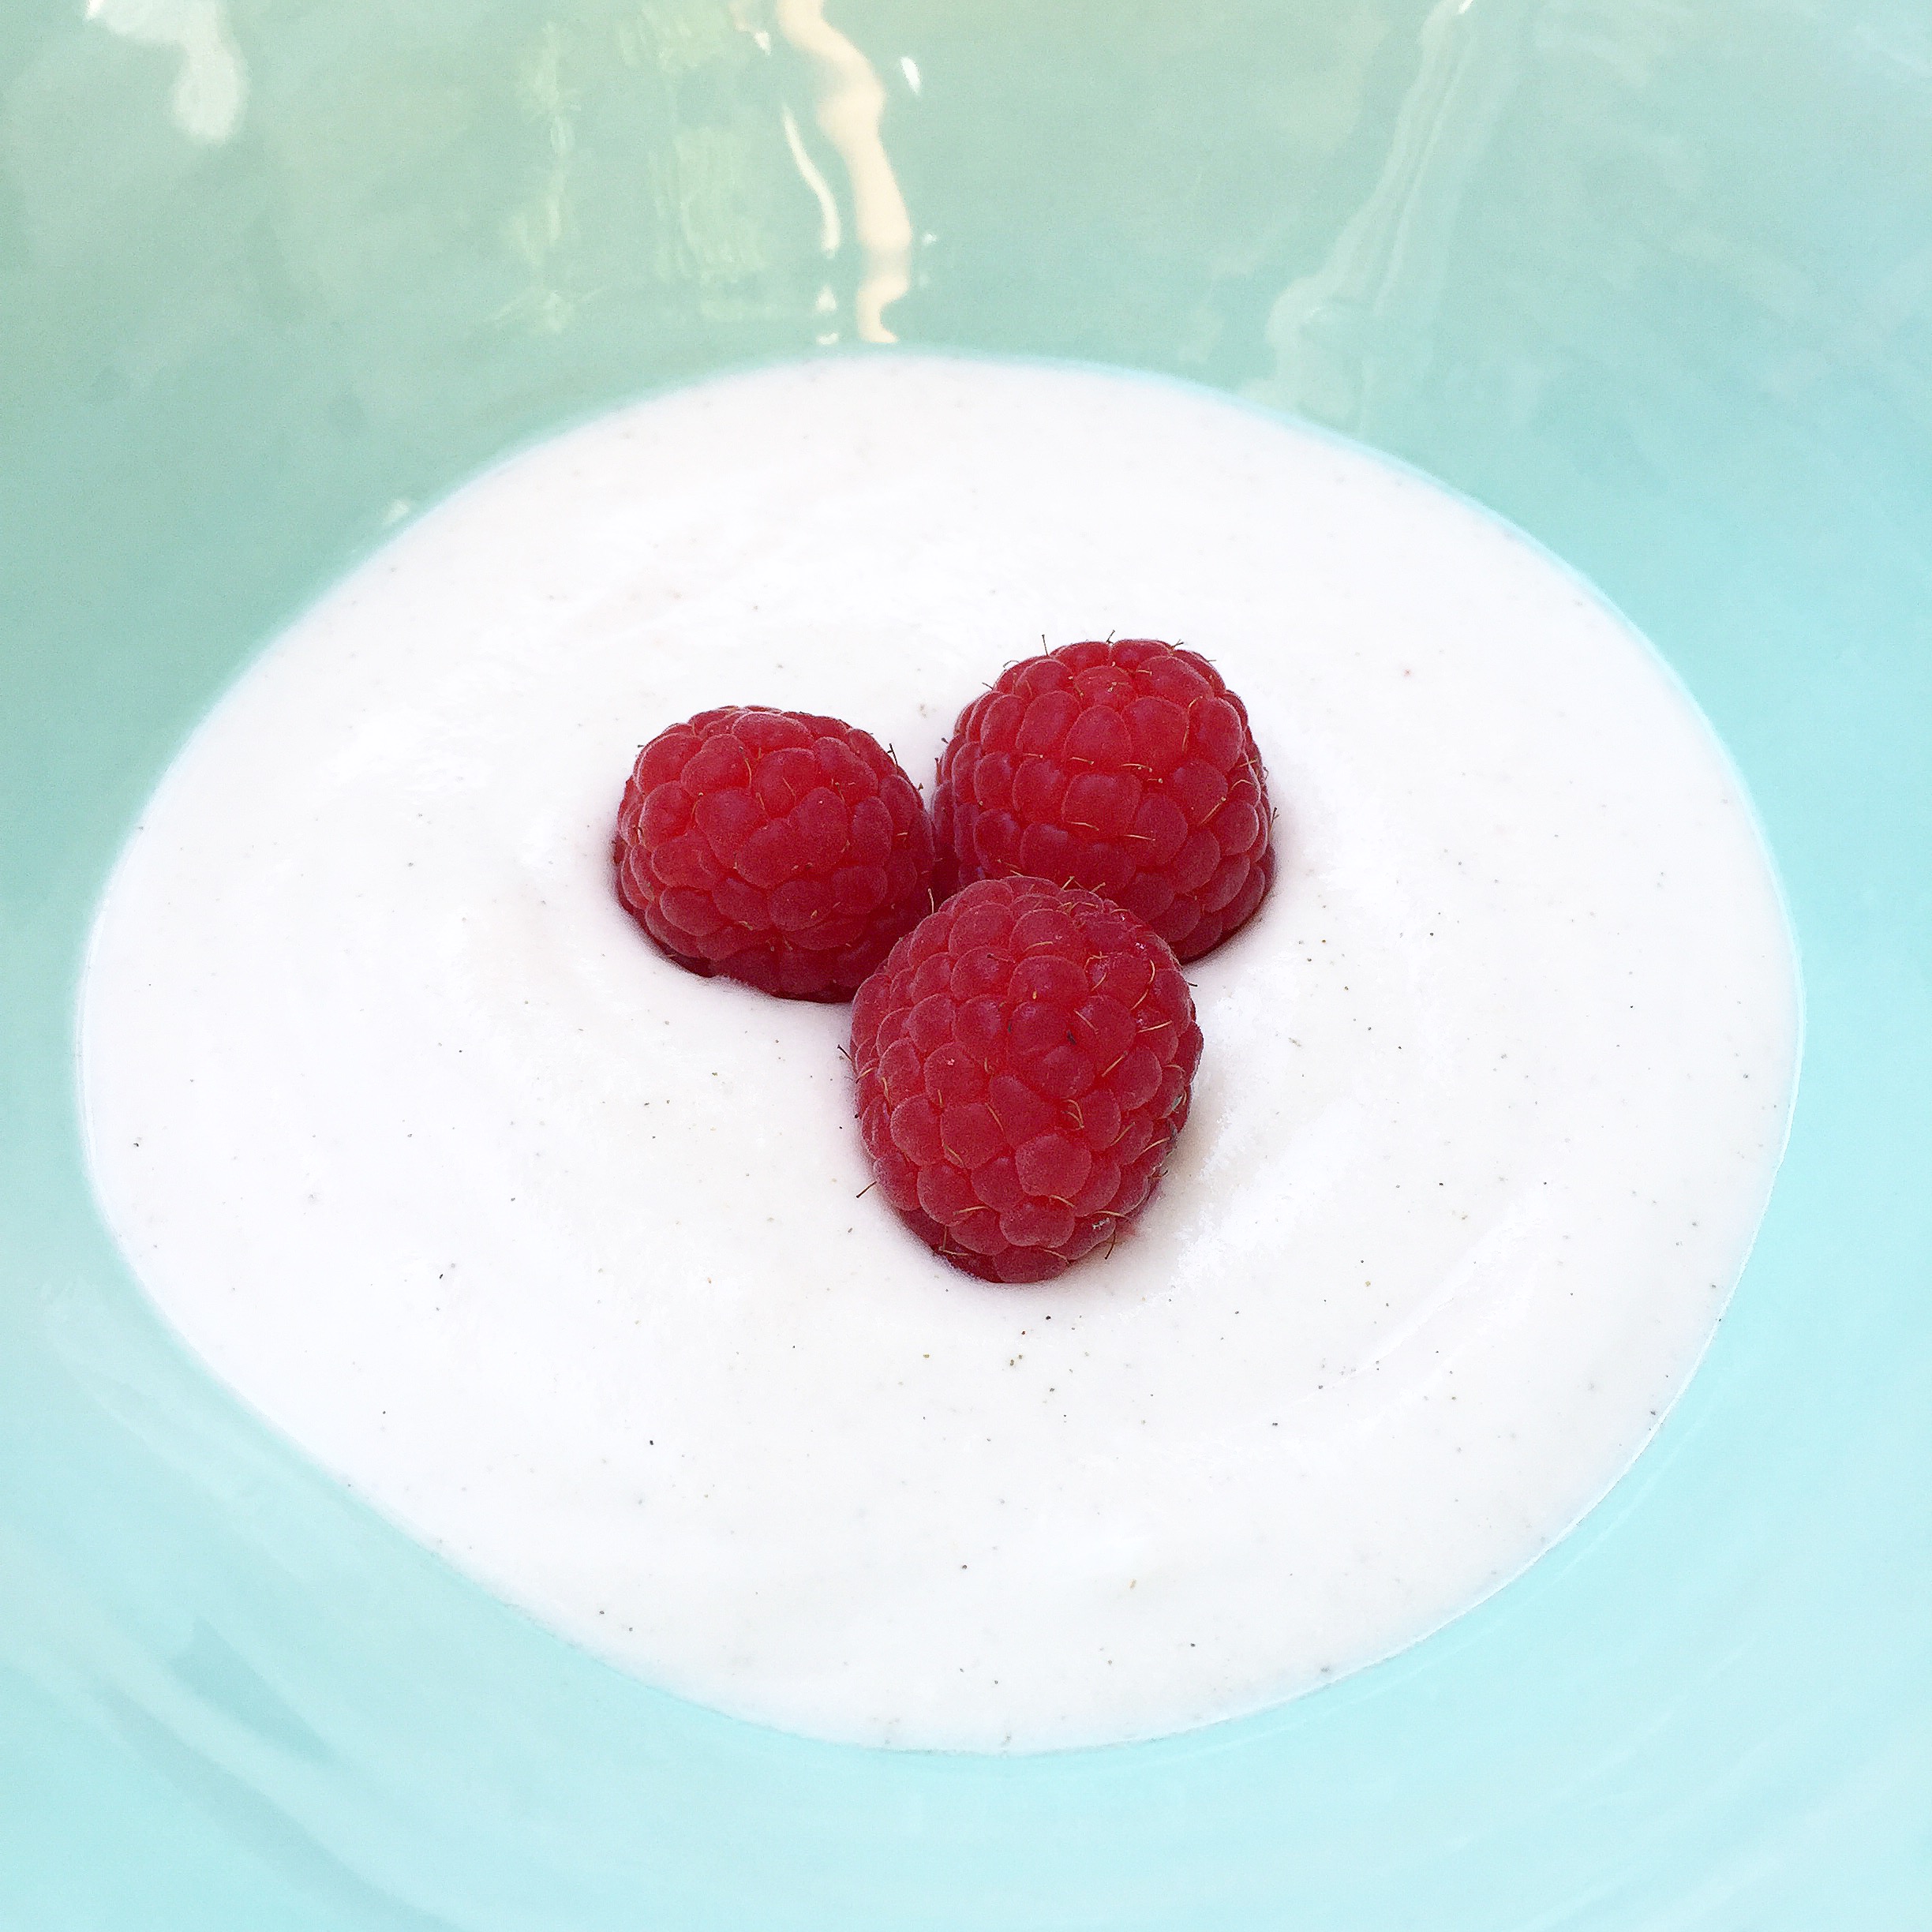
When I first started cutting out dairy, yoghurt was the hardest thing to give up… in fact I didn’t think I’d ever be able to do it! I’ve spent a lot of time working on my coconut yoghurt recipe and have finally come up with the perfect one. I normally make my own coconut milk from fresh coconut but you can also use an organic tinned coconut milk or cream. No dairy, sugar, artificial colours or flavours, but still thick, creamy and delicious 🙂 Need I say more?

Ingredients

160g fresh mature coconut flesh
350ml hot water (or replace the coconut and water with 420ml organic coconut milk or cream)
1/3 tsp agar agar powder (flakes require different measurements so make sure you are using powder)
1/4 tsp himalayan salt
1/4 tsp organic stevia leaf powder or 1 tbsp organic maple or raw honey
20ml baobab powder
1 tbsp of a high quality liquid probiotic, or the contents of 2 probiotic capsules
A glass jar, a piece of netting or breathable cloth, and an elastic

A note on making yoghurt

Two things are very important when making yoghurt: Firstly, the quality of the probiotic you use and secondly, hygiene. If you do not have a good quality probiotic it will not culture into yoghurt and you will merely have a nice tasting coconut cream. On the other hand, if you don’t sterilise the glass jar and wash your hands properly, you may end up culturing other bacteria. This won’t taste good and may even make you sick!

I’ve tried a few different probiotics and have found the best result with a liquid probiotic. I use Sambiotica or Nature’s Choice Ultimate Probiotic, available at Dischem.  Alternatively you can use Biogen Pre- & Probiotic capsules also available at Dischem. If you’re not in South Africa, you may need to experiment a bit to find the one that works best.

Probiotic Probiotic2 Probiotic3

Method

Firstly make sure you have a sterilised glass jar for fermenting the yoghurt. The easiest is to put it in a dishwasher, otherwise you can boil it for 2 minutes. Turn it upside down on a rack to dry. Also make sure that your hands are thoroughly clean!

Blend the coconut and hot water for 30 to 60 seconds in a high speed blender and then strain through a nut milk bag or muslin. Place the resulting cream in a saucepan. Sprinkle the agar over the cream and use a whisk to thoroughly combine. Bring up to a gentle simmer, and simmer for 3 minutes exactly. Agar needs to be heated to activate it, but over heating will destroy it and it will not thicken. Remove from the heat.

Once the coconut cream has cooled down to body temperature, whisk in the remaining ingredients. If you add the probiotic while it is too hot, you will kill the cultures. Remember that bacteria are living things so treat them as such… they like to be warm and fed 🙂 Cover the jar with a cloth that breathes and use an elastic to secure it.

Coconut Yoghurt 2

Leave the jar in a warm place for about 24 hours. If it is particularly hot, 18 hours may be enough. If it’s very cold, gently warm your oven, turn it OFF and then place the jar inside. After a day the cream will have cultured into yoghurt and you can refrigerate it. In the fridge it may culture and thicken further. You should eat it within about a 10 days, if it lasts that long!

Health & happiness.

Love,
Raine

Deliciously Ella’s Sweet Potato Brownies

Sweet Potato Brownies

I love Deliciously Ella’s recipes and always meant to get round to making these so here they are! Funny, you’d think, using sweet potato as the main ingredient but it really works! I have a dinner party tomorrow night where I’ve been asked to make gluten, dairy and sugar free desserts so this is going to be one of them.

For the recipe and more amazing healthy recipes go to http://www.deliciouslyella.com

Love,
Lauren

Lemon & Basil Truffles

Lemon & Basil Truffles

I love to use savoury flavours in desserts, and in these truffles the basil compliments the lemon really well. They are perfect to finish off a dinner or to give as a gift. Put them in a pretty glass jar and tie a ribbon around the neck… people always appreciate something that you have made yourself!

Ingredients

200g creamed coconut (or coconut butter, not coconut oil)
zest of 3 lemons
30ml lemon juice
1 tbsp honey
1/2 tsp organic stevia leaf powder
pinch of organic vanilla powder or 2 drops vanilla extract
1 tbsp baobab powder
pinch of himalayan salt
2 tbsp chopped fresh basil
about 40g cacao butter
an empty egg carton and toothpicks

Method

Place all the ingredients except the basil and cacao butter into a food processor. Process until well combined. Then add the chopped basil and pulse to combine. If the mixture is very soft you can refrigerate it until it firms up. Take about a heaped teaspoon of mixture at a time and use your palms to roll it into a neat ball. Place on a plate as you go. You should get about 21 truffles. Place them in the freezer to harden.

In a small saucepan, gently melt the cacao butter (don’t be alarmed that it turns brown as it melts, this is normal.) You will need to melt more cacao butter than what you actually end up using – simply allow the remainder to set again and return to the packet. Spear a truffle onto a toothpick and then dip it into the melted cacao butter, swirling to remove any excess and ensure an even coating.

Lemon & Basil Truffles 2

Then stick the other end of the toothpick into an empty egg carton, allowing the cacao butter to set.

Lemon & Basil Truffles 3

Repeat with all the truffles. Once they have set you can give them a second coating if you like, and then keep them refrigerated. This is actually the first time I’ve made truffles in years and I really enjoyed the process, but if this seems like too much hard work for you, you can omit the last step of coating them in cacao butter!

Health & happiness 🙂

Love,
Raine

Courgette Pasta with Sauteed Mushrooms and Vegan Pesto

Zoodles

OK I may have gone a little overboard with the sauce, it’s just so yummy! But you may want to tone yours down and add less sauce, or as much as you want to get it as creamy as you like.

It seems that everyone is jumping on the spiralizer bandwagon these days which is great! All these utensils give us more resources to be able to cook healthily more often, and in less time. It honestly takes about 60 seconds to put two courgettes through a spiralizer. I decided to go for a tagliatelle shape this time. I had some mushrooms and leeks in the fridge along with my courgettes so decided to mix all three together and the result was delicious. Added to it my creamy Vegan Pesto, you can’t go wrong! Either as an accompaniment to a meal or as a meal itself with some salad – just yum!

Ingredients

2 courgettes (zucchini)
About 6/7 chestnut mushrooms or any smallish mushroom
1 leek
1 tsp extra virgin olive oil
Salt and pepper to taste
1 x vegan pesto recipe

Method

First spiralize your courgettes and set aside. If you don’t have a spiralizer you can use a potato peeler. (Spiralizers are quite cheap and really great to have around.)

Chop your mushrooms and leeks.

Heat some olive oil in a deep saucepan and when hot, add the mushrooms and leeks. Stir for a while, until the mushrooms start to release juices, then add a little salt and pepper. After about 7-10 minutes, once they smell delicious, gently pour away the excess liquid.

Put the saucepan back on the hob and add the courgette. Mix well, then add the pesto sauce and mix around until all is hot. Serve hot and sprinkle a few pine nuts on the top.

Enjoy!

Love,
Lauren

Vegan Pesto

Vegan Pesto

A quick and simple recipe for a yummy, healthy pesto that also happens to be high in vitamins and vegan…

Ingredients

1 ripe avocado
Quarter cup extra virgin olive oil
5 tbsp lemon juice
5 Brazil nuts
Handful pine nuts
2 cloves garlic
Handful kale
Pinch Himalayan salt

Method

Simply place all the ingredients, apart from the kale, into a food processor and blitz until fully incorporated. If it’s too thick add some more olive oil. Once ready add the kale and blitz once more until you can see little bits of the kale incorporated.

Enjoy!

Love,
Lauren

Original Arab Israeli Hummus

Original Hummus

Firstly, please excuse the poor quality of the picture; my husband took my camera to work so I’m using my phone and it’s a bit ‘shadowy’. Anyway, onto the important part! HUMMUS! I’ve already posted on here my Turmeric Hummus and Roasted Red Pepper Hummus recipes, but I thought I’d do plain, original hummus.

There is a place in Jaffa (Israel) where I go to every time I’m there. It’s run by Arab Israelis and if you didn’t know about it, you’d never go in because it looks like a dive! It’s one small room with wooden tables, plastic chairs and the only thing they serve is hummus and drinks! They make the hummus in the morning, early,  and they close when it runs out. You go in (no later than midday otherwise there’s none left) sit down, they ask what you want to drink and then bring you a plate of hummus and some pitta bread and you just sit there dipping away. It’s seriously the most amazing tasting hummus in the world and I’m trying to replicate it myself and this is the closes I have come…

Ingredients

2 tins organic chickpeas (drained and rinsed)
Quarter cup purified water
2 tbsp tahini paste
5 tbsp lemon juice
4 tbsp olive oil
Half tsp Himalayan salt
4 cloves garlic, minced

Method

Simply blend all ingredients together in a high speed blender until completely smooth – it really is as easy as that! Enjoy with gluten free bread, crackers, rice or quinoa cakes or veggies.

Enjoy!

Love,
Lauren

Spelt Flour Banana Bread

Spelt Banana Bread

Everyone loves a bit of banana bread in the afternoon with a cup of tea, right? And everyone loves it more when it’s guilt free! I’ve tried this recipe with coconut flour, buckwheat flour and spelt flour and spelt seems to give it the most moist consistency. This is wheat free but not gluten-free as spelt does in fact contain gluten but the gluten in spelt has a different molecular make up which means that the body handles it differently. Gluten is a sticky substance with a consistency like glue (hence the name) which is difficult to digest (imagine chewing gum finding its way through your system) but which also gives dough its elasticity and allows bread to rise.

As the genetic make-up of spelt is different to wheat it is a grain that many people who suffer wheat intolerance or sensitivity may be able to use. The molecular structure of the protein in spelt is both brittle and soluble, allowing it to be assimilated more easily, so give it a go and see how it makes you feel. I know I’m totally fine with spelt; it never bloated me and never made the arthritis flare…
This really is a fool-proof recipe that always works!
Ingredients
Wet ingredients:
3 extra ripe bananas, mashed
1/4 cup vegan margarine or coconut oil
1/4 cup maple syrup
2 tbsp almond milk
2 tsp vanilla extract
2 free range organic eggs
Dry ingredients:
1 1/4 cups spelt flour
2 tsp baking powder
2 tsp cinnamon
Method
Preheat the oven to 180 and grease a loaf tin with coconut oil.
In a medium bowl, mix all the wet ingredients, mashing the bananas first.
In another bowl, mix all the dry ingredients.
Add the dry ingredients to the wet and mix really well until well combined.
Pour into the loaf tin and bake for 40-45 minutes or until a fork comes out dry but you still want it moist inside!
Tag us in pictures of this one on Instgaram if you make it please! Our Instagram is @twokitchensonelifestyle
Love,
Lauren

Chocolate Birthday Cake with Berry Chia Jam & Chocolate Mousse Icing

Chocolate Birthday Cake

For my son’s first birthday I made a cake without refined sugar but still used stoneground wheat flour and organic butter. Last year for his second birthday I was determined to come up with a completely clean cake recipe, so I began The Cake Trials (which you may have seen if you followed my old Instagram account @unsinfully_divine.) I must have baked about 10 cakes in the month leading up to his birthday, and finally came up with the perfect recipe!
This cake was so good I made it again this year for his third birthday. You would never guess that it is so healthy… it’s rich, moist and has a good crumb (very hard to do with gluten-free baking!) Berry chia jam and my awesome Chocolate Mousse Icing finish it perfectly.

INGREDIENTS

For the cake:

1 1/2 cups rolled oats
70g raw cacao paste
150g pitted fresh dates
180ml boiling water
150ml organic maple syrup
200g organic virgin coconut oil
4 eggs
1/2 tsp organic vanilla powder or 1 tsp vanilla extract
pinch of himalayan salt
2 tsp bicarbonate of soda
1 cup almond flour
60ml raw cacao powder

For the Chocolate Mousse Icing:

320g mature coconut flesh and 1 1/2 cups hot water, OR 2 cups organic coconut cream
80ml raw honey
pinch of himalayan salt
1/4 tsp organic vanilla powder or 1/2 tsp vanilla extract
5ml agar agar powder (not flakes – they require different measurements)
40ml organic virgin coconut oil
90ml raw cacao powder

For the Berry Chia Jam:

1 cup frozen mixed berries
1 tbsp raw honey
1ml organic vanilla powder
small pinch of himalayan salt
2 tbsp chia seeds

METHOD

Set aside the frozen berries to allow them to defrost.

Firstly make the icing. If using fresh coconut to make your own cream, blend the coconut and hot water in a high speed blender for 30 to 60 seconds. Strain through a nut milk bag. Allow it to cool slightly before squeezing so that you don’t burn your hands! Return the coconut cream to the blender, along with the honey, salt, vanilla, agar agar and coconut oil. Blend until smooth. Pour into a saucepan and bring to a gentle boil. Simmer for three minutes exactly and then remove from the heat. Boiling activates the agar agar, allowing it to set, but over boiling will destroy it, so use a timer. Refrigerate.

Preheat the oven to 160 C. Line two 20cm cake tins with baking paper or silicone liners.

In a clean, dry blender, grind the oats until you have a fine flour. Sift together with the almond flour and 60ml cacao powder. Set aside.

Place the cacao paste, dates, boiling water and maple syrup in the blender. Blend until completely smooth. Add the coconut oil, vanilla and salt, and the eggs one at a time. Blend until the mixture is smooth, thick and glossy. Add the bicarb and blend just to disperse it thoroughly. Pour the mixture onto the sifted dry ingredients and fold them together. Pour into the cake tins, dividing the mixture evenly, and bake for 30 minutes or until a skewer comes out clean.

While the cake bakes, make the jam. Blend the berries with the honey, vanilla and salt. You can make it smooth or leave it chunky, as you prefer. Pour into a bowl and stir in the chia seeds. Refrigerate until needed.

Once the icing has set, blend it again with the 90ml cacao powder. Agar sets much firmer in comparison to gelatine, but blending it breaks up that glassy texture, giving you a smooth and creamy end result. Refrigerate again to firm up.

Once the cakes have cooled, turn them out. Use the berry jam to sandwich them together and then top with the icing.

My son asked for a Maleficent cake. I made two 20cm cakes and two 10cm cakes, and sandwiched them together with the jam. I then used coloured cardboard and ribbon to decorate, rather than using fondant icing which is full of refined sugar and chemical colours which are so bad for kids! Once the cardboard was on, I carefully piped the icing ontop, and placed a Maleficent figurine we got from the toyshop on the top of the cake.

Maleficent Cake

Health & happiness!

Love,
Raine

Roasted Cabbage Wedges

Roast Cabbage Wedges

My weekly Abel & Cole organic fruit and veg box often came with cabbages over the winter, which we love in my house, but I wanted to try and find something new to do with them and I found the easiest way to make them as yummy as possible! A great accompaniment for any meal…

Ingredients

1 cabbage, cut from the base into wedges
2 cups organic vegetable stock
1 onion or leek, whichever you have around, sliced
2 cloves garlic, crushed
Spoonful of olive oil

Method

Preheat the oven to 180.

Heat the olive oil in a pan then add the onion. Once it turns transparent, add the garlic and cook for about a minute before adding the cabbage wedges.

Let them brown on each side before turning over so you brown all sides just slightly before transferring them to an oven dish.

Once in the oven dish, pour the stock over then put in the oven for around 30-45 minutes.

So yummy!

Love,
Lauren

Mango Coconut Ice Cream

mango coconut ice cream

The last few mornings in Joburg have been quite chilly and I’m not at all happy to admit that autumn is definitely on its way. Use the last of our beautiful tropical summer fruit to make this quick and easy ice cream – no dairy or sugar! I’ve frozen it in lolly molds to make it fun for my son, but you could also freeze it as regular ice cream to be scooped on its own or to accompany a dessert.

Ingredients:

650g fresh mango flesh (about 2 mangoes)
1 tin (400ml) organic coconut milk
60ml organic virgin coconut oil
30ml raw honey
1/4 tsp himalayan salt
1/4 tsp organic vanilla powder or 1/2 tsp vanilla extract
1/4 tsp organic stevia leaf powder

Method:

Blend all the ingredients until smooth. Pour into lolly moulds and freeze, or process in an ice cream machine. If you don’t have an ice cream machine, freeze until almost set, then blend again to break up the crystals and return to the freezer.

mango coconut ice cream 2

Health & happiness!

Love,
Raine