Simple Homemade Tomato Sauce

tomato sauce

Every freezer should be stocked with this simple and healthy tomato sauce – it can be used in a myriad of different dishes, and makes life easier for busy moms! Just got home from work and need to make dinner in under half an hour? Defrost this sauce and serve it with some buckwheat or quinoa pasta for a quick but still nutritious family meal.

Tomatoes are high in vitamin C and antioxidants, particularly lycopene. Researchers recently found a connection between tomatoes and bone health, concluding that tomatoes can help to prevent osteoporosis. They are also important for heart health, and have long been hailed as the anti-prostate cancer food of choice.

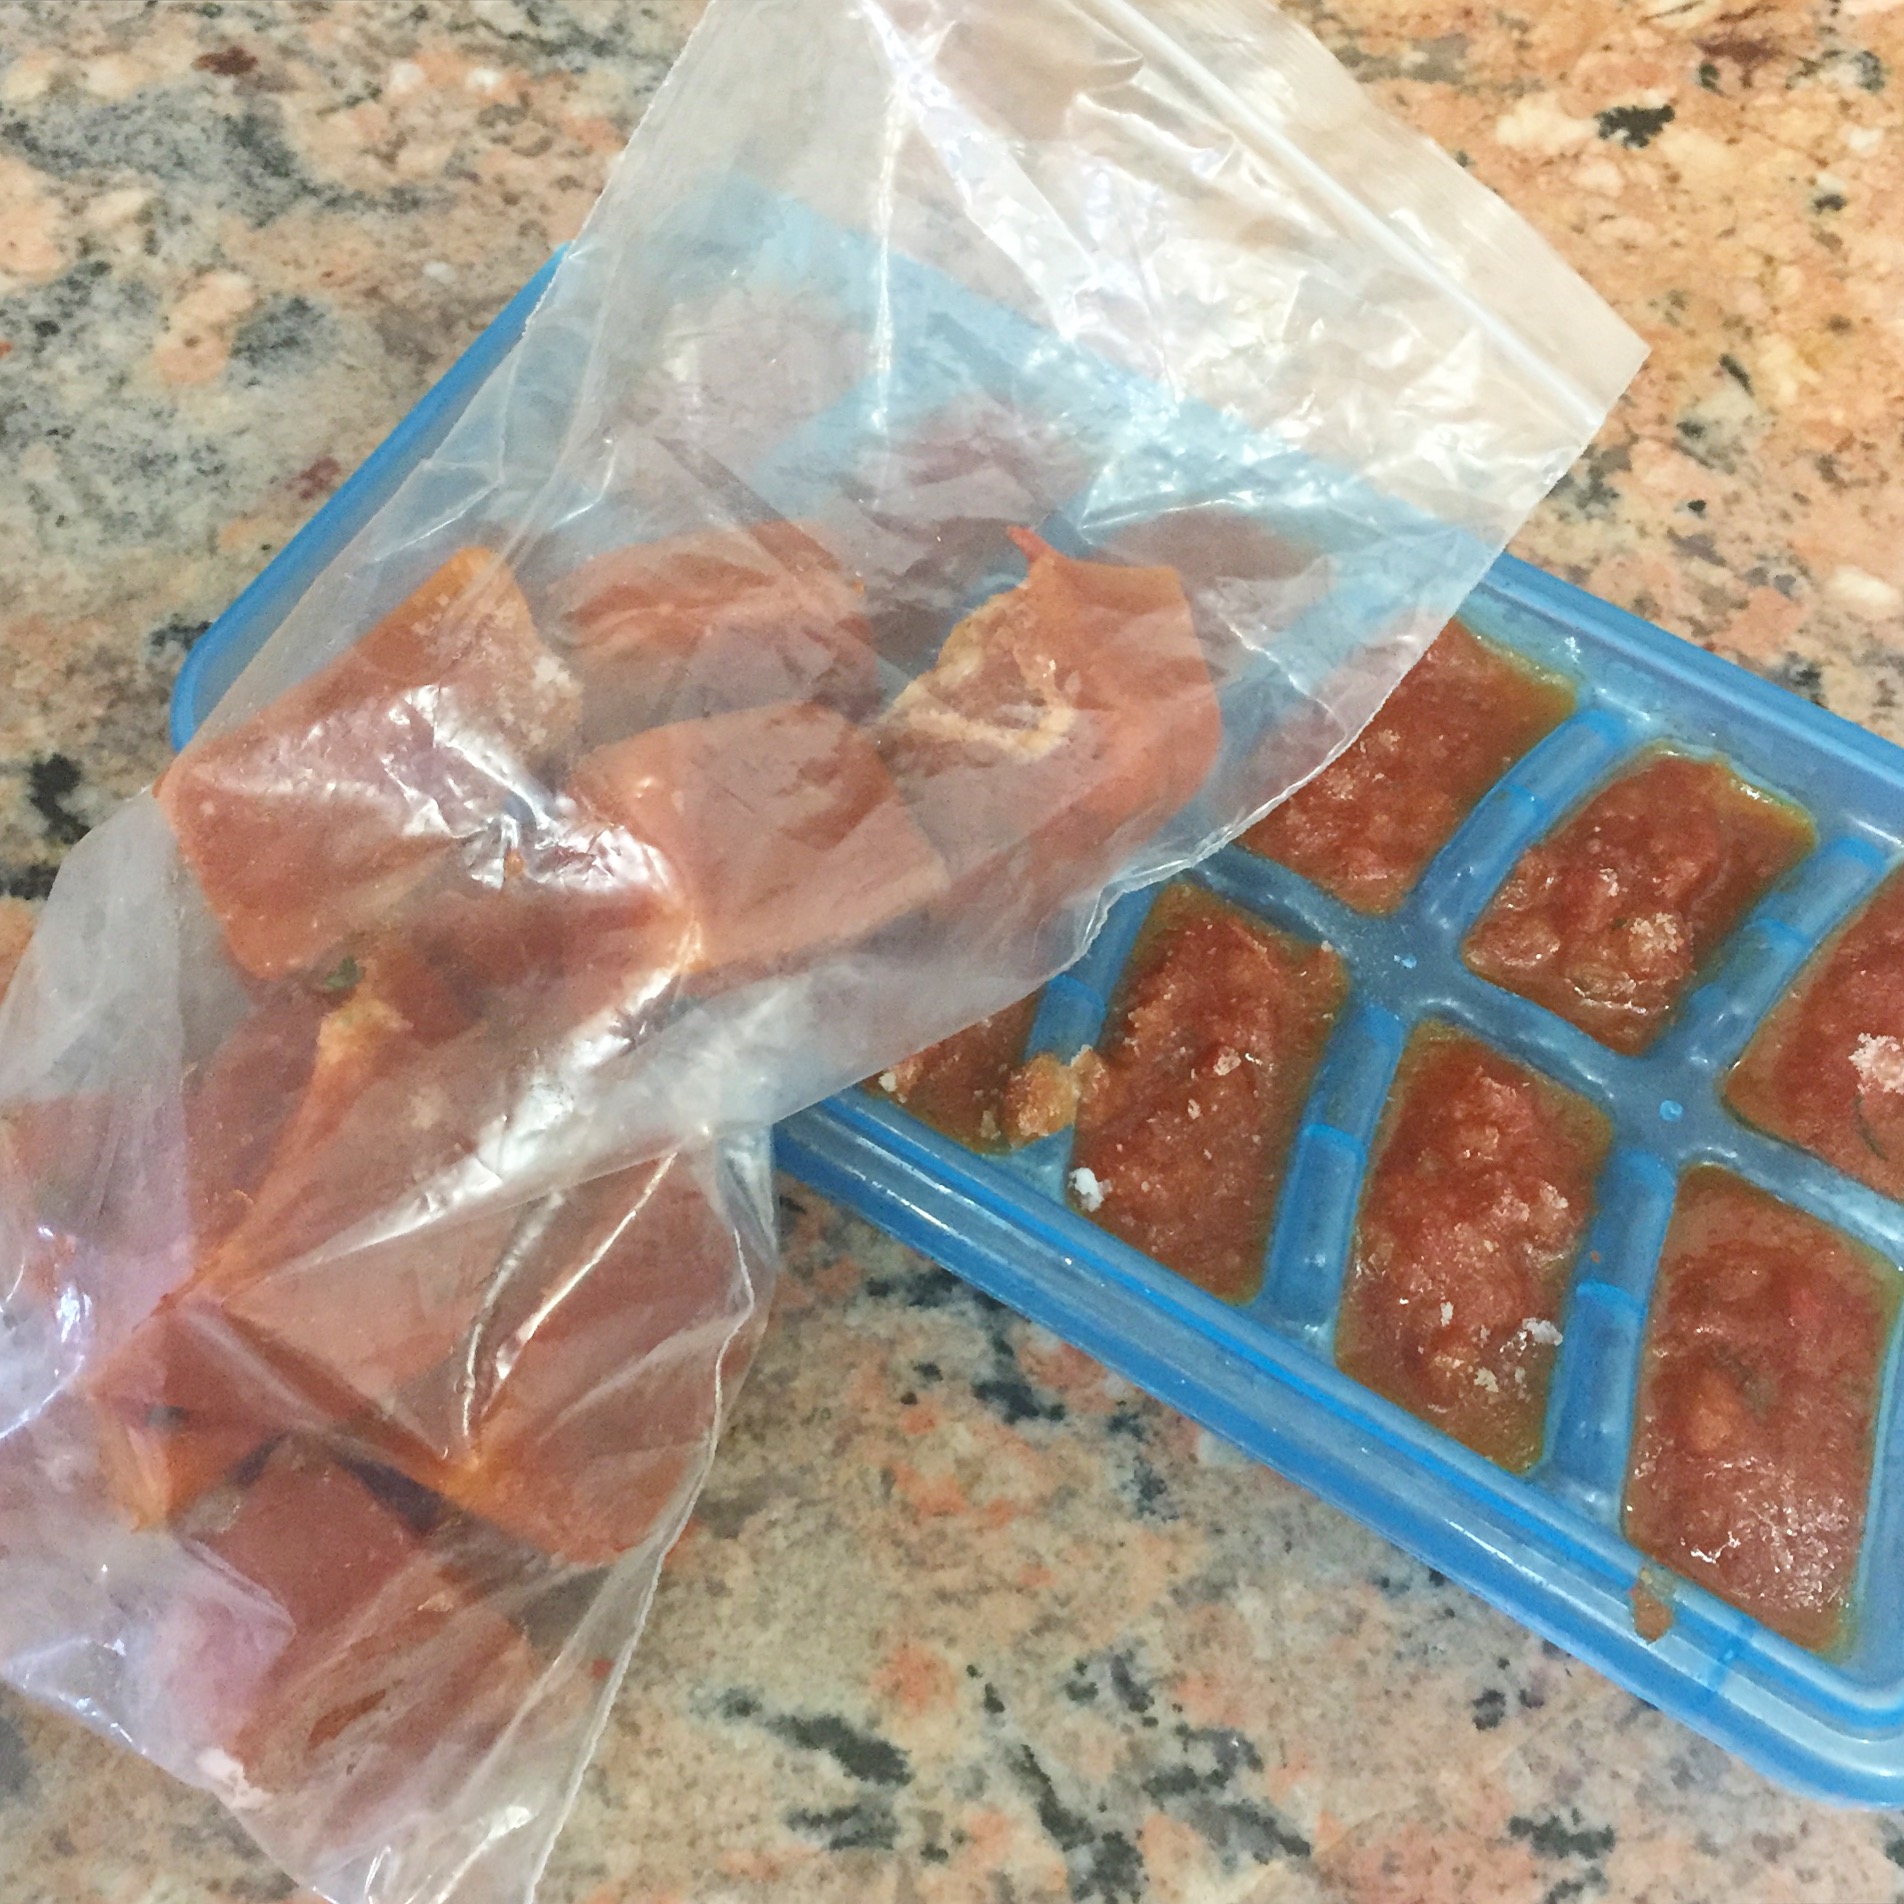
I like to make up a batch of this sauce and then freeze some of it in ice trays, so that I have small portions handy for my son’s meals (I use 2 – 3 cubes for him) and freeze the rest in one portion for a family meal.

IMG_0301

Ingredients

2 large onions, chopped
1 tbsp extra virgin olive oil
6 large cloves of garlic
1/2 cup of red wine (optional)
1.3kg fresh tomatoes, roughly chopped, including seeds
small handful of fresh thyme
2 bay leaves
1/4 cup dried dates
3/4 tsp himalayan salt
a few leaves of fresh basil

Method

Fry the onions in the olive oil until caramelised. Add the garlic and fry for 2 minutes. Add the wine. There should immediately be a cloud of steam, and a strong smell of alcohol. This is the alcohol in the wine cooking off – so don’t worry, there won’t be any alcohol left over in the sauce. You can omit the wine, but it adds depth of flavour.

Add the tomatoes, thyme, bay leaves and dates. Turn the heat down, cover with a lid and simmer for a minimum of 30 minutes. An hour or longer is better – the longer it simmers the more the flavours develop.

Remove the hard stalks of the thyme and then put the sauce in a blender or food processor. For pasta sauces I like a chunkier texture so will use a food processor. For a smoother sauce (for example, for pizza) use a blender. Add the salt and basil and blend until you have the desired consistency. Taste for seasoning and adjust accordingly. Traditionally tomato sauce would have quite a bit of sugar added (you’d be mortified to learn how much sugar there is in store-bought tomato sauce or ketchup!) I avoid this by adding the dates. If you feel that it needs more sweetness, add more dates or raw honey or organic maple syrup. If you feel that it needs more acidity, use fresh lemon or organic apple cider vinegar. This all depends on the natural flavour of the tomatoes you’ve used, so just taste and see!

Use immediately or freeze for future use.

Below are examples of how I would use this sauce:

tomato sauce 2

Here I roasted some aubergine with olive oil, salt and black pepper. I added it to the sauce along with some fresh chilli and basil. Served with buckwheat pasta.

IMG_0299

I fried onion, garlic, carrot, red pepper, broccoli and chilli in olive oil. I added the sauce, cooked brown basmati rice, shredded poached chicken and fresh coriander.

Health & happiness!

Love,
Raine

Raw Chocolate Hearts with Maca Caramel Centre

Maca Caramel Chocolates

With Valentine’s Day just a week away I’m sure chocolate is on everyone’s mind. So I thought I’d show you that it doesn’t have to be unhealthy or “fattening.” Chocoholics round the world rejoiced when the experts started saying “chocolate is good for you.” But some of you may have been confused by this statement… after all, chocolate is full of sugar, right? So how do you get all those amazing benefits of raw cacao without the toxins of refined sugar, dairy and other additives such as emulsifiers and thickeners? Raw chocolate!

This was one of my favourite discoveries when I started this lifestyle… and it really is simple to make. By omitting all the bad stuff, and keeping the raw cacao at low temperatures so that you don’t destroy the nutrients, you’re giving your body one of nature’s most nutrient dense foods. Raw cacao is rich in anti-oxidants, is good for cardiovascular health and fights cancer. It also contains phenylethylamine, which is a mood enhancer. That explains the “feel good” effect of chocolate! 🙂

What is the difference between cacao and cocoa? Cocoa is what you probably grew up with… it is made from cacao beans but has gone through processing which means a loss of nutrients. To get the full benefits of the cacao bean, and a high-quality chocolate, make sure you only buy organic raw cacao products.

My chocolate recipe uses raw cacao paste as well as cacao butter. If these are not available to you, or you first want to see what this is all about before spending money on those products, you can make raw chocolate using coconut oil and raw cacao powder.

Maca is a root grown in Peru, which comes from the radish family. It has been revered for over 2000 years for its ability to provide stamina, mental clarity and aid fertility. It is believed to be an excellent aphrodisiac, particularly when paired with raw cacao. It has a bit of an odd taste (I must admit at first I didn’t like it!) but adding it to my raw caramel is a good way to start… the result is heavenly!

Ingredients

1 x Raw Caramel recipe
2 tbsp maca powder

Chocolate recipe #1:

75g raw cacao paste
25g raw cacao butter
30ml runny raw honey or organic maple syrup
1/4 tsp organic stevia leaf powder (alternatively, use 60ml honey or maple)
pinch of himalayan salt

Chocolate recipe #2:

90ml coconut oil
90ml runny raw honey or organic maple syrup
125ml raw cacao powder

Method:

Add the maca powder to the caramel ingredients when blending. Set aside.

For chocolate recipe #1, place all the ingredients in a glass or stainless steel bowl which can fit over a saucepan. Bring some water to a simmer in the saucepan, and set the bowl over it. The trick with chocolate is to only ever use gentle heat, and to heat all the ingredients together. If you try to melt the cacao over direct heat, or add cold honey to it once it’s been melted, it will seize. Use a whisk to stir the chocolate until everything is melted, well combined and glossy.

For chocolate recipe #2, place the coconut oil and honey or maple in a glass or stainless steel bowl which can fit over a saucepan. Bring some water to a simmer in the saucepan, and set the bowl over it. Gently melt the oil and honey, using a whisk to combine. Remove from the heat and add the cacao powder, using the whisk to combine well.

Fill your heart mould with chocolate one third of the way. If you don’t have moulds, ice trays work just as well. Place in the freezer until set. Now use a small spoon to drop some caramel onto the set chocolate, trying to avoid the sides of the mould.

Maca Caramel Chocolates 2

Place in the freezer again for a few minutes to harden, so that pouring more chocolate over the caramel doesn’t melt it. If your chocolate is no longer pouring consistency, heat it gently again over the simmering water. Fill the moulds with chocolate so that it pours around the caramel, and covers it. Place in the freezer again until set. These chocolates do need to be kept in the fridge as they can melt at room temperature, especially if you’ve made the coconut oil version. I keep mine in a glass jar, and they can last up to a month (at least, that’s the longest mine have ever lasted before being eaten!)

I hope these will put you in the mood for Valentine’s Day!

Health & happiness.

Love,
Raine

Tri-colour Roasted Pepper Salad

roast pepper salad

My mom used to make something similar to this when I was growing up and it was one of my favourite salads. Roasting the peppers and then removing the skin gives them a lovely silky texture. This makes a great accompaniment to a big family Sunday lunch, or is filling enough as a meal on its own.

Ingredients (enough for a table salad, or serves 2 as a meal)

2 red bell peppers
2 yellow bell peppers
1 green bell pepper
1 tin organic chickpeas, rinsed well
about 20 olives (I used Blue Sky Organics chilli-stuffed olives for an extra kick, available at Organic Emporium)
2 tbsp of the liquid from the olives
2 tbsp capers
4 large cloves of garlic, minced
a small handful of fresh basil, torn
2 tbsp extra virgin olive oil
1/2 tsp himalayan salt
juice of 1/2 a lemon (about 2 tbsp)
freshly ground black pepper to taste

Method

Preheat the grill in your oven and then place the peppers about 10 – 15cm under the grill. Allow the skin to bubble and blacken (takes about 10 minutes) and then turn them to do the next side. Continue until the all the peppers have been blackened on all sides. If the skin has not at least bubbled and browned you will not be able to remove it. It needs to look like this:

IMG_0174

Place the cooked peppers in a glass bowl and cover tightly with clingfilm. Leave them to sweat (which separates the skin from the flesh) and cool down enough for you to work with them. Once cooled, peel all the skin off. You just want to remove the very thin outer layer, not any of the flesh.

IMG_0179

Remove the seeds and stem and cut the peppers into strips about 5 cm wide. Cut the olives in half. Combine all the ingredients and taste for seasoning. You can either eat immediately, or leave to marinate for a few hours. Best served at room temperature, not cold from the fridge, so I would suggest taking it out of the fridge at least 30 minutes prior to serving. I ate this as an easy dinner with some gluten-free flat bread. I’m still working on the recipe but will share it as soon as I’m happy with it 😉

Health & happiness!

Love,
Raine

Chocolate Kale Chips

IMG_0162

Technically I cannot take credit for these delicious little miracles… it was my son’s idea! The last time I made a batch of Kale Chips I added a bit of cayenne. He was not very impressed and asked why I put fire in them 🙂 So I asked him what flavour he would like next time and he said chocolate! At first I laughed, and then I started thinking it might actually work. The end result surprised even me… they are so moreish, and you just happen to be eating greens!

Ingredients

150 – 200g kale, weighed after removing the tough centre stem (I’ve used curly kale but you can use any variety)
90g natural peanut butter (I like Jozi’s Nut Butters which you can buy at The Organic Emporium)
2 tbsp organic maple syrup
1/2 tsp organic stevia leaf powder (or double up on the maple syrup)
60ml raw cacao powder
1/4 tsp himalayan salt
60ml water

Method

After removing the tough centre stem, tear the kale into pieces about 5cm square.

Combine the rest of the ingredients with a whisk and pour over the kale. Use your hands and “massage” the chocolate sauce into the kale, making sure to cover each piece with that chocolatey goodness.

Spread the leaves out on dehydrator sheets, and dehydrate at 45 C overnight.
Alternatively, spread out on a large baking tray (you might need 2) lined with baking paper. Set your oven to 100 C and prop the door open with a wooden spoon. This allows moisture to escape so that you’re drying the kale, rather than just baking it. They’re ready when they are completely dry with a light, crispy texture. Done in the oven these won’t be raw, but still healthy and delicious!

Store in an airtight container and consume within 2 weeks. If you have high humidity you should use them faster, before they go limp. These are so good though, I’m willing to bet that they won’t last very long! 😉

Health & happiness!

Love,
Raine

Raw Kale Chips

Kale Chips

This might not sound so appealing but trust me, they’re delicious! Even my 3 year old son loves them 🙂 Things like this always excite me – you get to eat something salty and delicious, and yet you’re getting in all the wonderful nutrients of kale.

Kale is among the most nutrient dense foods of the world. It is loaded with powerful anti-oxidants, is a good source of vitamins A, C and K and beta-carotene, lowers cholesterol and fights cancer. All this for very few calories, so it can help you to lose weight too!

I make my kale chips in a dehydrator, but you can still make them if you don’t have one. Simply lay them out on a baking tray lined with baking paper and put your oven on 100 C. Prop the door of the oven open with a wooden spoon. This allows moisture to escape, so that you’re drying the chips rather than just baking them. They won’t be raw, but it’s still a far cry from high-saturated fat, high-salt, processed potato chips.

Stay tuned for my Chocolate Kale Chips!

Ingredients

150 – 200g kale, weighed once you have removed the tough centre stem
70g raw nut butter (almond, cashew or macadamia – whatever your preference)
45ml freshly squeezed lemon juice
45ml water
1/2 tsp himalayan salt
1 tbsp nutritional yeast
1/4 – 1/2 tsp cayenne (optional)

Method

After removing the tough stem, tear the leaves into pieces about 5cm square and place in a large mixing bowl. In this photo I have used dinosaur kale (cavalo nero) but you can use any variety.

Use a whisk to combine the rest of the ingredients and pour over the kale. I find it easiest to use my hands and “massage” the dressing into the leaves, making sure that each leaf is well coated.

kale chips 2

Spread the leaves out on your dehydrator sheets, making sure that none of them are clumped together, as these will dry into chewy lumps, not individual crispy pieces. Dehydrate on 45 C overnight. Store in an airtight container and consume within 2 weeks. If you have high humidity you may need to eat them faster before they become limp!

kale chips 3

Health & happiness!

Love,
Raine

Baobab & Melon Nice Cream (African Superfoods Part 1)

Baobab & Melon Ice Cream

There’s a lot of hype about Central and South American superfoods, but here in Africa we have some amazing plants too! I think it’s important to both be proud of your country & heritage, as well as to support locally grown and manufactured products. Over the next few weeks I want to do a series of posts on various African superfoods. For those of you in other parts of the world, I hope it will be interesting and informative (most of them are becoming more well known and popular in health circles so you should be able to get hold of them.) For fellow South Africans, I hope this will encourage you to make use of our beautiful continent’s bounty 🙂

baobab tree copy

According to African legend, long, long ago the first baobab tree sprouted beside a lake. As it grew, it surveyed the other trees and admired their colourful flowers, their tall, straight trunks and their beautiful green foliage. One day the little tree was tall enough to see its own reflection in the lake. It was dismayed at the sight! Its trunk was short and fat, its leaves were sparse and dull and its bark looked like the wrinkled hide of an elephant. The tree implored the Creator to change its appearance, but its request was ignored. Day after day, it watched the beautiful trees, compared them to its own reflection, and cried to the heavens. One day the Creator had had enough, reached down and unearthed the tree. Turning it upside down, the Creator replanted the tree with its branches in the earth, and its roots in the sky. From that day on the baobab tree was silenced, and as penance has served animals and humans with good deeds ever since.
Source: http://www.ecoproducts.co.za

These beautiful trees are grown in 32 African countries, and are revered by many tribes, even worshipped by some. The fruit is a highly nutritious food source, the seeds provide oil (I used baobab oil during and after my pregnancy to prevent stretch marks) and the fibre in the bark is used to make fishnets, cord and clothing. The trunks are a good source of timber and are often hollowed out and used for shelter, grain storage or as water reservoirs.

Baobab powder has recently become a very popular superfood, and for good reason. The powdered fruit contains 3 times more calcium than milk, 4 times more vitamin C then oranges, 6 times more potassium then bananas, 5 times more anti-oxidants than blueberries, a whopping 16 times more fibre than pears, and 5 times more magnesium than avocados. Its sweet-tart flavour makes the perfect addition to this quick and easy vegan “nice cream.”

Ingredients

350g melon, weighed without skin or seeds
2 bananas
3 tbsp baobab powder (I use EcoProducts)
1 – 2 tbsp raw honey
1/2 cup almond milk

Method

This requires some forethought, in that you have to freeze the melon and banana overnight (or you could freeze when you have it and use whenever!) I used canary melon, but you could also use spanspek (aka cantaloupe) or honeydew (aka musk melon.)

Place all the ingredients in your blender and blend until smooth and creamy, using your tamper to mix as you blend. The amount of honey required depends on the sweetness of the melon. I had a melon that was not very sweet, which is why I decided to freeze it and turn it into ice cream. You may have a melon so sweet that you won’t need any honey at all, so sweeten to taste.

This will serve 2 people as breakfast or 4 people as dessert. If you have any left over you can freeze it again. It won’t be quite as smooth and creamy, more like a sorbet, but still delicious.

Health & happiness!

Love,
Raine

Cauliflower & Tahini Soup

Cauliflower & Tahina Soup

I love cauliflower, especially as a purée, because of the beautiful smooth texture it blends into. This soup makes use of that, and the addition of tahini makes it even creamier!

Cauliflower contains sulforaphane, which has been shown to kill cancer stem cells, thereby slowing tumor growth. Researchers believe that eliminating cancer stem cells may be the answer to fighting cancer. It is also packed full of anti-oxidants and phytonutrients, is good for your heart and your brain, and has anti-inflammatory properties.

Sesame seeds (the main ingredient of tahini) are high in calcium, magnesium, phosphorus and iron. Need any more reasons to make this soup tonight? It’s simple to make and takes no time at all!

Ingredients (serves 4)

3 tbsp extra virgin olive oil
2 large onions, sliced
6 big cloves of garlic
1 tsp cumin seeds
1 whole star anise
a head of cauliflower (about 500g) cut into florets
one potato (about 200g) peeled and cut up
1 litre water
1 tbsp organic vegetable stock paste or powder
3 bay leaves
the juice of half a lemon
1/2 tsp himalayan salt
1/8 tsp white pepper
1/3 cup organic tahini
pomegranate concentrate (optional)

Method

Fry the onion in the olive oil until it caramelizes. The more colour you get on the onions, the more flavour you’ll be putting into the soup. You want them to look something like this:

IMG_0130

The trick is to keep it on a medium heat and stir every now and then. If you feel that they may start to burn, add a few drops of water and continue. You could brown them even more than I’ve done here, I was just in a rush to make supper!

Add the garlic, cumin and star anise. Fry for a few more minutes. Add the cauliflower, potato, water, stock and bay leaves. Simmer until the cauliflower and potato are tender. The smaller (and more evenly-sized) your pieces of cauliflower and potato, the faster they will cook.

Remove the bay leaves and star anise, then pour everything into your blender. Add the rest of the ingredients and blend until completely, 100% smooth. The measurements I’ve given for lemon, salt and pepper are just a guideline – use your taste!

I’ve served it with a drizzle of pomegranate concentrate – the sweet tartness balances the soup beautifully.

Health & happiness!

Love,
Raine

Homemade Almond Milk

almond-milk

If you would like to read about why dairy is bad for you and why I don’t have it myself and why I don’t give it to my baby, read this article about why dairy is bad for you. I do not recommend replacing dairy with soy, even if you’re buying organic non-GMO soy products. Soy beans naturally contain isoflavones, which function as phytoestrogens. These mimic your body’s own oestrogen, therefore it’s as though you have increased oestrogen production. It’s never a good idea to mess around with your hormones. Furthermore, soy beans may have health benefits in their natural, whole state, but most of the dairy-replacement products made from soy are very processed. My rule of thumb is that processed is bad, and this is the major theory behind the “raw food” and “clean eating” movements. I don’t think that eating organic tofu once in a while will have a bad effect, but for most people whatever they use to replace dairy is something they will be eating every day. So you need to choose something which will contribute to your health, not hinder it!

For me, the best alternative to cow’s milk is almond milk. It’s just so damn yummy! The health benefits of almond milk include improved vision, weight loss, stronger bones and muscles, and a healthy heart. It helps to maintain ideal blood pressure and is good for your kidneys. Almond milk (or any other nut milk) is such a great substitute for cow’s milk that you won’t even miss it. In fact, once you’re used to having nut milk the taste of cow’s milk is quite unpleasant. 

Nut milk is really simple to make, and once it becomes part of your routine, no big deal, you’re ready to move onto the next step of cleaning up your diet 🙂

Ingredients

1 cup raw almonds
water for soaking
900ml purified water
1/4 tsp himalayan salt
1/4 tsp vanilla powder or 1/2 tsp vanilla extract
3 – 4 dried dates, or 1 tbsp raw honey or organic maple syrup

Method

Firstly, soak the almonds in water overnight or minimum 4 hours. Don’t skip this step! Almonds contain an enzyme which inhibits digestion so it’s important to soak them first. Drain the water off and rinse them.
Time-saving tip: if you own a dehydrator, soak a kilogram of almonds in one go and then dehydrate them. That way your almonds are pre-soaked and you can make milk without any forethought!

Now put all the ingredients in a blender, and blend well. In a high-speed blender 30 seconds is enough, but it may take longer in a regular blender.

Strain the liquid through a nut milk bag (available at health shops or online) or use a clean piece of cheesecloth or muslin. Keep refrigerated and use within 3 – 4 days. You could play around with flavour by adding cinnamon, or raw cacao powder for chocolate milk!

almond milk2

What you have left over after straining off the liquid is called almond pulp. In Raw food preparation we dry this out in a dehydrator to get almond flour (as opposed to store-bought almond flour, which is usually ground, blanched almonds.)

If you don’t have a dehydrator you can spread it out on a baking tray and put it in your oven on a low heat until it dries. Then process it in your blender to a fine flour. Keep in an airtight container. If you live in a very hot or humid place I recommend keeping it in the fridge. You can use this for gluten-free baking, as I do in my Banana Bread.

almond milk3

Health and happiness!

Love,
Lauren

On-The-Go-Lunch Wraps

Falafel wrap

We’re all busy running around and most of us don’t have the time to stand there cooking a fresh soup and home-baked gluten-free bread for lunch every day, but lunches should still be healthy, and they can be healthy and easy at the same time.

I used my vegan falafel and put them in a spelt flour wrap with leftover homemade tahini and lettuce. You can add whatever you want to it!

This is a great baby led weaning idea as you can just rip it all up and leave it on the tray in front of them!

Just a short post but hoping it inspires you to create healthy lunches for you and the kids!

Love,
Lauren

Basil Pesto

IMG_0007

This is my dairy-free version of pesto (traditionally you would add parmesan,) and using a combination of cashews and sunflower seeds makes it more economical.  If you have pine nuts, feel free to use them! If you have a nut allergy you could replace the nuts with more seeds.
This will keep in a jar in the fridge for about a week, or you could make a big batch when you have lots of basil and freeze it in smaller portions. I often freeze sauces in an ice tray, and then put the cubes into a freezer bag. That way you can just defrost a few cubes at a time, instead of the whole lot.

I’ve given alternatives in case you feel like a change, or if you don’t have the correct ingredients on hand.

Ingredients

80g fresh basil leaves (or replace 40g with fresh spinach)
1/2 cup raw cashews (or macadamias)
2 tbsp raw sunflower seeds (or pumpkin seeds)
2 cloves garlic
1/2 tsp Himalayan salt
1 tbsp nutritional yeast
juice of 1 lemon, or to taste
1/2 cup extra virgin olive oil

Method

I like my pesto chunky so I make it in a food processor, but you could do it in a blender if you prefer it smoother. Simply throw in all the ingredients and pulse until you have the desired consistency. As with all our dips & sauces, taste for seasoning and adjust if necessary to the way you like it!
I find that this makes the perfect consistency for using as a dip or spread, but if you want to use it as a sauce for gnocchi for example, add a few drops of water just to loosen it up a bit.

Health and happiness!

Love,
Raine