Lunchtime Quinoa Salad (in preparation for the week)

Quinoa salad

Stuck on what to make as a healthy lunch? I also find quinoa salad to be such a good, easy and healthy option and today I made a HUGE batch of it which means it will last me until at least Wednesday. Cooking healthy food does take time and preparation, but this took me ten minutes to make and I’ve now got lunch for a few days. You can add homemade tahini with it or have it with other hot, steamed veg on top, on its own, or with any meat or fish-based protein if you like, although quinoa is a complete protein so you don’t actually need it if you don’t want it.

I always use whatever vegetables I have to hand so just use whatever you have in the fridge!

Ingredients

1 cup organic quinoa
1 red or orange pepper
1 red onion
1 fennel
7 chestnut mushrooms
1 tin organic sweetcorn
1 courgette (zucchini), spiralized
1 lemon
Himalayan salt and black pepper

Method

Make the quinoa as per the packet instructions.

While it’s cooking, chop all your veg up into small pieces.

Once the quinoa is ready, let it cool a bit before adding it to the bowl of veg, mix well with lemon juice, salt and pepper.

TIP: if you want more flavour add a tsp Bouillon to the quinoa while it’s cooking.

Enjoy!

Love,
Lauren

Raw Chocolate Orange Brownies

Raw Chocolate Orange Brownies

Being pregnant I am hungry quite a lot of the time but I try to nourish my body with as many pure ingredients as possible to give my baby the best start in life. If I’m hungry, I eat, and by making snacks like these and keeping a batch in the fridge, there is always something healthy to snack on when I fancy something sweet.

Everyone loves a chocolate brownie, but we all love it better when it’s guilt free. I had a load of Jaffa oranges left from my juicing so thought about doing a sweet variation on my usual raw brownies.

The raw cacao, as we know, is full of organic, pure nutrients and, like the almonds, is a great source of protein. Look no further for a snack for the kids that isn’t full of rubbish, is made with pure ingredients, and will take you no more than 15 minutes to make. This really is the easiest recipe with so few ingredients, anyone can make these!

Ingredients – (do double up if you want to make enough to last a while. This recipe makes about 8 small brownies)

1 heaped mug almonds (make sure to soak in purified water for at least 6 hours)
15 organic medjool dates
3 heaped tbsp raw cacao powder
1 tsp organic pure maple syrup
Juice of one orange
Zest of the orange

Method

Once the almonds have been soaked, rinse and pat dry with a paper towel, then put in the blender and blend until it almost turns into an almond butter.

Scrape away the sides then add the dates, cacao, maple, orange juice and a quarter of the orange zest. Blend until well incorporated.

Grease a silicone loaf tin or square tin with a little coconut oil, spoon the mixture in, smooth the top over with a spatula and put in the freezer for an hour and a half.

Remove from the freezer, sprinkle the remainder of the zest on top, cut into brownie slices and store in the fridge.

Enjoy!

Love,
Lauren

Nutella Cake with Banana Caramel Frosting

IMG_1783 (3)

I needed to bring a cake to a dinner party that was gluten free – for a gluten free person, dairy free – for a kosher person, sugar free – for a diabetic and egg free, but of course I still wanted it to be yummy! Here is what I came up with… And I called it a Nutella cake because it is chocolate and hazelnut… (BTW someone got confused when we use the term ‘cups’ to measure things. It really is as simple as using a cup to measure. A normal size mug is usually the best way to measure a cup.)

Ingredients

3 cups buckwheat flour
Half tsp baking powder
3 large bananas
1 and half cups almond or hazelnut milk
Just under a cup of maple syrup
3 tbsp coconut palm sugar
1 cup hazelnuts
Half cup vegan chocolate chips

Frosting:
1 banana
Half cup maple
4 tbsp coconut oil
3 tbsp almond butter

Method

Preheat the oven to 180 / gas mark 6.

Measure out the buckwheat flour and baking powder and put it in a large mixing bowl then set this aside.

Add the bananas, almond milk, maple syrup and coco palm sugar to a blender and blend until smooth. Pour this mix into the flour and mix well.

Add the hazelnuts to the blender and blend until they form a flour, then add this into the bowl and mix well.

Lastly, add the chocolate chips and mix evenly.

Get two springform cake tins of the same size and cut baking paper in a circle the same size as the bottom of the cake tins and put one in each, then grease with coconut oil.

Distribute the mixture evenly between the two tins and bake in the oven for around 25 minutes. You want it to be moist but not undercooked.

You can make the frosting while it is baking by putting all the ingredients in the blender and letting it blend non-stop for at least 2-3 minutes, if not more, until a caramel-like consistency forms.

Once the cakes are ready, leave to cool fully. Once cooled add half the frosting to one cake, then place the other one on top and top with the rest of the frosting. You can serve immediately.

Enjoy!

Love,
Lauren

Buckwheat Waffles

GF Waffles

I have this problem at the moment: I want nothing more than to have a lie-in on the weekend but my belly wakes me up and tells me it needs food! So I left my husband in bed this morning and went to make us both some yummy, guilt-free waffles. This is a variation on the last batch of waffles I made (which you can see here), as these ones are not vegan. They are, however, gluten-free, dairy-free, refined sugar-free and simply delicious 🙂 fun to make with the kids too. (The cleaning of the waffle iron is not such fun though!)

Ingredients

1 cup buckwheat flour
1 and half tbsp coconut palm sugar
1 and half tsp baking powder
1 tsp baking soda
Pinch salt (I used Himalayan)
1/2 tsp ground cinnamon
1 cup almond milk (can also use coconut milk, hemp milk or oat milk)
4 tbsp vegan margarine or coconut oil, melted but at room temperature
2 eggs
1 tbsp maple syrup

Toppings of choice: I used maple syrup and almond butter

Method

Preheat the waffle iron as you want it extra hot.

Mix all the dry ingredients in a bowl: buckwheat flour, sugar, baking powder, baking soda, salt & cinnamon.

In another bowl mix the wet ingredients and whisk together: milk, eggs, margarine and maple.

Pour the wet mixture into the dry and mix really well, making sure all flour is incorporated from the bottom of the bowl.

Pour the batter onto the hot waffle iron and leave for around 10 minutes, or until you can see they are crunchy on the outside. This recipe makes 4 waffles, and my iron holds two at a time so I put the first two in the oven on a low heat to keep them warm while I made the next two.

Enjoy!

Love,
Lauren

Raw Chocolate & Coconut Mousse

Chocolate Coconut Mousse

Pregnancy has got me craving something sweet after a meal (or all the time?!) and although I am totally happy with my 80%/20% lifestyle in which, during the 20% I allow myself to eat out, have the odd pizza or have a processed chocolate bar, I have to remember that my continued remission is not something to take for granted; it is a product of continuous maintenance on my part and that maintenance comes in the form of diet and homeopathy. If I get slack on either one I could see the arthritis coming back at any point and now, more than ever, with a baby on the way, I need to make sure that I stay strong and healthy, especially because carrying extra weight could also impact my joints if they are not kept healthy and supple enough. It is constant work, this keeping healthy business, but I can’t think of anything more worth it.

Sometimes people say to me, ‘we can’t afford to eat organic’ or ‘I don’t have time to make those meals’. In some cases this is very true, but a lot of people who say these things to me would happily go out on a Saturday night and spend £150 on a meal, or buy a new pair of shoes, or spend the evening in front of the TV. There is nothing more precious than our health and prevention is better than cure so ditch the dinner out and save yourself some money and put it towards buying organic, and spend an extra hour in the kitchen once or twice a week preparing fresh lunches and snacks like this one here. I have to sacrifice many things to be able to afford organic food, superfoods and my supplements, and it shouldn’t just be a case of ‘well that’s ok because you had a disease but I don’t’. Because if you ever get diagnosed with something, from arthritis to cancer or the millions of others that people suffer from, you will wish you did all you could to prevent it, for you and your children. There are ways around EVERY SINGLE HEALTH ISSUE, you just need to be willing to work hard enough and remember that a lifetime consuming the chemicals that are found in every single thing you eat or drink that isn’t organic, WILL lead to disease. Don’t do it to your bodies, not in this day and age when there are so many options. Enjoy an organic, superfood lifestyle! And if you need any help getting started, feel free to drop us a line so we can help.

Ingredients

Chocolate mousse layer:
Half cup pecans
1 frozen banana
Half an avocado
Half a cup of almond milk
1 heaped tbsp raw cacao powder
1 tsp maple syrup
Half tsp vanilla extract

Coconut mousse layer:
2 frozen bananas
The cream from the top of a can of organic coconut milk (save the watery part for cooking)

Optional toppings:
Raw cacao covered goji berries
Desiccated coconut

Method

You will need a high speed blender to make the ‘ice cream’ from bananas. I use a Vitamix.

Put the pecans in the blender and blend well until they form a fine meal. Then add the banana and blend until smooth, followed by the rest of the ingredients and blend until smooth. Add this to fill just over half a small glass.

Wash the blender out then add the 2 bananas for the coconut layer until smooth but not melting, then add the coconut cream and blend quickly so combined but not melting.

Add this to the top of the chocolate layer then top with your choice of toppings. I used cacao covered goji berries and desiccated coconut.

I hope you all enjoy this as much as my husband and I will enjoy it after our dinner tonight!

Love,
Lauren

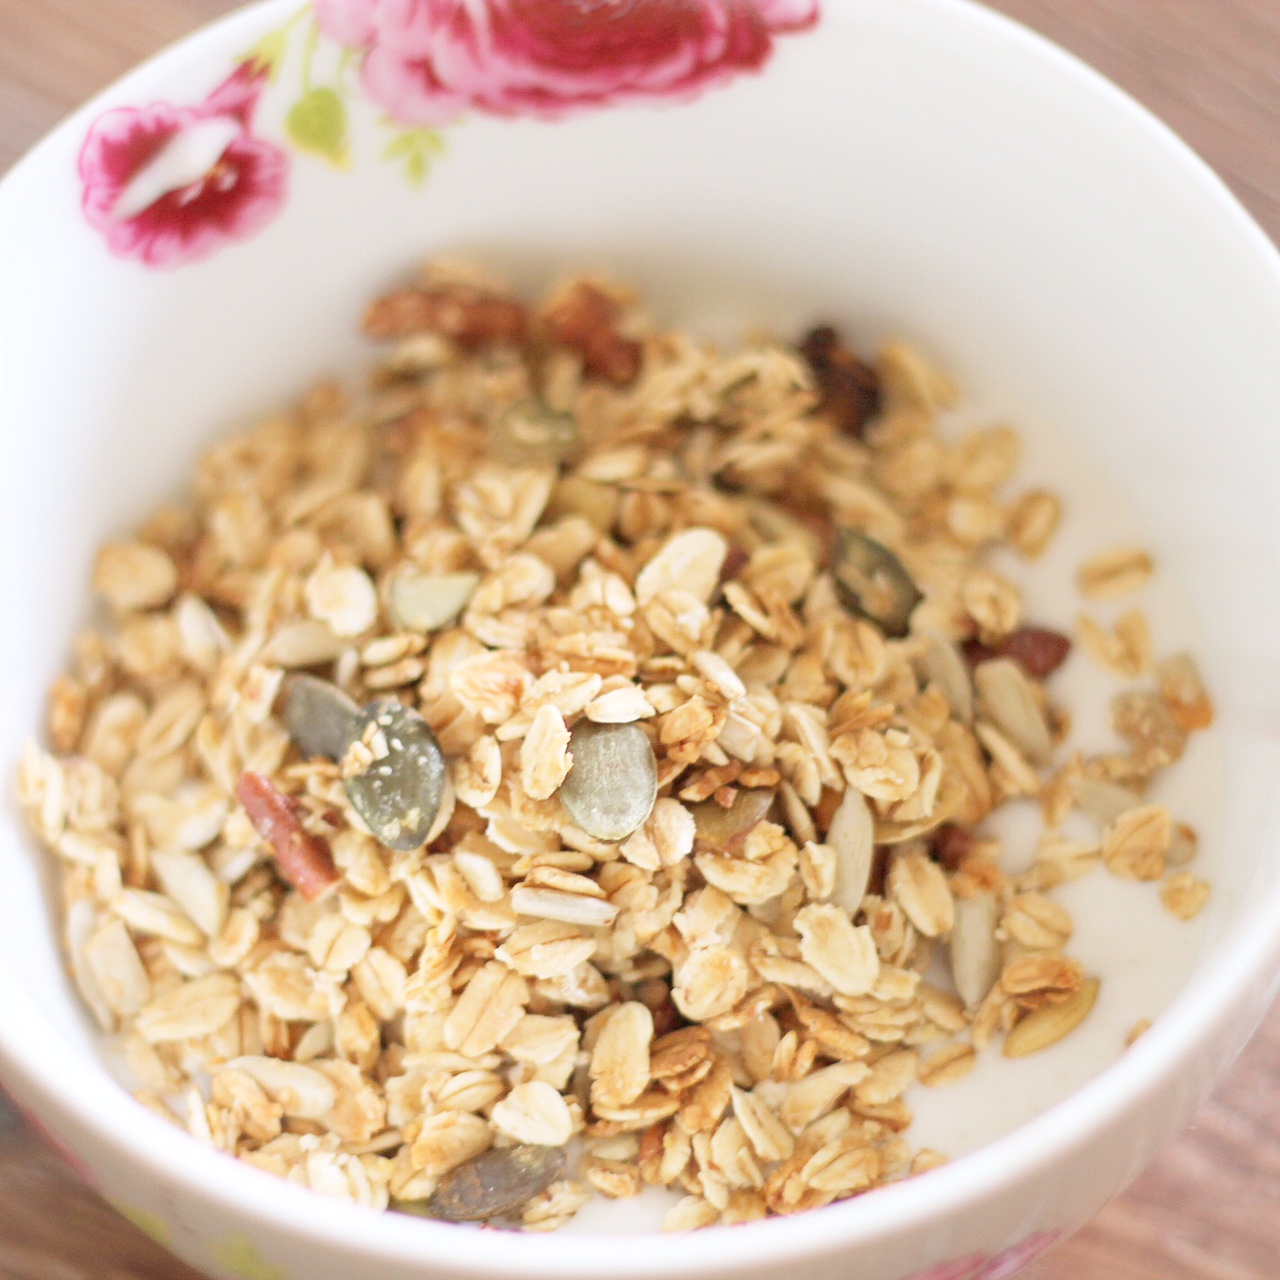
P.s. I had some leftover from the coconut layer so I used this as a milk / yoghurt replacement with my homemade granola this morning. Was lush!

Coconut mousse granola

Gluten-free Biscotti

Biscotti

Biscotti are a family favourite so I knew I had to come up with a healthier version of these traditional Italian biscuits. They are wheat- and grain-free, and I’ve used some stevia, allowing me to cut the amount of coconut sugar in half. I love to have them with a cup of tea or hot chocolate while I’m working on the blog 🙂

Ingredients

1 1/4 cups almond flour
1 1/2 cups raw almonds
1/3 cup coconut sugar
1/3 tsp stevia (or replace with an additional 1/3 cup coconut sugar)
pinch of Oryx Desert Salt
1 tsp aluminium-free baking powder
zest of 1 orange
zest of 1 lemon
2 eggs
1 tsp vanilla extract or 1/2 tsp vanilla powder

Method

Preheat the oven to 160 C.

Place 1 cup of the almonds in a blender or food processor and grind finely. Chop the remaining 1/2 cup almonds roughly. Combine both with the almond flour, coconut sugar, stevia, salt, baking powder and zest.

Beat the eggs and vanilla. Make a well in the dry ingredients and pour the egg into it. Use a fork to pull the dry ingredients into the egg, mixing as you go. It may look like the mixture is too dry, but just keep going and it will come together. Use your hands to fully combine if necessary, and then shape it into a ball.

Dust your work surface with a generous amount of almond flour. Divide the dough in half, and then shape each half into a log about 7cm wide and 3cm high. Place both logs onto a baking tray lined with baking paper or a silicone mat, or greased with coconut oil.

Bake for 25 minutes, remove from the oven and allow to cool. Turn the oven down to 140 C. Slice the logs at an angle and about 1.5cm thick. Slicing at angle will give you the traditional biscotti shape. Lay the slices out on the baking tray and return to the oven to dry out; 30 – 40 minutes, depending on how you like them.

Health & happiness!

Love,
Raine

Bite-Size Chocolate Caramel Maca Bars

Bitesize Snickers

Please don’t get scared – these are way easier to make than they look! It kind of takes a while only because of waiting for each layer to freeze, but the making itself is easy. They are pretty similar to our Raw Snickers bars but I added maca powder for extra energy and vitality. I also wanted to cut them smaller as I am needing small snacks more often now my pregnancy is progressing.

These are amazing to have around to give the kids if they want a sweet treat, and you don’t even have to feel guilty about giving it to them – they are full of goodness!

Ingredients

1 and half cups medjool dates, pitted then soaked in water for a couple of hours)
2 heaped tbsp organic, natural peanut butter (I use Meridian)
1 tsp maca powder (I use Organic Burst)
1 tbsp coconut oil
Pinch salt (I use Oryx desert salt)
2 x amount of our chocolate sauce recipe or if you don’t have the time, you can melt bittersweet or vegan chocolate in a bowl over a pan of boiling water until melted. You need enough to fill about 1 mug.
Half cup almonds, soaked overnight

Method

Prepare a square baking tray with baking paper and spread some coconut oil over it to grease.

Pour half the chocolate mix at the bottom and put in the freezer for 20 minutes.

Drain the dates well, then put them in the food processor and blitz until a paste forms.

Once it is smooth, add the peanut butter, maca, coconut oil and salt and blend again.

Take the tray out the freezer and pour the date mix on top and spread evenly. Leave in freezer for 40 minutes.

Crush the almonds in a pestle and mortar, then sprinkle them on top of the ‘caramel’ date layer, then pour the rest of the chocolate on top and smooth to even it out.

Put back in freezer for a further 20 minutes. Remove, slice into bite-size chunks and enjoy!

If you can stop eating after just one, you deserve a medal!

Love,
Lauren

Potato & Spinach Frittata

Frittata

Healthy yet easy to make dinner ideas – it’s a constant battle right?? We’re trying to add as many of our lunch and dinner recipes to the site as possible to help you all out with easy dinner ideas for the whole family. This one was a winner and I served it with a fresh salad of lettuce, cucumber, cherry tomatoes, radish, carrot and spring onion.

Ingredients

6 organic free-range eggs
2 potatoes, peeled and sliced thinly
Half a bag of spinach
About 8 cherry tomatoes
Handful of parsley
Splash of almond milk
Salt & pepper (I used Oryx desert salt)
Coconut oil or spread of choice for the pan

Method

Boil your potatoes (already sliced) for no more than 5 minutes. Drain and set aside. Cut up the tomatoes into quarters, roughly chop the parsley and wash and drain the spinach.

Beat the eggs in a bowl, then add the almond milk, salt and pepper.

Melt the oil or vegan butter in a large frying pan. Once hot, add the egg mix, then add the potatoes, pushing them down so they are semi-covered by the eggs. Then add the rest of the veg and do the same thing.

Turn the heat to medium-high and let it cook for around 5 minutes. While it’s doing this, turn on your grill.

Once the frittata has cooked on the bottom, put the pan under the grill for a further few minutes, until you can see it has cooked through.

Serve with a crisp, fresh salad.

Enjoy!

Love,
Lauren

Chocolate Maca Chia Pudding

Chocolate Chia Maca Pudding

People are constantly looking for healthy and easy to make alternatives to artificial, cardboard-like breakfast ‘cereals’ and toast. We are the biggest lovers of breakfast here at Two Kitchens! We have more breakfast recipes on our site than any other recipes.

This one is amazing for the whole family. It is packed with chia so it is full of bioavailable plant-based, organic protein, has maca powder in it so gives instant but long-lasting natural energy, the raw cacao is another source of plant-based protein, the almonds in the almond milk add calcium and you can add whatever fruit you like to it for more fibre and fruit intake. I added bananas but you can add strawberries or other berries too. The kids will honestly love this, you can send them off to school knowing they have been given the best start to the day and if you make enough, you can save some as a snack or even dessert for after dinner – so versatile!

Ingredients

1 cup almond milk
3 tbsp chia seeds
1 tsp maca powder (I use Organic Burst)
1 heaped tbsp raw cacao powder
1 tsp organic maple syrup or other natural sweetener of choice
1 banana, sliced
Small handful organic vegan chocolate chips (optional)

Method

Put all the ingredients except the banana and chocolate chips into a saucepan and heat gently over a low heat. It will seem dry at the beginning but eventually it will all melt into itself, just keep stirring. You want it to heat but not boil as boiling chia seeds will take the goodness out of them but we still want them to soften and swell.

Once it’s ready, transfer to a bowl, wait for it to cool then leave in the fridge for half an hour. Alternatively you can make it the night before and leave in the fridge overnight. The chia will then swell even more and be softer.

Transfer to a glass or any bowl of choice and top with your favourite toppings.

Enjoy!

Love,
Lauren

Roasted Butternut Quinoa Salad

Butternut Quinoa Salad

When people ask me what my go-to gluten free, yet easy to make, lunch is, I tell them quinoa. It takes around 10 minutes to make and you can either make it that day or the day before and keep a tupperware full in the fridge for a few days. You can also add to it whatever you happen to have in the fridge at that time. In order to make it a bit more filling, I added butternut squash to it this time. You can add some grilled halloumi too, if you fancy, I just wanted to keep this one dairy-free. Quinoa is such an amazing source of protein that you don’t need to add any meat or fish (you can if you want to – if it’s organic of course 🙂 ) But you don’t have to all the same. This will give you all the protein you need.

Ingredients

Quinoa (add as much as is needed for the amount of people you want to feed)
1 butternut squash
Half a cucumber
3 spring onions
2 fresh beetroot, steamed and chopped
Generous handful of cherry tomatoes
2 carrots, shaved into ribbons through a potato peeler
Handful of pine nuts
1 tbsp lemon juice
Pinch salt (I used Oryx desert salt here)
Black pepper

Method

Preheat the oven to 180 degrees.

Cook the quinoa as per the packet instructions. When it is ready, transfer to a bowl and set aside to cool.

While this is happening, peel the butternut squash and chop into bite-size pieces. Transfer onto a prepared oven tray and drizzle with olive oil. Roast for around 40 minutes, stirring occasionally with a spoon to make sure all pieces are coated by the oil.

While it’s in the oven, chop up your vegetables and add them to the bowl with the quinoa.

Add the lemon juice, salt and pepper and stir well, then take the butternut out the oven and add to the top.

Serve straight away or wait until cooled and keep in the fridge.

Enjoy!

Love,
Lauren