Chocolate Kale Chips

IMG_0162

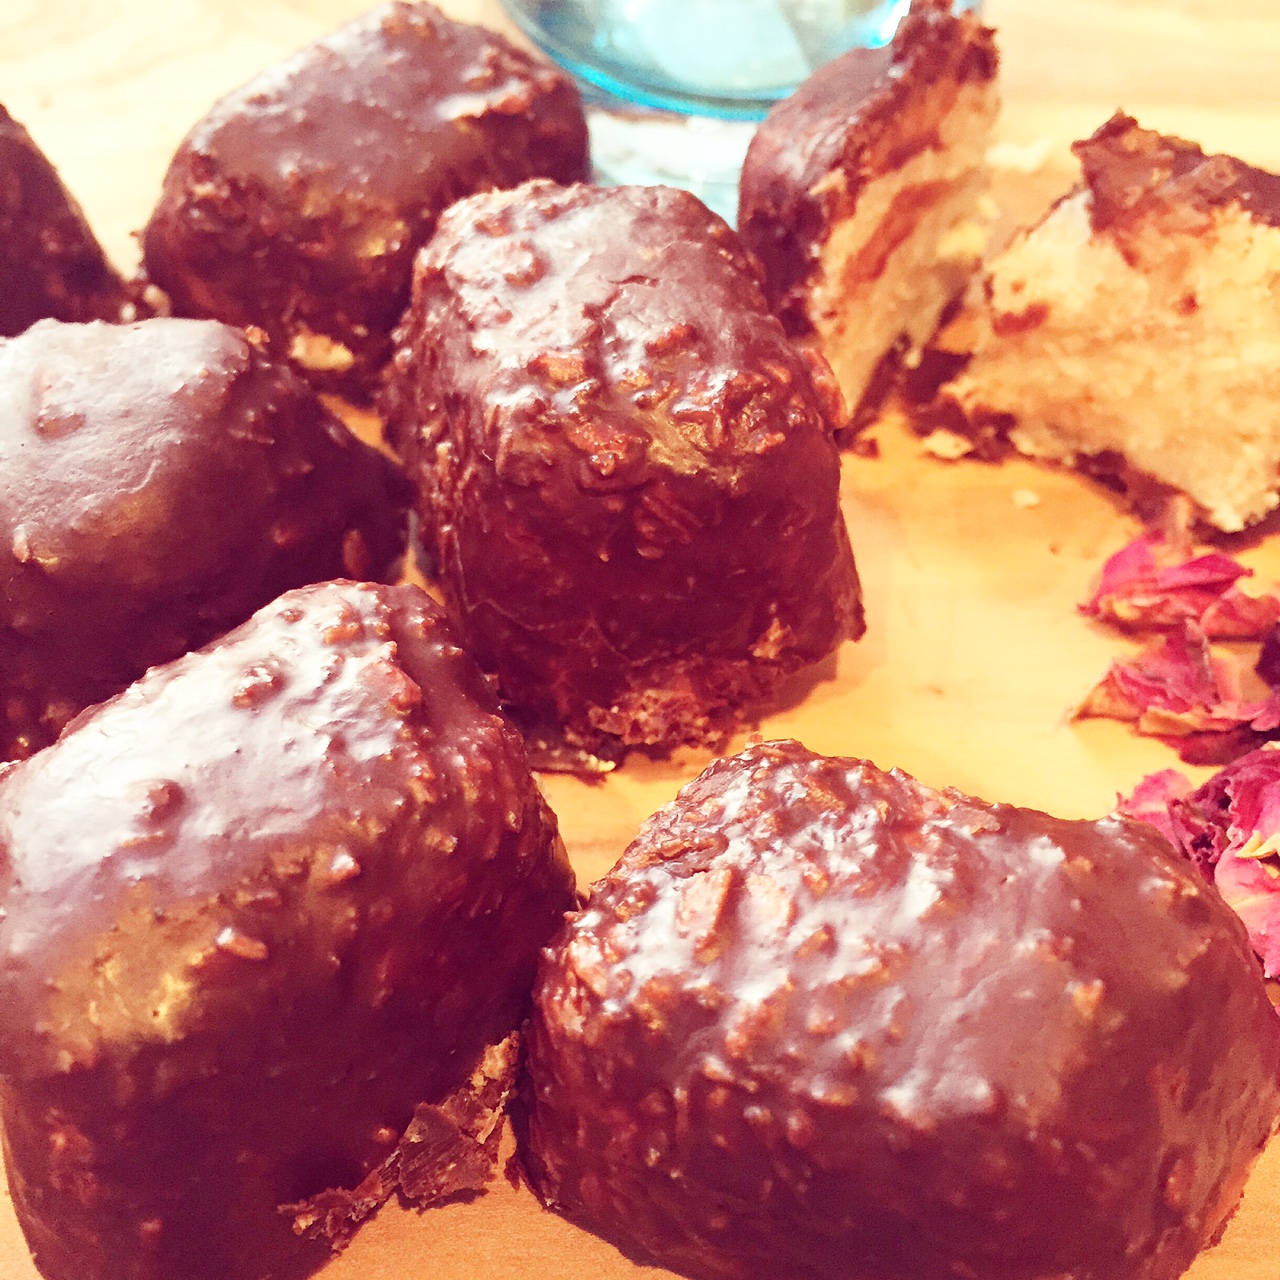
Technically I cannot take credit for these delicious little miracles… it was my son’s idea! The last time I made a batch of Kale Chips I added a bit of cayenne. He was not very impressed and asked why I put fire in them 🙂 So I asked him what flavour he would like next time and he said chocolate! At first I laughed, and then I started thinking it might actually work. The end result surprised even me… they are so moreish, and you just happen to be eating greens!

Ingredients

150 – 200g kale, weighed after removing the tough centre stem (I’ve used curly kale but you can use any variety)
90g natural peanut butter (I like Jozi’s Nut Butters which you can buy at The Organic Emporium)
2 tbsp organic maple syrup
1/2 tsp organic stevia leaf powder (or double up on the maple syrup)
60ml raw cacao powder
1/4 tsp himalayan salt
60ml water

Method

After removing the tough centre stem, tear the kale into pieces about 5cm square.

Combine the rest of the ingredients with a whisk and pour over the kale. Use your hands and “massage” the chocolate sauce into the kale, making sure to cover each piece with that chocolatey goodness.

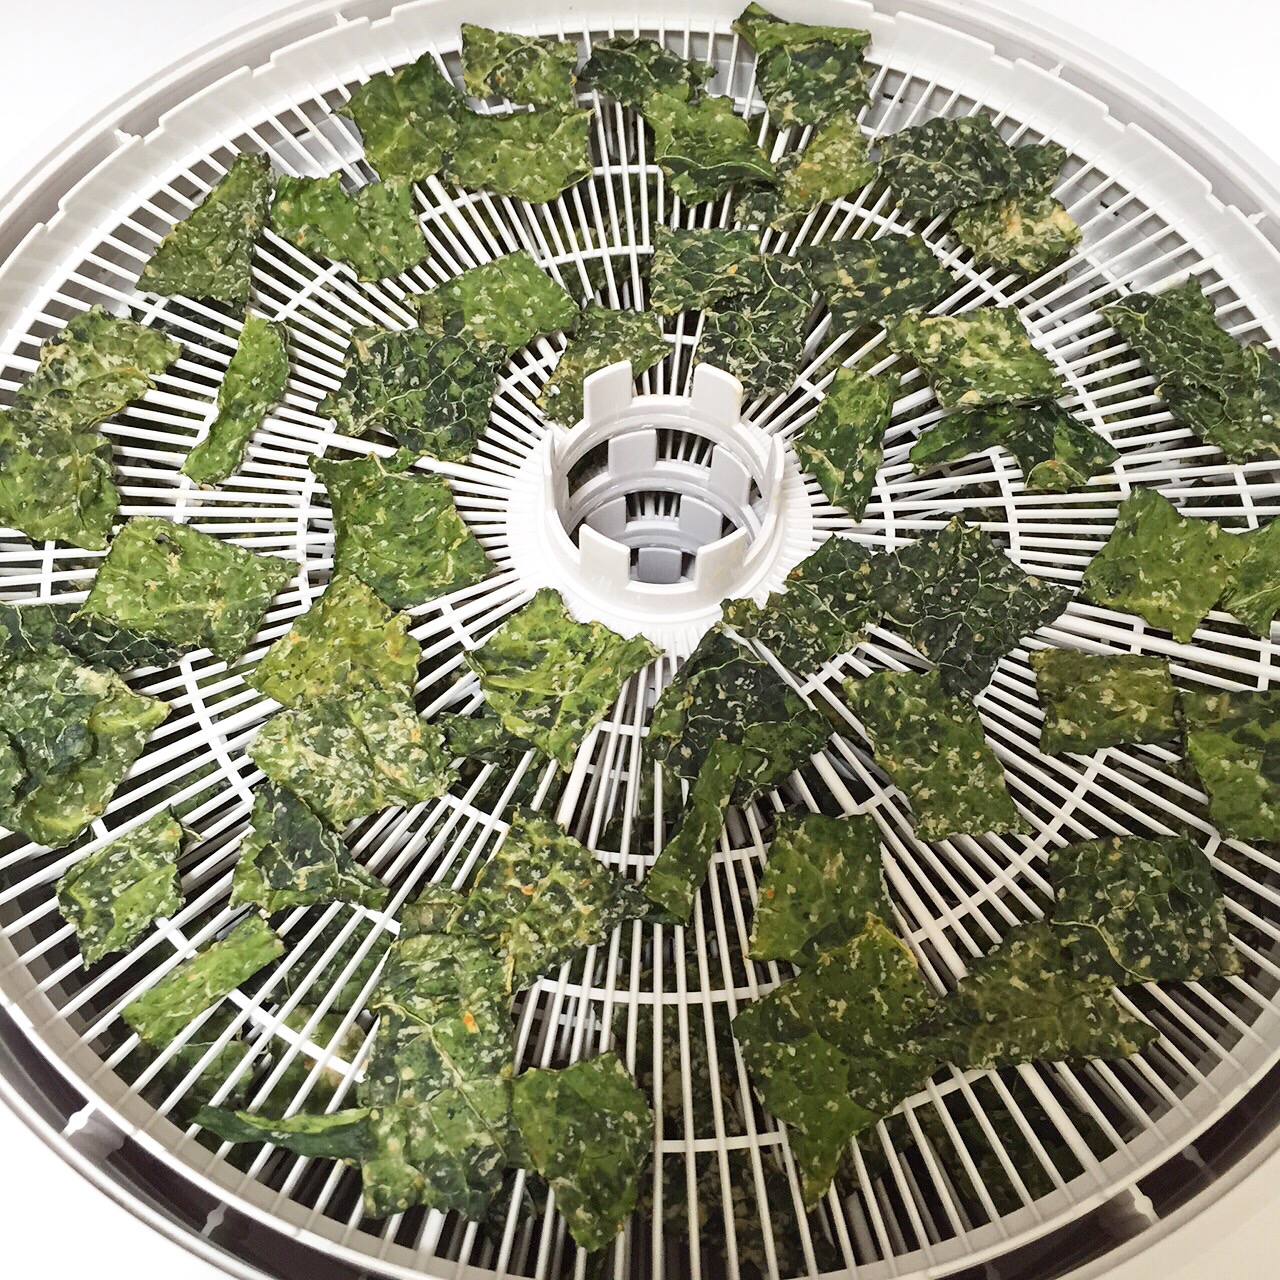
Spread the leaves out on dehydrator sheets, and dehydrate at 45 C overnight.
Alternatively, spread out on a large baking tray (you might need 2) lined with baking paper. Set your oven to 100 C and prop the door open with a wooden spoon. This allows moisture to escape so that you’re drying the kale, rather than just baking it. They’re ready when they are completely dry with a light, crispy texture. Done in the oven these won’t be raw, but still healthy and delicious!

Store in an airtight container and consume within 2 weeks. If you have high humidity you should use them faster, before they go limp. These are so good though, I’m willing to bet that they won’t last very long! 😉

Health & happiness!

Love,
Raine

Raw Kale Chips

Kale Chips

This might not sound so appealing but trust me, they’re delicious! Even my 3 year old son loves them 🙂 Things like this always excite me – you get to eat something salty and delicious, and yet you’re getting in all the wonderful nutrients of kale.

Kale is among the most nutrient dense foods of the world. It is loaded with powerful anti-oxidants, is a good source of vitamins A, C and K and beta-carotene, lowers cholesterol and fights cancer. All this for very few calories, so it can help you to lose weight too!

I make my kale chips in a dehydrator, but you can still make them if you don’t have one. Simply lay them out on a baking tray lined with baking paper and put your oven on 100 C. Prop the door of the oven open with a wooden spoon. This allows moisture to escape, so that you’re drying the chips rather than just baking them. They won’t be raw, but it’s still a far cry from high-saturated fat, high-salt, processed potato chips.

Stay tuned for my Chocolate Kale Chips!

Ingredients

150 – 200g kale, weighed once you have removed the tough centre stem
70g raw nut butter (almond, cashew or macadamia – whatever your preference)
45ml freshly squeezed lemon juice
45ml water
1/2 tsp himalayan salt
1 tbsp nutritional yeast
1/4 – 1/2 tsp cayenne (optional)

Method

After removing the tough stem, tear the leaves into pieces about 5cm square and place in a large mixing bowl. In this photo I have used dinosaur kale (cavalo nero) but you can use any variety.

Use a whisk to combine the rest of the ingredients and pour over the kale. I find it easiest to use my hands and “massage” the dressing into the leaves, making sure that each leaf is well coated.

kale chips 2

Spread the leaves out on your dehydrator sheets, making sure that none of them are clumped together, as these will dry into chewy lumps, not individual crispy pieces. Dehydrate on 45 C overnight. Store in an airtight container and consume within 2 weeks. If you have high humidity you may need to eat them faster before they become limp!

kale chips 3

Health & happiness!

Love,
Raine

Cream of Mushroom and Thyme Soup

Mushroom Thyme Soup

These flavours go so well together I just had to do it! I got a load of mushrooms in my Abel & Cole delivery this week so soup it is! I love making a soup at the beginning of the week that will last me for the whole week… great for lunch alongside a salad or on its own with some Biona organic Rye bread 🙂

Ingredients

A box of mushrooms – about 10-12 – chopped
1 onion – peeled and chopped
1 potato, peeled and chopped
1 can coconut milk
1 cup organic vegetable stock
About 6 sprigs of fresh thyme, without branches (add more if you like)
Salt & pepper to taste
Half tsp coconut oil

Method

Heat the oil in a large saucepan. Once hot, add onion and cook for 1 minute, then add the mushrooms and cook for a further minute. Add the potato until coated in the oil then add the stock, and then the coconut milk.

Leave to heat for around two minutes then add the thyme, salt and pepper. Stir well, turn down heat, add lid and leave to simmer for an hour.

Once ready, blend fully (in a blender or with a handheld) and serve.

Enjoy!
Love,
Lauren

Vegan Lunch Sandwich

Vegan Sandwich 1

This isn’t going to be a long post, it is simply here to remind you that being vegetarian or vegan isn’t as hard as you think, so we want to give you as much inspiration as possible for easy, healthy meals to convince you that you can do it!

Ingredients

Sliced cucumber
Sliced tomato
Sliced avocado
A handful of alfalfa sprouts
Granary bread or Biona organic rye

Optional spreads:
Hummus
Vegan mayonnaise
Tahini
Cottage cheese (if you don’t need it vegan)

Easy peasy yummy lunch!

Vegan Sandwich 2

Lauren x

Baobab & Melon Nice Cream (African Superfoods Part 1)

Baobab & Melon Ice Cream

There’s a lot of hype about Central and South American superfoods, but here in Africa we have some amazing plants too! I think it’s important to both be proud of your country & heritage, as well as to support locally grown and manufactured products. Over the next few weeks I want to do a series of posts on various African superfoods. For those of you in other parts of the world, I hope it will be interesting and informative (most of them are becoming more well known and popular in health circles so you should be able to get hold of them.) For fellow South Africans, I hope this will encourage you to make use of our beautiful continent’s bounty 🙂

baobab tree copy

According to African legend, long, long ago the first baobab tree sprouted beside a lake. As it grew, it surveyed the other trees and admired their colourful flowers, their tall, straight trunks and their beautiful green foliage. One day the little tree was tall enough to see its own reflection in the lake. It was dismayed at the sight! Its trunk was short and fat, its leaves were sparse and dull and its bark looked like the wrinkled hide of an elephant. The tree implored the Creator to change its appearance, but its request was ignored. Day after day, it watched the beautiful trees, compared them to its own reflection, and cried to the heavens. One day the Creator had had enough, reached down and unearthed the tree. Turning it upside down, the Creator replanted the tree with its branches in the earth, and its roots in the sky. From that day on the baobab tree was silenced, and as penance has served animals and humans with good deeds ever since.
Source: http://www.ecoproducts.co.za

These beautiful trees are grown in 32 African countries, and are revered by many tribes, even worshipped by some. The fruit is a highly nutritious food source, the seeds provide oil (I used baobab oil during and after my pregnancy to prevent stretch marks) and the fibre in the bark is used to make fishnets, cord and clothing. The trunks are a good source of timber and are often hollowed out and used for shelter, grain storage or as water reservoirs.

Baobab powder has recently become a very popular superfood, and for good reason. The powdered fruit contains 3 times more calcium than milk, 4 times more vitamin C then oranges, 6 times more potassium then bananas, 5 times more anti-oxidants than blueberries, a whopping 16 times more fibre than pears, and 5 times more magnesium than avocados. Its sweet-tart flavour makes the perfect addition to this quick and easy vegan “nice cream.”

Ingredients

350g melon, weighed without skin or seeds
2 bananas
3 tbsp baobab powder (I use EcoProducts)
1 – 2 tbsp raw honey
1/2 cup almond milk

Method

This requires some forethought, in that you have to freeze the melon and banana overnight (or you could freeze when you have it and use whenever!) I used canary melon, but you could also use spanspek (aka cantaloupe) or honeydew (aka musk melon.)

Place all the ingredients in your blender and blend until smooth and creamy, using your tamper to mix as you blend. The amount of honey required depends on the sweetness of the melon. I had a melon that was not very sweet, which is why I decided to freeze it and turn it into ice cream. You may have a melon so sweet that you won’t need any honey at all, so sweeten to taste.

This will serve 2 people as breakfast or 4 people as dessert. If you have any left over you can freeze it again. It won’t be quite as smooth and creamy, more like a sorbet, but still delicious.

Health & happiness!

Love,
Raine

Beautiful Beetroot Juice

Beetroot Juice

It’s funny how nature helps us know what we need. When you juice beetroot it looks like blood and it just so happens that the primary benefit that beetroot has on our health, is for our blood. It helps normalise blood pressure and increases the flow of blood to the brain – great for concentration and creativity! Beetroot also has a detox effect on the liver so if you’re carrying a lot of toxins, having more than one raw beetroot at a time may make you feel a little queezy. If you’ve never had raw beets before, go slow. The more you have over time, the more your liver will be used to it and you’ll find it will help you to detox.

I got my Abel & Cole box of organic fruit and veg delivered today (as I do every Monday) and there was a huge bunch of beets in there so I decided to juice some, save some more for juicing over the week, and I lightly steamed some to have ready to use in salads for lunches.

I added some other veg to this, ones I think go particularly well…

Ingredients

2 raw beetroot
3 sticks celery
4 large carrots
1 handful spinach

Method

Juice in a juicer (in a blender you’ll need less)…

Love,
Lauren

Cauliflower & Tahini Soup

Cauliflower & Tahina Soup

I love cauliflower, especially as a purée, because of the beautiful smooth texture it blends into. This soup makes use of that, and the addition of tahini makes it even creamier!

Cauliflower contains sulforaphane, which has been shown to kill cancer stem cells, thereby slowing tumor growth. Researchers believe that eliminating cancer stem cells may be the answer to fighting cancer. It is also packed full of anti-oxidants and phytonutrients, is good for your heart and your brain, and has anti-inflammatory properties.

Sesame seeds (the main ingredient of tahini) are high in calcium, magnesium, phosphorus and iron. Need any more reasons to make this soup tonight? It’s simple to make and takes no time at all!

Ingredients (serves 4)

3 tbsp extra virgin olive oil
2 large onions, sliced
6 big cloves of garlic
1 tsp cumin seeds
1 whole star anise
a head of cauliflower (about 500g) cut into florets
one potato (about 200g) peeled and cut up
1 litre water
1 tbsp organic vegetable stock paste or powder
3 bay leaves
the juice of half a lemon
1/2 tsp himalayan salt
1/8 tsp white pepper
1/3 cup organic tahini
pomegranate concentrate (optional)

Method

Fry the onion in the olive oil until it caramelizes. The more colour you get on the onions, the more flavour you’ll be putting into the soup. You want them to look something like this:

IMG_0130

The trick is to keep it on a medium heat and stir every now and then. If you feel that they may start to burn, add a few drops of water and continue. You could brown them even more than I’ve done here, I was just in a rush to make supper!

Add the garlic, cumin and star anise. Fry for a few more minutes. Add the cauliflower, potato, water, stock and bay leaves. Simmer until the cauliflower and potato are tender. The smaller (and more evenly-sized) your pieces of cauliflower and potato, the faster they will cook.

Remove the bay leaves and star anise, then pour everything into your blender. Add the rest of the ingredients and blend until completely, 100% smooth. The measurements I’ve given for lemon, salt and pepper are just a guideline – use your taste!

I’ve served it with a drizzle of pomegranate concentrate – the sweet tartness balances the soup beautifully.

Health & happiness!

Love,
Raine

Raw Vegan Super Berry ‘Cheesecake’

Raw Cheesecake 1

Need we say more?? We both have a real sweet tooth so come 3/4 in the afternoon, we are wanting something with our herbal tea and this is a perfect afternoon treat… We had made a massive batch of cashew yoghurt and had loads leftover so we thought, what can we use it for? And we came up with this. It’s easy to make, but takes some time because you have to do each layer separately.

We love using acai berries for their anti-oxidant powers so we wanted to make a super-berry topping, next time we’ll do chocolate!

Ingredients

Base:
1 cup almonds
Quarter cup pecans
6 dates
1 tbsp coconut oil, melted
Pinch of Himalayan salt

Middle layer – Cashew cream:
1 cup cashews
1 and quarter cups purified water
2 dates
2 tsp organic natural maple
1 tsp vanilla essence

Top layer:
1 frozen banana
Quarter cup of freshly frozen blueberries (blueberries bought pre-frozen have too much water)
The cream from the top of a can of coconut milk
4 acai berry capsules (we used Organic Burst)
1 tsp organic natural maple syrup

Method

Before you start any of this, you must soak your nuts. Soak almonds and pecans for the base in one bowl, and the cashews for the middle in two separate bowls and leave to soak in purified water for AT LEAST 4 hours. Soak overnight if you can. Do not omit this step.

Once the nuts are ready, drain and rinse the almonds and pecans and put them in the blender with the dates, coconut oil and salt. Once combined, flatten this base layer into the base of a smallish springform cake tin and put it in the freezer while you make the middle layer.

For the middle layer, rinse your cashews then put them in the blender with the water and blend for around 7-10 minutes. You need it to go super smooth and creamy. If you have a high-speed blender like a Vitamix, the mixture will heat up like a soup, don’t worry. After around 4 minutes of blending, add the rest of the ingredients and proceed to blend until completely smooth like a yoghurt. Leave it by the window until it cools then pour it over the base layer and put back in freezer. Leave it in the freezer for an hour

Now make your top layer by simply blending all the ingredients. Once the middle layer is firm enough, pour top layer on top and put back in freezer for the last time for around 45 minutes or until firm.

When you take it out, you may need to wait 15 minutes until it is ready to push out of the cake tin and you could use a sharp, thin knife to cut around the edges to help you.

Leave it to melt a little bit and serve straight away or put in fridge and serve from fridge once it’s a little softer.

Raw Cheesecake 2

We hope you love it as much as we do!

Love,
Lauren & Raine

Raw ‘Bounty’ Bars

raw bounty bites

Well these certainly went down a treat in my house! Who doesn’t like Bounty?? It is one of my favourite chocolates and just like with most things, here at Two Kitchens, we like to create healthy variations for our favourite snacks.

These are completely free of gluten, refined-sugar, dairy and chemicals, and require surprisingly few ingredients!

Ingredients

Coconut filling:
Half cup desiccated coconut (unsweetened, organic)
A quarter cup coconut oil, melted over the hob
5 tbsp agave nectar
1 tsp vanilla essence

Chocolate layer:
4 tbsp cacao butter
1 tsp coconut oil
4 tbsp raw cacao powder
2 tbsp organic maple

Method

Mix the coconut filling ingredients well in a bowl. Get an empty ice cube tray and portion the mixture into the little cube holes and push them in so they gain the right shape. Once you’ve finished the mixture, put this in the freezer for twenty minutes.

Meantime, melt the cacao butter and coconut oil in a small saucepan over a medium heat. Once melted, add the cacao. Once combined, while stirring, remove from the heat and add the maple. It will bubble a bit so leave it off the heat while you mix it then when it calms down, put it back on the hob on a low heat for a minute, until fully combined.

Once the coconut bites are ready, remove from the freezer and from the ice tray and put them on a plate. Coat each one individually in the chocolate, then, leaving them to sit on a plate put back in the freezer for 10 minutes, remove, and repeat this step as the first chocolate layer will be absorbed by the coconut oil but the second layer will go on nicely. Leave for about half an hour, remove, and store in an airtight container in either the fridge or freezer for up to two weeks.

Happy bounty hunting!
Love,
Lauren

Simple Chia Pudding with Berry Compote

Chia pudding

I keep trying to spread a message about breakfast… it really isn’t very hard to make nutritious, delicious, simple breakfasts for the whole family in order to be able to bin the horrible processed cereals. It can be very daunting when embarking upon this lifestyle, we think it’s going to be really hard but making this chia pudding was no harder than making a bowl of cereal or porridge. If you just change one thing at a time, make breakfast your first change, the kids will love these ideas – just check out all our other breakfast options!

It isn’t baby led weaning-friendly but if you’re happy with spoon feeding your baby / toddler, this really makes such a nutritious breakfast.

“Chia” is the ancient Mayan word for “strength” and these little seeds were prized for their ability to provide long-lasting energy. They provide high nutrition for low calories (almost all of their carbohydrates are in the form of fibre) so this is a great food if you’re trying to lose weight. They are high in protein, fibre, Omega 3 fatty acids, calcium, magnesium, phosphorus and antioxidants.

You can sprinkle chia seeds over your breakfast or add them to smoothies, but this is just another great way to eat them. When you soak these little nutritional powerhouses in liquid, they swell and absorb the liquid. The result is a creamy and delicious pudding. Great for breakfast or dessert
 and who doesn’t love dessert for breakfast?!

Ingredients (one portion)

2-3 tbsp chia seeds
1 small cup almond milk
1 tsp organic natural maple syrup
1 tsp vanilla essence

For the compote (completely optional as you can top the pudding with whatever you like):
4 strawberries
4 raspberries
6 blueberries

Method

The night before you want to eat this, simply mix the chia seeds in a bowl or glass or jar with the almond milk, maple and vanilla (both the latter are optional also, but nice for a bit of sweetness and flavour), cover and leave in the fridge overnight. When you first mix it, it will look like it isn’t absorbing but in the morning you’ll see how the seeds have swelled to look almost like passion fruit seeds (don’t worry, they’re much softer than passion fruit seeds).

Add the fruit to the blender and blend until smooth. Top the pudding with this and add any nuts, seeds or fruit you fancy!

You can also try Raine’s Chai Chia Pudding (a mouthful yes but the pudding works so well with the chai spice flavours)

Health and Happiness,
Love,
Lauren